Small Footprint Scara Laser Engraver Has Massive Build Area

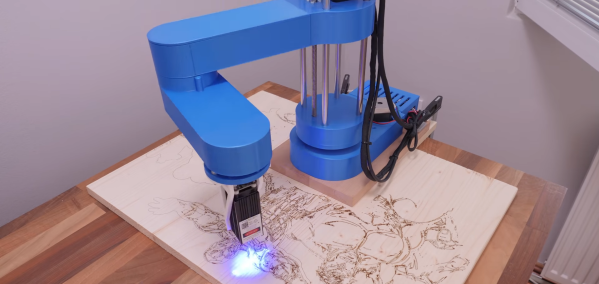
One of the limitations of the conventional Cartesian CNC platforms is that the working area will usually be smaller than its footprint. SCARA arms are one of the options to get around this, as demonstrated by [How To Mechatronics], with his SCARA laser engraver.

This robot arm is modified from the original build we featured a while back, which had a gripper mounted. It uses mainly standard 3D printer components with 3D printed frame parts. The arms lengths are sized to fold over the base and take up little table horizontal space when not in use. It can work in a large semi-circular area around itself, and if a proper locating and homing method is implemented, it can be moved around and engrave a large area section by section.

One of the challenges of SCARA arms is rigidity. As the cantilevered arm extends, it tends to lean over under its weight. In [How To Mechatronics]’s case, it showed up as skewed engravings, which he managed to mitigate to some degree in the Marlin firmware.

Another possible solution is to reduce the weight of the arms by moving the motors to the base, as was done with the Pybot or dual-arm SCARA printers like the RepRap Morgan.

Continue reading “Small Footprint Scara Laser Engraver Has Massive Build Area”

Hacking An Air Assist For The Ortur Laser

Getting great results from a laser cutter takes a bit of effort to make sure all of the settings are just right. But even then, if the air between the material and the laser source is full of smoke and debris it will interfere with the laser beam and throw off the results. The solution is to add air assist which continuously clears that area.

Earlier this year I bought an Ortur laser engraver/cutter and have been hacking on it to improve the stock capabilities. last month I talked about putting a board under the machine and making the laser move up and down easily. But I still didn’t have an air assist. Since then I found a great way to add it that will work for many laser cutter setups.

I didn’t design any of these modifications, but I did alter them to fit my particular circumstances. You can find my very simple modifications to other designs on Thingiverse. You’ll also find links to the original designs and you’ll need them for extra parts and instructions, too. It is great to be able to start with work from talented people and build on each other’s ideas.

Continue reading “Hacking An Air Assist For The Ortur Laser”

Hacking The Ortur Laser With Spoil Board, Z-Height, And Air Assist

Last month in my hands-on review of the Ortur Laser I hinted that I had done a few things to make it work a little better. I made three significant changes in particular: I anchored the machine to a spoil board with markings, I added a moving Z axis to adjust focus by moving the entire laser head, and I added an air assist.

Turns out, you can find designs for all of these things all over the Internet and I did, in fact, use other people’s designs. The problem is the designs often conflict with one another or don’t exactly work for your setup. So what I’ll tell you about is the combination that worked for me and what I had to do to get it all working together. The air assist is going to take a post all by itself, but some of the attempts at air assist led to some of the other changes I made, so we’ll talk about it some in this post, as well.

One of the modifications — the spoil board mount — I simply downloaded and the link for that is below. However, I modified the moving Z axis and air assist parts and you can find my very simple modifications on Thingiverse. You’ll also find links to the original designs and you’ll need them for extra parts and instructions, too.

Continue reading “Hacking The Ortur Laser With Spoil Board, Z-Height, And Air Assist”

Hands On With The Ortur Laser Cutter

I couldn’t write very much without a computer. Early in my career, I wrote with a typewriter. Unless you are pretty close to perfect — I’m not — it is very frustrating to make edits on typewritten stuff. The equivalent in the real world, for me, has been 3D printers and CNC machines. I can visualize a lot of things that I’m not careful enough to build with normal tools. Despite my 7th-grade shop teacher’s best efforts, everything I did turned out to be a toothpick or a number 7. But I can get my ideas into CAD and from there the machines do the rest. That’s why I was excited to get a laser cutter this past Christmas. You might wonder why I’d need a laser cutter if I have the other tools. Then again, if you read Hackaday, you probably don’t need me to explain why you need a new gadget. I’ve had my eye on a laser for a good long time, but recent developments made it more attractive. I thought I’d share with you some of what I’ve found getting started with the Ortur laser cutter. The cutter is easy to put together and costs somewhere in the $200-$400 range depending on what you get with it. I thought I’d take some time to share what I’ve learned about it.

Why a Laser?

If you haven’t had experience with a laser cutter or engraver before, you might think it is a very specific instrument. Sure, the Ortur is good at engraving some things (but not all things). It can cut some things, too, but not as many things as a big serious laser cutter. However, creative people find lots of ways to use cutting and engraving to produce things you might not expect.

Continue reading “Hands On With The Ortur Laser Cutter”

Laser Etching Stainless Steel With Mustard

[Brain] wanted to mark some scissors with his Ortur laser engraver. The problem? The laser won’t cut into the hard metal of the scissors. His solution? Smear the scissors with mustard. No kidding. We’ve heard of this before, and apparently, you can use vinegar, as well, but since the mustard is a paste it is easier to apply. You can see the result in the video, below.

In case you think you don’t need to watch because we’ve already told you the trick, you should know that [Brian] also goes into a lot of detail about preparing single line fonts to get a good result, among a few other tips like improvements to his air assist setup. On a laser cutter, the air assist blows away charred material leaving a clear field of view between the laser and the remaining uncut material. Using a proper air assist can really expand the capabilities of these inexpensive laser cutters — something we recently saw upgraded with a 3D-printed air assist nozzle.

You can buy a commercial marking solution called CerMark Black, but you probably already have mustard. If you are super cheap, you can probably pick up a packet next time you buy a burger somewhere. After all, you don’t need much. Although the video talks about the Ortur, this technique would work with any engraver. We’ve also heard you can do something similar with plaster and alcohol.

Continue reading “Laser Etching Stainless Steel With Mustard”

An Open Hardware Laser Engraver For Everyone

Right now, you can get a diode laser engraver on eBay for around $100 USD. That sounds like a deal, but it’ll probably use some arcane proprietary software, won’t be terribly accurate, and the laser itself will almost certainly be fully exposed. Of course there’s no shortage of DIY builds which improve upon this situation greatly, but unfortunately the documentation and instructions to replicate them yourself often leave a lot to be desired.

To get a safe and accurate laser platform into the hands of hackers everywhere, we need more well documented open source designs that are actually built with community in mind. Projects like the Engravinator from [Adam Haile]. This isn’t a one-off design with documentation thrown together after the fact, it’s a fully open hardware engraver with a concise assembly guide that’s built from 3D printed parts and readily available components. You’re free to source and print the parts yourself or, eventually, purchase everything as a kit.

Pen-equipped Engravinator

The microwave-sized Engravinator is built from standard 2020 aluminum extrusion, and offers a workable area of 130mm x 130mm. There’s a hatch on the front of the enclosure for objects that are small enough to fit inside the machine, but the open bottom and handles on the top also allow the user to place the Engravinator directly onto the work surface. [Adam] says this feature can be especially useful if you’re looking to burn a design into a tabletop or other large object.

Outside of the aluminum extrusion and miscellaneous hardware that make up the frame, most of the other parts are 3D printed. Released under the CERN Open Hardware License v1.2 and distributed as both STL and STEP files, the printable parts for the Engravinator are ripe for modification should you be so inclined. The same goes for the DXF files for the enclosure panels, which will need to be cut out of orange acrylic with a CNC or (ironically) a laser.

Continue reading “An Open Hardware Laser Engraver For Everyone”

A CNC Hacked Together In Pajamas

Sometimes you just gotta sit down and hack something together. Forget the CAD and the cool software toys; just hammer away until you have something working. That’s how [bobricus] ended up with this cute little laser engraver anyway.

For under $300 US of parts and a few nights working in his pajamas, the aptly named, pajama micro laser engraver is a pretty nice little machine for its class. Not having the space for a full size machine and not necessarily needing its capabilities he aimed to produce something compact.

The frame is aluminium extrusion, the movement is core-XY an H-bot on linear rails, and it appears to just be a grbl board with a Chinese laser module on it. He took a bit of care to make the frame a cube which allows him to easily vent the fumes from the little unit. There’s even a small air pump to blow the off-gas from the cutting away from the laser.

All in all a nice little hack useful for all sorts of things from solder masks to cutting wood veneers. You can see it zipping around in the video after the break.


Continue reading “A CNC Hacked Together In Pajamas”