Making A Custom Caliper Case For Pros

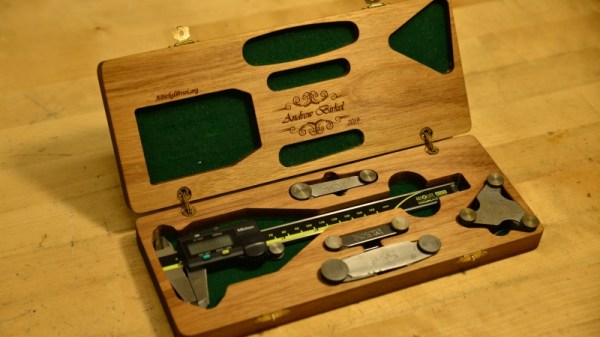
Every professional has a tool set that they would never part with. Likewise, for experimental physicists, mechanical engineers, and tinkerers, a caliper set can be unspeakably crucial to their work. That’s why [Andrew Birkel] designed his own personal caliper set to fit just the right proportions for his tools while adding a bit of personal flair.

The project uses CNC routing, Solidworks for CAD, laser engraving, and woodworking to design the custom case for a set of calipers, metric and English screw pitch gauges, fillet gauges, and radius gauges. It’s a practical build for a custom tool set that doesn’t already come with a case of its own. The particular tools were chosen for their use in particle physics experiments: for determining threads, inside and outside curvatures, and measuring length, depth, and width.

The box was made from an oversized piece of wood with holes drilled into the sides. After compiling the G-code program for the build, the two halves of the box was was milled from the wood. The first run on the CNC mill with aluminum managed to cause the grain to split, so [Birkel] went with a CNC router instead. Once the piece was sanded, hidden barrel hinges were added. The finished box was wiped down with mineral oil and teak oil to bring out the natural coloration of the wood as well as to add protection (lacquer mixed into the oil). To finish it off, the case was customized with a laser engraved name and email for identification.

It’s a pretty slick build to say the least, and certainly one that can be customized to the dimensions of whatever tools your personal caliper set happens to have.

Video Shows Power Isn’t Everything In Laser Engraving

When it comes to power tools, generally speaking more watts is better. But as laser maestro [Martin Raynsford] shows, watts aren’t everything. He shares a brief video showing his older 100 W laser being handily outperformed by a newer 30 W machine. Shouldn’t the higher power laser be able to do the same job in less time? One might think so, but wattage isn’t everything. The 30 W laser engraves and cuts a wooden tile in just under half the time it takes the 100 W machine to do the same job, and with a nicer end result, to boot.

Why such a difference? Part of the answer to that question lies in that the newer machine has better motion control and can handle higher speeds, but the rest is due to the tubes themselves. The older 100 W machine uses a DC-excited (big glass water-cooled tube) CO2 laser, and the newer 30 W machine uses an RF-excited laser that looks a bit like a big metal heat sink instead of oversized lab glassware. Both tubes output what is essentially the same beam, but the RF tube is overall capable of a more refined, more stable, and more finely focused point than that of the glass tube. Since engraving uses only a small fraction of even the 30 W laser’s power, the finer control that the RF laser has over the low end of the power scale results in a much higher quality engraving.

Embedded below is a short video showing both machines engraving and cutting the same tile, side by side. You may wish to consider watching this one full screen, to better see the fine details.

Continue reading “Video Shows Power Isn’t Everything In Laser Engraving”

Monoprice Mini Laser Engraver Hack

There’s an old saying, that in theory there’s no difference between theory and practice, but in practice there is. That sentiment could easily be applied to refitting a 3D printer to hold a laser. There shouldn’t be much to it, rig up a laser module to turn on under computer control, mount it to your hot end carriage and off you go. In practice, though there are other considerations to account for. If you have a Monoprice Mini Select, you can start with instructions from [drodrii] for adding a laser to your printer.

Although [drodrii] mentions that you need a second 3D printer to make a bracket for the laser, we think you should be able to print it on the Mini as long as you do it before the first step of removing the hot end. However, since your laser module might not exactly match the one used in this project, you’d have to get it right the first time if you don’t have another 3D printer. Of course, you could remove the laser gear, remount the hot end, print a new bracket and start over, but that’d be a drag.

Continue reading “Monoprice Mini Laser Engraver Hack”

Edge-lit Pendants Show Two Layers Are Better Than One

Engraved acrylic lights up nicely with LED lighting. Simply engrave clear acrylic with a laser engraver, then edge-light the acrylic and watch the engraving light up. This badge made by [Solarbotics] shows how they used this principle when creating some pendants for an event that performed particularly well in the dark.

The pendants they created have two engraved acrylic panels each, and that’s about it. Two LEDs and a CR2032 battery nestle into pre-cut holes, and the engraved sides are placed face-to-face, so the outer surfaces of the pendant are smooth. By using some color-cycling RGB LEDs on one panel and blue LEDs on the other panel, the effect is that of an edge-lit outer design with a central element that slowly changes color separately from the rest of the pendant.

The design stacks the LED leads and coin cells in such a way that a simple wrap of tape not only secures things physically, but also takes care of making a good electrical connection. No soldering or connectors of any kind required. [Solarbotics] found that CR2032 cells would last anywhere between a couple of days to a week, depending on the supplier.

This design is great for using a minimum of materials, but if that’s not a priority it’s possible to go much further with the concept. Multiple layers of edge-lit acrylic were used to make numeric 0-9 display modules as well as a full-color image.


Improved Game Tokens With Laser Cutting And Clever Design

[Martin Raynsford] is a prolific project maker, especially when it comes to using a laser cutter. These laser-cut token counters for the board game Tigris & Euphrates demonstrate some clever design, and show that some simple touches can make a big difference.

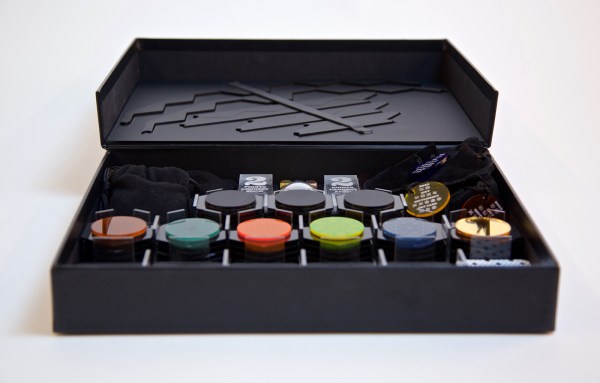
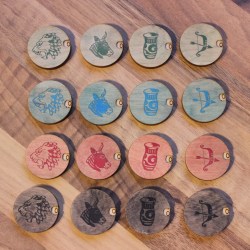
In the digital version of the game, the tokens conveniently display a number representing their total power value. [Martin] liked this feature, and set out to design a replacement token for the tabletop version that could display a number while still keeping the aesthetic of the originals. The tokens were designed as a dial with a small cutout window to show a number, but the surface of the token showing color and icon is still mostly unchanged.

Magnets hold the top and bottom together, and because of the small size of the assembly, no detents are needed. Friction is enough to keep things from moving unintentionally. The second noteworthy design feature is the material for the top layer of the token. This layer is made from 0.8 mm birch plywood; a nice and thin top layer means a wider viewing angle because the number is nearer to the surface. If the top layer were thicker, the number would be recessed and harder to see.

[Martin] made the design file available should anyone wish to try it out. No stranger to games, he even once game-ified the laser itself, turning it into a physical version of Space Invaders. Be sure to check it out!


Convert That Cheap Laser Engraver To 100% Open-Source Toolchain

laserweb-on-cheap-laser-squareLaserWeb is open-source laser cutter and engraver software, and [JordsWoodShop] made a video tutorial (embedded below) on how to convert a cheap laser engraver to use it. The laser engraver used in the video is one of those economical acrylic-and-extruded-rail setups with a solid state laser emitter available from a variety of Chinese sellers (protective eyewear and any sort of ventilation or shielding conspicuously not included) but LaserWeb can work with just about any hardware, larger CO2 lasers included.

LaserWeb is important because most laser engravers and cutters have proprietary software. The smaller engravers like the one pictured above use a variety of things, and people experienced with larger CO2 laser cutters may be familiar with a piece of software called LaserCut — a combination CAD program and laser control that is serviceable, but closed (my copy even requires a USB security dongle, eww.)

LaserWeb allows laser engravers and cutters to be more like what most of us expect from our tools: a fully open-source toolchain. For example, to start using LaserWeb on one of those affordable 40 W blue-box Chinese laser cutters the only real hardware change needed is to replace the motion controller with an open source controller like a SmoothieBoard. The rest is just setting up the software and enjoying the added features.

Continue reading “Convert That Cheap Laser Engraver To 100% Open-Source Toolchain”

Ultra-Polished, Handmade Settlers Of Catan Redux

[Fuzzy Wobble] and [Amy Wang]’s Deep Space Settlers project is a one-of-a-kind re-invention of the popular board game Settlers of Catan, and showcases the polished results that are possible with the fabrication tools and methods available in many workshops and hackerspaces today. We reached out to the makers for some of the fabrication details, which they were happy to share.

(For those of you who are familiar with the game, technically this is a remake and slight evolution of the Seafarers expansion to the base Settlers of Catan game. A few rule changes were made, but it is mostly a total remodel and redesign.)

Continue reading “Ultra-Polished, Handmade Settlers Of Catan Redux”