RPDot: The RP2040 Dev Board Barely Bigger Than The Chip

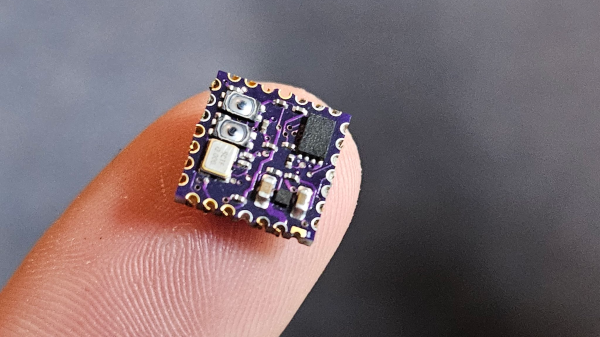
Is [William Herr]’s RPDot actually the world’s smallest RP2040 dev board? We can’t say for sure, but at 10 mm on a side, we’d say it has a pretty good shot at the record.

Not that it really matters, mind you — the technical feat of building a fully functional dev board that’s only 3 mm longer on each side than the main chip is the kind of stuff we love to see. [William] says he took inspiration from the [SolderParty] RP2040 Stamp, which at one inch (25.4 mm) on a side is gigantic compared to the RPDot. Getting the RP2040 and all the support components, which include an 8MB QSPI Flash chip, a 3V3 LDO, a handful of 0201 passives, and even a pair of pushbuttons, required quite a lot of design tweaking. He started his PCB design as a four-layer board; while six layers would have made things easier, the budget wouldn’t allow such extravagance for a prototype. Still, he somehow managed to stuff everything in the allotted space and send the designs off — only to get back defective boards.

After reordering from a different vendor, the real fun began. Most of the components went on the front side of the board and were reflowed using a hot plate. The RP2040 itself needed to go on the back side, which required gentle hot air reflow so as not to disrupt the other side of the board. The results look pretty good, although those castellated edges look a little worse for the wear. Still, for someone who only ever worked with 0402 components before, it’s pretty impressive.

[William] says he’s going to open-source the designs as well as make some available for sale. We’ll be looking out for those and other developments, but for now, it’s just pretty cool to see such SMD heroics.

A Coin Cell Powers This Tiny ESP32 Dev Board

Just for the challenge, just for fun, just for bragging rights, and just to do a little showing off – all perfectly valid reasons to take on a project. It seems like one or more of those are behind this tiny ESP32 board that’s barely larger than the coin cell that powers it.

From the video below, [Mike Rankin] has been working down the scale in terms of powering and sizing his ESP32 builds. He recently completed a project with an ESP32 Pico D4 and an OLED display that fits exactly on an AA battery holder, which he populated with a rechargeable 14550. Not satisfied with that form factor, he designed another board, this time barely larger than the LIR2450 rechargeable coin cell in its battery holder. In addition to the Pico D4, the board sports a USB charging and programming socket, a low drop-out (LDO) voltage regulator, an accelerometer, a tiny RGB LED, and a 96×16 OLED display. Rather than claim real estate for switches, [Mike] chose to add a pair of pads to the back of the board and use them as capacitive touch sensors. We found that bit very clever.

Sadly, the board doesn’t do much – yet – but that doesn’t mean we’re not impressed. And [Mike]’s no stranger to miniaturization projects, of course; last year’s Open Hardware Summit badge was his brainchild.

Continue reading “A Coin Cell Powers This Tiny ESP32 Dev Board”

Level Conversion With Plenty Of Options

[Andy Brown] wanted one level converter to rule them all, so he set out to build his own which included plenty of options.

The chip at the top and center is a pretty neat little device. It’s an NXP 74ALVC164245DL. In addition to having an incredibly long and seemingly meaningless part number, it contains a pair of bi-directional octal ports. It runs very fast (about 333 MHz) and supports voltages up to 5V on one side, and up to 3.3V on the other. As long as you stay below those maximums you can choose your own target voltages. To do so, he included a couple of adjustable voltage LDOs which are set using jumpers.

But wait, [Andy’s] not finished quite yet. If the jumpers don’t offer the target voltage you’re looking for he also included breakout pins so that you may inject the voltage using an external source. He even included the option to use the LDOs on their own, without the level converter. How do you keep all of these configurations straight? He build a little web form that lets you set your desired parameters and it tells you which jumper should be connected.