One can imagine a political or business conference without an interactive badge — but not a hacker conference. Does this make the case for hackers being a special breed of people, always having something creative to show for their work? Yes, I think it does.
Following the Hackaday Belgrade conference in April of this year, we met at the Supplyframe offices to discuss the badge for the Hackaday SuperConference that will happen in Pasadena on 5+6th of November. The Belgrade conference badge (which was fully documented if you’re curious) was surprisingly popular, and I was asked to design the new one as well.
I was prepared to come up with something completely new, but [Mike Szczys] suggested keeping with the same basic concept for the project: “No reason to change anything, we have a badge that works”. To which I responded: “Well, the next one will also work”. But then I realized that “works” does not stand for “being functional”. The key is that it was embraced by visitors who played with it, coded on it, and solved a crypto challenge with it.
The World Doesn’t Have Enough LEDs
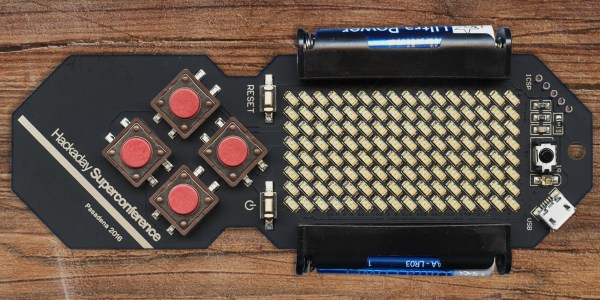
 Fast forward six months — here are the modifications made to the basic concept. First, the existing LED matrix, which was composed of two compact 8×8 blocks, was replaced by 128 discrete SMD LEDs. It was a much needed change to help scale down the dimensions and clunkiness, but also to avoid another painful experience of trying to purchase and have the matrix displays shipped, which seriously threatened the production of the previous badge.
It’s a long story which I discussed in my Belgrade talk — it turned out we did not manage to get enough common anode (CA) displays from all distributors in the whole world. We had a plan B, which also fizzled, leaving us with the plan C which actually included two “C”s: Common Cathode. We cleaned up all the supplies at five distributors, and managed to get 122 CA red, 340 CC red and 78 CA green displays (enough for only 270 badges) — the entire world supply. After that, you couldn’t get any 38 mm Kingbright’s display for months! The only problem was that there were two different versions of PCBs, one for CA and the other for CC displays, but luckily only one version of software, as it could autodetect the display type.
 Motion and Expansion
So, what else was new in the concept? In the Belgrade version, the badge supported an accelerometer module and included an unpopulated footprint in case you decided to install it, but now the badge has the MEMS chip LIS3 as an integral part. There are nine pads (with five I/O ports, driven directly from the MCU) to which you can add a 9-pin expansion connector. There will be a number of these connectors at the Design Lab, so that anyone can expand their badge for their convenience, on the spot.
The Visual Design
The biggest change was in the visual design. What we came up with ended up being a fair bit smaller, lighter, with a more convenient shape, and less than half the thickness of the previous one. After we had scrapped quite a few ideas during the development process (including stylized skull, frog, etc), we were left with a couple of options which you can see on the image below. The wireframe drawing on the left hand side is the Belgrade badge, shown here for a size comparison. At this point the locale and date of the conference weren’t yet definitive, which is why you see San Francisco written on the images.
![]()
Design number 4 prevailed, so the PCB layout could begin. I don’t like autorouted PCBs, so I was in for quite a rough time trying to solve the routing manually having only 2 layers on the board at my disposal.
Routing a Compact LED Matrix
The LED matrix is so dense that there was virtually no room on the LED layer, so most of the tracks on the component layer had to be routed as if it was a single layer PCB. To make matters worse, the LED layer is routed as a matrix, with a bunch of horizontal and vertical tracks, otherwise a good reason to use a 4-layer PCB. To stay inside the budget, everything had to be placed on 2 layers, and that’s why the final result seems so confusing at the populated area between batteries:
Continue reading “Design And Hacking Drilldown: SuperCon Badge”


