Super-Portable, Tunable VHF Antenna

Ham radio is having a bit of a resurgence these days, likely due to awards programs like Parks on the Air (POTA) and Summits on the Air (SOTA), which encourage amateur radio operators to head outside and “activate” at various parks and mountaintops. For semi-mobile operations like this, a low-power radio is often used, as well as other portable gear including antennas. In the VHF/UHF world, the J-pole is a commonly used antenna as well, and this roll-up tunable J-pole antenna is among the most versatile we’ve seen.

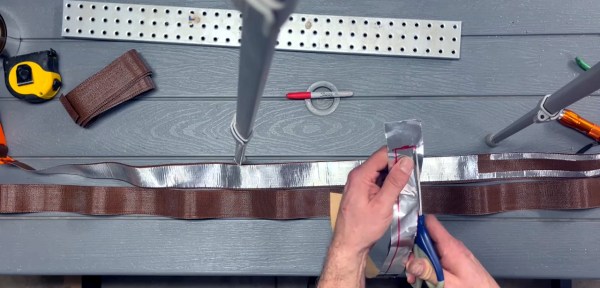
The antenna uses mostly common household parts which keeps the cost down tremendously. The structure of the antenna is replacement webbing for old lawn chairs, and the conductive elements for the antenna are made out of metallic HVAC tape which is fixed onto the chair webbing after being cut to shape. The only specialized parts needed for this is a 3D printed bracket which not only holds the hookup for the coax cable feeding the antenna, but is also capable of sliding up and down the lower section of the “J” to allow the antenna to be easily tuned.

As long as you have access to a 3D printer, this antenna is exceptionally portable and pretty easy to make as well. Although VHF and UHF aren’t too popular for POTA and SOTA, portable equipment like this for the higher frequency bands is still handy to have around when traveling or operating remotely. With the antenna situation sorted out, a DIY radio that can make use of it might be in order as well.

Continue reading “Super-Portable, Tunable VHF Antenna”

STM32 Offers Performance Gains For DIY Oscilloscope

There’s no shortage of cheap digital oscilloscopes available today from the usual online retailers, but that doesn’t mean the appeal of building your own has gone away — especially when we have access to powerful microcontrollers that make it easier than ever to spin up custom gear. [mircemk] is using one of those microcontrollers to build an improved, pocket-sized oscilloscope.

The microcontroller he’s chosen is the STM32F103C8T6, part of the 32-bit STM family which has tremendous performance compared to common 8-bit microcontrollers for only a marginally increased cost. Paired with a small 3-inch TFT color display, it has enough functions to cover plenty of use cases, capable of measuring both AC and DC signals, freezing a signal for analysis, and operating at an impressive 500 kHz at a cost of only around $15. The display also outputs a fairly comprehensive analysis of the incoming signal as well, with the small scope capable of measuring up to 6.6 V on its input.

This isn’t [mircemk]’s first oscilloscope, either. His previous versions have used Arduinos, generally only running around 50 kHz. With the STM32 microcontroller the sampling frequency is an order of magnitude higher at 500 kHz. While that’s not going to beat the latest four-channel scope from Tektronix or Rigol, it’s not bad for the form factor and cost and would be an effective scope in plenty of applications. If all you have on hand is an 8-bit microcontroller, though, we have seen some interesting scopes built with them in the past.

The $50 Pen Plotter

[Arca] sets out to build himself a low-cost pen plotter that doesn’t require access to a 3D printer. The plotter uses a coreXY arrangement, powered by 28BYJ-48 stepper motors, which he overdrives with +12 VDC to increase the torque. Pen up and down control is done using a stepper motor salvaged from a DVD reader. The frame is constructed using PVC electrical conduit and associated fittings, and [Arca] uses the hot glue gun quite liberally. Steppers were driven by A4988 modules with heatsinks, and motion control is provided by GRBL running on an Arduino UNO.

He has a few issues with glitches on the limit switches, and is continuing to tweak the design. There is no documentation yet, but you can discern the construction easily from the video if you want to try your hand at making one of these. This is a really cool DIY plotter, and many parts you probably have laying around your parts boxes. As [Arca] says, it’s not an AxiDraw, but the results are respectable. Keep a lookout for part 2 of this project on his YouTube channel.

Continue reading “The $50 Pen Plotter”

Low-Cost, Two-Channel Scriptable Waveform Generator

Microcontroller addict [Debraj] decided to make his own programmable sine wave generator, and was able to put it together for under $40 USD. Other than low-cost, his list of requirements was as follows:

  • Dual sine wave output, synchronized
  • Frequency, Amplitude, and Phase control
  • Low harmonics under 1 MHz
  • Scriptable via Python

The heart of the project is the Analog Devices AD9833, a complete Direct Digital Synthesis (DDS) waveform generator system on a chip. If you’ve ever rolled your own DDS using discrete ICs or in an FPGA, you can appreciate the benefit of squeezing the phase accumulator, sine lookup table, DAC, and control logic all into a single ten-pin package. [Debraj] uses AD9833 modules from the usual online vendors for a few dollars each. He synchronizes the generators by disconnecting the reference crystal on the second module and driving it from the first one. The remaining specifications are met by the inherent characteristics of the DDS system, and the scriptable interface is accomplished with an Arduino controlling the AD9833 chips and two programmable gain amplifiers (MCP6S31). We like the confidence that [Debraj] displays by sketching the initial circuit diagram with a ball-point pen — check out the sketch and the final pictorial schematic in the video below the break.

This is a good example of combining off-the-shelf modules to quickly build a project. This approach is great for one-off builds or as a proof-of-concept test bed that can later be spun onto a custom PCB. Another reason to use modules these days is that the modules are often in-stock but the chips are unobtainable. Though it appears [Debraj]’s only needs one of these generators, it would be an easy board to layout and build — if you can buy the parts.

Continue reading “Low-Cost, Two-Channel Scriptable Waveform Generator”

Small low-cost CNC mill with rotary tool

Minimal Mill: The Minamil

Having a few machine tools at one’s disposal is a luxury that not many of us are afforded, and often an expensive one at that. It is something that a large percentage of us may dream about, though, and with some commonly available tools and inexpensive electronics a few people have put together some very inexpensive CNC machines. The latest is the Minamil, which uses a rotary tool and straps it to an economical frame in order to get a functional CNC mill setup working.

This project boasts impressively low costs at around $15 per axis. Each axis uses readily available parts such as bearings and threaded rods that are readily installed in the mill, and for a cutting head the build is based on a Dremel-like rotary tool that has a similarly low price tag. Let’s not ignore the essentially free counterweight that is used.

For control, an Arduino with a CNC shield powers the three-axis device which is likely the bulk of the cost of this project. [Paul McClay] also points out that a lot of the material he needed for this build can be salvaged from things like old printers, so the $45 price tag is a ceiling, not a floor.

The Minamil has been demonstrated milling a wide variety of materials with excellent precision. Both acrylic and aluminum are able to be worked with this machine, but [Paul] also demonstrates it in its capacity to mill PCBs. It does have some limitations but for the price it seems that this mill can’t be beat, even compared to his previous CNC build which repurposed old CD drives.

A Standing Desk On The Cheap

A programmer forced to work from home during the pandemic, [MrAkpla] was having back pains from sitting in front of the computer all day. He considered buying a standing desk, but all the various options didn’t fit with either his desk or his budget. Not to be deterred, he devised one of the simplest standing desk implementations that we’ve seen. It clearly works for him, because he’s been using it for one year now with great success. [MrAkpla] espouses three main benefits of his approach:

  • Cheap as heck
  • Five minute set up time
  • Uses your existing desk

These goals were accomplished. You can see in the video below that transition from sitting to standing is indeed as quick as he claims, is clearly inexpensive, and indeed it doesn’t require any modifications to his desk or furniture.

This design centers on a having an 80 cm long monitor arm, which is quite a range of adjustment. He’s using a monitor arm pole mount from UK manufacturer Duronic. Although they are having delivery problems these days because of Brexit issues, [MrAkpla] was able to get one delivered from existing inventory outside of the UK.

Admittedly, this is a crude design — in effect two trash bins and a board. But even if this doesn’t fit well with your office decor, its a great way to try out the concept of a standing desk without the up-front investment. By the way, [MrAkpla] is on the lookout for similar monitor mounting poles from non-UK manufacturers. If you have any recommendations, put them in the comments below. If you’re interested in a DIY standing desk that is on the opposite side of the complexity spectrum, check out this beauty that we covered back in the pre-pandemic era.

Continue reading “A Standing Desk On The Cheap”

CubeSat For Under $1000?

Want to build your own CubeSat but have been put off by the price? There may be a solution in the works — [RG Sat] has challenged himself to design and build one for less than $1,000. (Video, embedded below.)

He begins by doing a survey of available low-cost options in the first video, and finds there isn’t a complete package for less than $10,000. By the time you added all necessary “options”, the final tally would probably be well over $20,000.

His idea isn’t just a pipe dream, either. In the the fifteen months since he began the project, [RG Sat] has designed and built the avionics and electrical power system circuit boards, and is currently testing his sun tracker design. Software is written in Rust, just because he wants to learn something new. You can check out the hardware and software design files on the project’s GitHub repositories, if you are inclined to build one yourself.

[RG Sat] lays out a compelling case, but we wonder if there’s a major gotcha lurking in the dark somewhere. In fact, [RG Sat] himself asks the question, “where do these high costs come from?” Our first instinct is to point the finger at qualifying parts for space and/or testing. But if you don’t care about satellite longevity or failure rates, then maybe [RG Sat] is onto something here.

Stepping back and looking at the big picture, however, the price of a CubeSat can be a drop in the bucket when compared to the launch costs, unless you’ve got a free ride. Is hardware the best place to focus cost reduction efforts?  Regardless, [RG Sat]’s project is bound to provide interesting and useful results whether he succeeds in his goal or confirms that indeed you need $10,000 to build a CubeSat. We’ll be following his progress with interest.

We’ve written about open source CubeSats before, and also a port-mortem analysis of a failed mission that contains some good lessons. Thanks to [Jeremy Grosser] for the tip.