Burnt Resistor Sleuthing

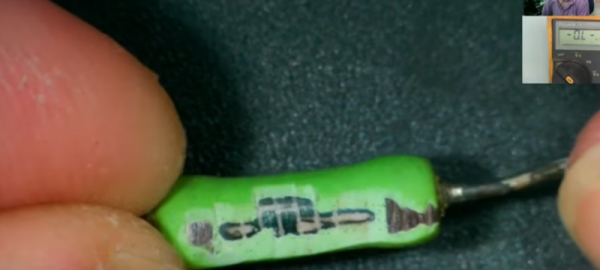
You smell smoke and the piece of gear you are working on stops working, probably at an inopportune time. You open it up and immediately see the burned remains of a resistor. You don’t have the schematic, the Internet has nothing to say, and the markings on the resistor are burned away. What do you do? [Learn Electronics Repair] has some advice.

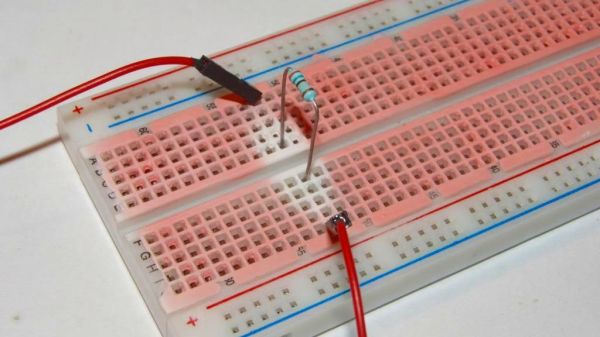
The resistor is probably open, but even if it isn’t, you can’t count on any measurement you make. The burning could easily change the value. The technique comes from comments on one of his earlier videos where he had such a burned resistor but was able to find the correct value. He decided to test the suggestion: cut away the burned resistor and measure the pieces that are left. It probably won’t give you the exact value, but it will get you in the ballpark.

So a rotary tool did the surgery, and you can see it all in the video below. We aren’t sure this method would work on every type of resistor you might encounter, and surface mount will also present special problems. However, if you are stabbing in the dark anyway, it won’t hurt to try.

Everyone knows the smoke that comes out is magic. Sometimes, you cut into components by necessity. Other times, it is for art’s sake.

Continue reading “Burnt Resistor Sleuthing”

Thermochromic Treatment Keeps Solderless Breadboards Smokeless

There’s a point in a component’s thermal regime that’s between normal operation and overloaded to the point of obvious failure. That’s a dangerous region, because the component isn’t quite hot enough to release the Magic Smoke, but hot enough to singe any finger you poke around with the see if everything’s running right. So if you’re looking to keep your fingerprints unmodified, but you don’t want to invest in a thermal camera, you might want to let this thermochromic breadboard point the way to overloaded components.

We’re not sure where this tip came from, but judging by the look of the website it was sometime in the late 90s. We’re also not sure who’s behind this little hack, so we’ll just credit [improwis]. The idea is pretty simple — white acrylic paint is mixed with thermochromic pigment, and the mixture is carefully painted onto the plastic surface of a standard-issue solderless breadboard. Care is taken to apply thin coats, lest the paint gets into the contacts and really muck things up. Once the paint is dry you’re ready to build your circuit. We have to admit we’re surprised at how sensitive the paint is; judging by the pictures, the heat coming off a 1/4-watt resistor dissipating 350 mW is plenty, even when the body of the resistor is well above the surface of the breadboard. We’d imagine the paint would point out not only hot components but probably the breadboard contacts too, if things got really toasty.

This seems like such a great application of thermochromism, one that’s a bit more useful than clocks and Pi Day celebrations. If you’re going to try this yourself, you’ll have to track down your own supply of thermochromic pigment, though — the link in the article is long dead. That’s not a problem, though, as Amazon sells scads of the stuff, seemingly aimed mainly at nail salons. The more you know.

Flipper Zero “Smoking” A Smart Meter Is A Bad Look For Hardware Hackers

Alright, we’re calling it — we need a pejorative equivalent to “script kiddie” to describe someone using a Flipper Zero for annoyingly malign purposes. If you need an example, check out the apparent smart meter snuff video below.

The video was posted by [Peter Fairlie], who we assume is the operator of the Flipper Zero pictured. The hapless target smart meter is repeatedly switched on and off with the Flipper — some smart meters have contactors built in so that service can be disconnected remotely for non-payment or in emergencies — which rapidly starts and stops a nearby AC compressor. Eventually, the meter releases a puff of Magic Smoke, filling its transparent enclosure and obscuring the display. The Flipper’s operator mutters a few expletives at the results, but continues turning the meter on and off even more rapidly before eventually running away from the scene of the crime.

We qualify this as “apparent” because the minute we saw this over on RTL-SDR.com, we reached out to reverse engineer par excellence and smart meter aficionado [Hash] for an opinion. Spoiler alert: [Hash] thinks it’s an elaborate hoax; the debunking starts at the 4:32 mark in the second video below. The most damning evidence is that the model of smart meter shown in the video doesn’t even have a disconnect, so whatever [Peter] is controlling with the Flipper, it ain’t the meter. Also, [Hash] figured out where [Peter] lives — he doxxed himself in a previous video — and not only does the meter shown in the video not belong to the Canadian power company serving the house, StreetView shows that there’s a second meter, suggesting that this meter may have been set up specifically for the lulz.

It should go without saying that Hackaday is about as supportive of hardware experimentation as an organization can be. But there have to be some boundaries, and even if this particular video turns out to be a hoax, it clearly steps over the line. Stuff like this paints a poor picture of what hardware hacking is all about, and leads to unintended consequences that make it harder for all of us to get the tools we need.

Continue reading “Flipper Zero “Smoking” A Smart Meter Is A Bad Look For Hardware Hackers”

Old Robotic Vacuum Gets A New RC Lease On Life

To our way of thinking, the whole purpose behind robotic vacuum cleaners is their autonomy. They’re not particularly good at vacuuming, but they are persistent about it, and eventually get the job done with as little human intervention as possible. So why in the world would you want to convert a robotic vacuum to radio control?

For [Lucas], the answer was simple: it was a $20 yard sale find, so why not? Plus, he’s got some secret evil plan to repurpose the suckbot for autonomous room mapping, which sounds like a cool project that would benefit from a thorough knowledge of this little fellow’s anatomy and physiology. The bot in question is a Hoover Quest. Like [Lucas] we didn’t know that Hoover made robotic vacuums (Narrator: they probably don’t) but despite generally negative online reviews by users, he found it to be a sturdily built and very modular and repairable unit.

After an initial valiant attempt at reverse engineering the bot’s main board — a project we encourage [Lucas] to return to eventually — he settled for just characterizing the bot’s motors and sensors and building his own controller. The Raspberry Pi Zero he chose may seem like overkill, but he already had it set up to talk to a PS4 game controller, so it made sense — right up until he released the Magic Smoke within it. A backup Pi took the sting out of that, and as the brief video below shows, he was finally able to get the bot under his command.

[Lucas] has more plans for his new little buddy, including integrating the original sensors and adding new ones. Given its intended mission, we’d say a lidar sensor would be a good addition, but that’s just a guess. Whatever he’s got in store for this, we’re keen to hear what happens.

Continue reading “Old Robotic Vacuum Gets A New RC Lease On Life”

PCB Bring-Up Hack Chat

Join us on Wednesday, April 15 at noon Pacific for the PCB Bring-Up Hack Chat with Mihir Shah and Liam Cadigan!

The printed circuit design process is pretty unique among manufacturing processes. Chances are pretty good that except for possibly a breadboard prototype, the circuit that sits before you after coming back from assembly has only ever existed in EDA software or perhaps a circuit simulator. Sure, it’s supposed to work, but will it?

You can — and should — do some power-off testing of new boards, but at some point you’re going to have to flip the switch and see what happens. The PCB bring-up process needs to be approached carefully, lest debugging any problems that crop up become more difficult than need be. Mihir and Liam from inspectAR will discuss the bring-up process in depth, offering tips and tricks to make things go as smoothly as possible, as well as demonstrating how the inspectAR platform can fit into that process, especially with teams that are distributed across remote sites. If your board releases the Magic Smoke, you’ll want to know if it’s your design or an assembly issue, and an organized bring-up plan can be a big help.

Note: Liam will be doing a simulcast web demo of inspectAR via Zoom. ​

join-hack-chatOur Hack Chats are live community events in the Hackaday.io Hack Chat group messaging. This week we’ll be sitting down on Wednesday, April 15 at 12:00 PM Pacific time. If time zones have got you down, we have a handy time zone converter.

Click that speech bubble to the right, and you’ll be taken directly to the Hack Chat group on Hackaday.io. You don’t have to wait until Wednesday; join whenever you want and you can see what the community is talking about.

Continue reading “PCB Bring-Up Hack Chat”

Epoxy Fix For A Combusted PCB

When the Magic Smoke is released, chances are pretty good that you’ve got some component-level diagnosis to do. It’s usually not that hard to find the faulty part, charred and crusty as it likely appears. In that case, some snips, a new non-crusty part, and a little solder are usually enough to get you back in business.

But what if the smoke came not from a component but from the PCB itself? [Happymacer] chanced upon this sorry situation in a power supply for an electric gate opener. Basking in the Australian sunshine for a few years, the opener started acting fussy at first, then not acting at all. Inspection of its innards revealed that some unlucky ants had shorted across line and neutral on the power supply board, which burned not only the traces but the FR4 of the board as well. Rather than replace the entire board, [Happymacer] carefully removed the carbonized (and therefore conductive) fiberglass and resin, leaving a gaping hole in the board. He fastened a patch for the hole from some epoxy glue; Araldite is the brand he used, but any two-part epoxy, like JB Weld, should work. One side of the hole was covered with tape and the epoxy was smeared into the hole, and after a week of curing and a little cleanup, it was ready for duty. The components were placed into freshly drilled holes, missing traces were replaced with wire, and it seems to be working fine.

This seems like a great tip to keep in mind for when catastrophe strikes your boards. There are more extreme ways to do it, of course, but perhaps none so flexible. After all, epoxy is versatile stuff.

Arduino Trivia Box Is A Gift Unto Itself

There’s something about impressing strangers on the Internet that brings out the best in us. Honestly, we wouldn’t be able to run this site otherwise. A perfect example of this phenomenon is the annual Reddit Secret Santa, where users are challenged to come up with thoughtful gifts for somebody they’ve never even met before.

For his entry into this yearly demonstration of creativity, [Harrison Pace] wanted to do something that showcased his improving electronic skills while also providing something entertaining to the recipient. So he came up with a box of goodies which is unlocked by the successful completion of a built-in trivia game tailored around their interests. If this is how he treats strangers, we can’t wait to see what he does for his friends.

Hardware packed into the lid so the box itself remains empty.

There’s quite a bit of hardware hidden under the hood of this bedazzled gift box. The primary functions of the box are handled by an Arduino Nano; which runs the trivia game and provides user interaction via a 16×2 LCD, three push buttons, and a buzzer. Once the trivia game is complete, a servo is used to unlock the box and allow the recipient access to the physical gifts.

But that’s not the only trick this box has hidden inside. Once the main trivia game is complete, a ESP8266 kicks into action and advertises an access point the user can connect to. This starts the second level of challenges and gifts, which includes a code breaking challenge and gifted software licenses.

The project wasn’t all smooth sailing though. [Harrison] admits that his skills are still developing, and there were a few lessons learned during this project he is unlikely to forget in the future. Some Magic Smoke managed to escape when he connected his 5V Arduino directly to the 3.3V ESP8266, but at least it was a fairly cheap mistake and he had spares on hand to get the project completed anyway.

This project is reminiscent of reverse geocache boxes which only open when moved to a certain location, but the trivia aspect makes it perfect even for those of us who don’t want to put pants on just to receive our Internet gifts.

Continue reading “Arduino Trivia Box Is A Gift Unto Itself”