Thorough Macbook Charger Teardown Reveals Some Complex Circuitry

Apple has a reputation in the tech world as being overpriced, and nowhere is that perception more common than in the Hackaday comments. The standard argument, of course, is that for a device with equivalent specs, Apple charges a lot more than its competitors. That argument is not without its flaws, especially when you consider factors other than simple specs like RAM and processor speed, and take into account materials used and build quality. But, as this teardown by [Ken Shirriff] shows, Apple’s attention to detail extends beyond simply machining Macbook bodies out of aluminum.

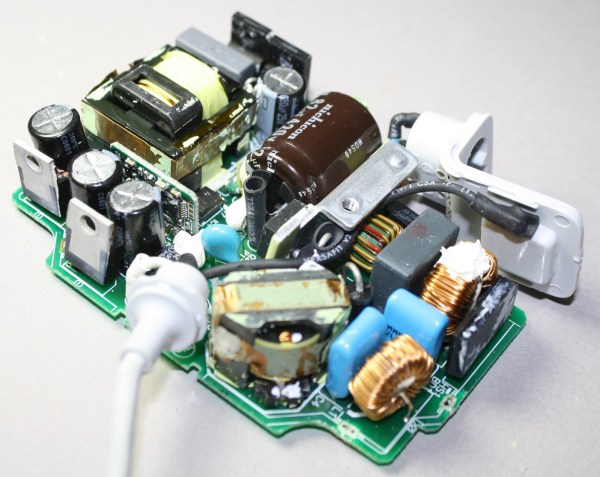
In his teardown, [Ken Shirriff] thoroughly investigates and describes all of the components and circuitry that go into the ubiquitous Macbook charger. Why does it cost $79? Other than the MagSafe connector, what makes it any better than the charger that came with your Toshiba Satellite in the ’90s? Isn’t it just a transformer to convert AC power to DC?

components1

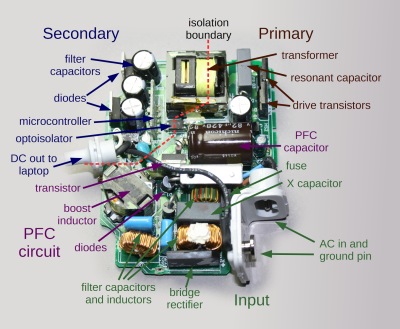
[Ken Shirriff] answers all of this and more, and you may be surprised by what he found. As it turns out, the Macbook charger isn’t just a transformer in a plastic case with a fancy magnetic connector. There is a lot of high-quality circuitry involved to make the power output as clean and stable as possible, and to avoid potential damage to your Macbook that could be caused by dirty power or voltage spikes. Does it justify the costs, even with so many reported failures? That’s for you to decide, but there is no questioning that Apple put more thought into their chargers than simply converting AC to DC.

Hackaday Links Column Banner

Hackaday Links: June 7, 2015

I’ve said over and over again that Apple’s MagSafe port is the greatest advancement in laptop tech in the last 15 years. Those charger connectors break, though, so how do you fix it? With Lego, of course (Google translatrix). Use a light-colored 1×4 brick so the LED will shine through.

Want to learn Git commands? Here’s a great game that does just that. It’s a really well-designed game/tutorial that walks you through basic Git commands.

Lets say you’re just slightly paranoid about the Bad Guys™ getting into your computer with 0-days and roller blades. You’d like to connect this computer to the Internet, but you don’t want to leave it connected all the time. The solution? A timer for an Ethernet switch. It’s actually a better solution than doing the same thing with scripts: there’s a real, physical interface, and if the Bad Guys™ get in when you are connected, they could just enable the network adapter anyway. An extremely niche use case, but that’s 99% of the security hacks we see.

The DaVinci 3D printer is an okay printer if you’re cool with the Gilette model. The filament cartridges are chipped, and the software is proprietary. These problems have been solved, and now you can use a standard RepRap heated bed and glass with the DaVinci. At this point, people are buying the DaVinci just to tear it apart.

Reading Analog Values With A MagSafe Port

The MagSafe adapter in MacBooks and MacBook Pros is probably the greatest single advancement in laptop technology in the last 10 years. Interestingly, the MagSafe port is also a an analog volt meter that can be read by the OS, and it’s not just limited to monitoring battery voltage; with the right software, you can turn a MagSafe port into a terrible and expensive analog sensor, letting scripts on the computer run based on analog values.

[Peter] created a voltmeter application for his mac after realizing the System Management Controller – the chip responsible for charging the battery – was accessible through low-level kernel calls. If you care enough to chop an Apple power adapter in half, the MagSafe port can read other analog inputs.

The SMC Voltmeter app [Peter] wrote samples the voltage every second and displays values on a graph. This app also allows you to run scripts. While you won’t be able to do much with an extremely expensive, very slow, one-channel data logger (the battery is going to run down eventually), we’re sure we’ll see something that’s held together with duct tape and prayer that uses this weird tool.

Hacking A MagSafe Connector For Your IPhone

maglock

The MagSafe power connector for Apple MacBooks is probably one of the handiest features they developed — we’re not too sure why it hasn’t been integrated onto iPhones yet. [Tony Hoang] isn’t sure either, but that didn’t stop him making his very own!

Due to the size of the MagSafe adapter, it’s simply not possible to integrate it directly into an iPhone, so [Tony] took his trusty Otter-box case and modified it instead. He’s using a Qi wireless charging receiver on the inside of the case, because it has a very slim ribbon cable to the USB. Modifying that he was able to solder on the MagSafe adapter directly to the ribbon cable. In order for it to fit nicely through the case, he 3D printed an adapter bracket for it to stay nice and secure.

From there it was just a matter of soldering the MagSafe power cable onto a 5V USB power brick, and boom-bada-bing, he’s got a MagSafe compatible iPhone. Previously he’s done this mod to a Samsung Note II, and plenty of other people have added it to laptops and ultrabooks!

Magsafe On An Android, Cats And Dogs Living Together

Mag

We’re thinking most Hackaday readers have at one time or another been tasked with replacing the power connector in a laptop. Anyone who has done so can easily see the genius behind the Apple Magsafe connector. Since the second gen iPhone, there have been rumors Apple will release a cellphone with the Magsafe connector, a great idea, seeing as how cell phones are thrown around even more than laptops. [Tony] got tired of waiting, and had an Android device anyway, so he decided to retrofit a Magsafe power adapter to his Note II.

In the interest of excess, [Tony] is using the absurdly large ZeroLemon 9300mAh battery and case for his device, giving him a lot of room for this hardware mod. A tiny 3D printed adapter fits around a slightly modified Magsafe connector, and with a little bit of super glue and solder, the connector is wired up to the charging port.

Of course the charger isn’t a stock Apple power supply; it’s just another Magsafe plug wired into a 5V wall wart. We’re not going to take a guess at what would happen if [Tony] plugged a stock Apple charger into his modded phone, but the mod works perfectly without the danger of ripping a USB port out of his phone.

Hacking A Mac Magsafe Jack Into A PC Ultrabook

zenbookAir

Something’s fishy about the above-pictured ultrabook: it’s an Asus Zenbook that [WarriorRocker] hacked to use a MagSafe power connector typically found on Macbooks. Most of us probably consider it standard procedure to poke around inside our desktop’s tower, but it takes some guts to radically alter such a shiny new ultrabook. It seems, however, that the Zenbook’s tiny power plug causes serious frustrations, and [WarriorRocker] was tired of dealing with them.

Using information he found from an article we featured earlier this summer on a MagSafe teardown, [WarriorRocker] hit up the parts drawer for some connectors and got to work. He had to modify the MagSafe’s housing to fit his Zenbook while still holding on to the magnets, but he managed to avoid modifying the ultrabook’s case—the connector is approximately the same size as a USB port. Deciding he could live with just one USB connection, [WarriorRocker] took to the board with a pair of side cutters and neatly carved out space for the MagSafe next to the audio jack. He then soldered it in place and ran wires from the VCC and Ground pins along a the channel where the WiFi antenna is routed, connecting them to the original power jack’s input pins.

[WarriorRocker] regrets that he fell short of his original goal of getting the MagSafe’s protocol working: he instead had to hack on his own adapter. We’re still rather impressed with how well his hack turned out, and it did manage to solve the charging problems. Hit us up in the comments if you can provide some insight into the MagSafe’s otherwise obscure innerworkings.

Apple MagSafe Protocol Hacking

[Ken Shirriff] was interested in how the Apple MagSafe works. Specifically he wanted to know what controlled the LED on the connector itself so he tore one open to see what is inside. There’s a chip present and he didn’t waste time figuring out how the MagSafe communication protocol works.

The DS2413 chip he found on the MagSafe’s tiny little PCB has just six pins. Two of these control a pair of LEDs, which give the indicator its color range.  Another pin is used for 1-wire communications. When polled the charger will return a 64-bit identification number that includes a variety of information. [Ken] looks into what data is offered from several different models of charger by using the Arduino setup above. But the results are not entirely straight-forward as he discusses in his article. The 1-wire protocol is also used to switch the LEDs. This process is the responsibility of the computer being charged, but [Ken] shows how the colors can be cycled using an Arduino (with a couple of 9-volts as a source instead of a connection to mains).