That TRS Jack On Your Graphing Calculator Does More Than You Think

It’s not Apple IIs, and it’s not Raspberry Pis. The most important computing platform for teaching kids programming is the Texas Instruments graphing calculator. These things have been around in one form or another for almost three decades, and for a lot of budding hackers out there, this was the first computer they owned and had complete access to.

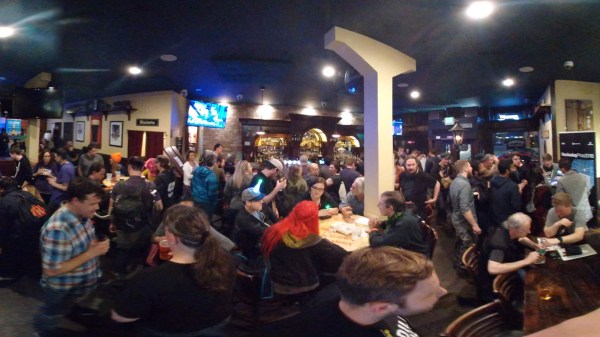
As hacking graphing calculators is a favorite for Maker Faires, we were pleased to see Cemetech make it out to this year’s World Maker Faire in New York last weekend. They’re the main driving force behind turning these pocket computers with truly terrible displays into usable computing platforms.

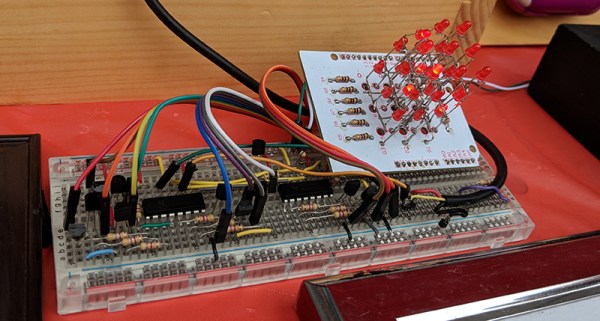
As you would expect from any booth, Cemetech brought out the goods demonstrating exactly what a graphing calculator can do. The most impressive, at least from a soldering standpoint, is their LED cube controlled by a graphing calculator. The electronics are simple, and just a few 595s and transistors, but this LED cube is taking serial data directly from the link cable on a graphing calculator. Of course, the PCB for the LED cube is designed as an Arduino shield for ease of prototyping, but make no mistake: this is an LED cube controlled by a calculator.

If you can send serial data to a shift register from a graphing calculator, that means you can send serial data to anything, bringing us to Cemetech’s next great build featured this year. It’s an N-gauge model train, with complete control over the locomotive.

There’s a lot more to controlling model trains these days than simply connecting a big ‘ol variac to the tracks. This setup uses Direct Cab Control (DCC), a system that modulates commands for locomotives while still providing 12-15V to the tracks. There’s a good Arduino library, and when you have that, you can easily port it to a graphing calculator.

Cemetech is one of the perennial favorites at Maker Faire, and over the years we’ve seen everything from the Ultimate TI-83+ sporting an RGB backlight and a PS/2 port to a game of graphing calculator Whac-A-Mole. It’s all a great example of what you can do with the programmable computer every 90s kid had, and an introduction to computer programming education, something Cemetech is really pushing out there with some hard work.

A Rotary Axis CNC Machine

There’s a certain class of parts that just can’t be made on a standard 3-axis mill, nor with a 3D printer or a lathe. These parts — weird screws, camshafts, strange gears, or simply a shaft with a keyway (or two) — can really only be made with a rotary axis on a CNC machine. Sure, you could buy a rotary axis for a Haas or Tormach for thousands of dollars, or you could build your own. That’s exactly what [Adam Zeloof] and [Matt Martone] did with their project at this year’s World Maker Faire in New York. It’s the Rotomill, a simple three-axis CNC machine, with a rotary axis, that just about anyone can build.

The design of the Rotomill uses a standard, off-the-shelf Makita rotary tool for the spindle, and uses leadscrews to move the X and Z axes around with NEMA 24 stepper motors. The A axis — the rotary bit — is driven through a worm gear, also powered by a NEMA 24. Right now this provides more than enough power to cut foam, plastic, and wood, and should be enough to cut aluminum. That last feat is as yet untested, but the design is open enough that a much more powerful spindle could be attached.

The software for this machine is a bit weird. For most CNC machines with a rotary axis, the A axis is treated as such — a rotary axis. For the Rotomill, [Adam] and [Matt] are generating G Code like it’s a normal Cartesian machine, only with one axis ‘wrapped’ around itself. This is all done through Autodesk HSM, and a properly configured Arduino running GRBL makes sense of all this arcane geometry.

It’s a great looking machine, and the guys behind it say it’s significantly less expensive than any other machine with a rotary axis. That’s to be expected, as it’s basically a five axis mill with two axes removed. Still, this entire project was built for about $2000, and some enterprising salvage and hacking could bring that price down a bit.

Maker Faire NY: Programmable Air

At this year’s World Maker Faire in New York City we’re astonished and proud to run into some of the best projects that are currently in the running for the Hackaday Prize. One of these is Programmable Air, from [Amitabh], and it’s the solution to pneumatics and pressure sensing in Maker and IoT devices.

The idea behind Programmable Air is to create the cheapest, most hacker-friendly system for dealing with inflatable and vacuum-based robotics. Yes, pneumatic robotics might sound weird, but there’s plenty of projects that could make use of a system like this. The Glaucus is one of the greatest soft robotic projects we’ve ever seen, and it turns a bit of silicone into a quadruped robot with no moving parts. The only control you have over this robot is inflating one side or the other while watching this silicone slug slowly crawl forward. This same sort of system can be expanded to a silicone robot tentacle, too.

On display at the Programmable Air booth were three examples of how this device could be used. The first was a simple pressure sensor — a weird silicone pig with some tubing coming out of the nostrils was connected to the Programmable Air module. Squeeze the pig, and some RGB LEDs light up. The second demo was a balloon inflating and deflating automatically. The third demo was a ‘jamming gripper’, basically a balloon filled with rice or coffee grounds, connected to a pump. If you take this balloon, jam it onto an odd-shaped object and suck the air out, it becomes a gripper for a robotic arm. All of these are possible with Programmable Air.

Right now, [Amitabh] has just finalized the design and is getting ready to move into mass production. You can get some updates for this really novel air-powered robotics platform over on the main website, or check out the project over on Hackaday.io.

Prusa Introduces A Resin Printer At Maker Faire NY

For one reason or another, the World Maker Faire in New York has become the preeminent place to launch 3D printers. MakerBot did it with the Thing-O-Matic way back when, and over the years we’ve seen some interesting new advances come out of Queens during one special weekend in September.

Today Prusa Research announced their latest creation. It’s the resin printer you’ve all been waiting for. The Prusa SL1 is aiming to become the Prusa Mk 3 of the resin printer world: it’s a solid printer, it’s relatively cheap (kit price starts at $1299/€1299), and it produces prints that are at least as good as resin printers that cost three times as much.

The tech inside the SL1 is about what you’d expect if you’ve been following resin printers for a while. The resin is activated by a bank of LEDs shining through a photomask, in this case a 5.5 inch, 1440p display. Everything is printed on a removable bed that can be transferred over to a separate ‘curing chamber’ after the print is done. It’s more or less what you would expect, but there are some fascinating refinements to the design that make this a resin printer worthy of carrying the Prusa name.

Common problems with a masked SLA printer that uses LEDs and an LCD are the interface between the LCD and the resin, and the temperature of the display itself. Resin is not kind to LCD displays, and to remedy this problem, Prusa has included an FEP film on the bottom of the removable tank. This is a user-replaceable part (technically a consumable, at least to the same extent as a PEI build plate on a filament printer), and Prusa will be selling those as spare parts on their store. The LCD is also cooled; one of the major drawbacks of shining several watts of UV through an LCD is the lifetime of the display. Cooling the display helps, and should greatly increase the lifetime of the printer. All of this is wrapped up in an exceptionally heavy metal case with the lovely hinged UV-opaque orange plastic lid.

Of course, saying you’ve built a resin printer is one thing, but how do the prints look? Exceptional. The Prusa booth at Maker Faire was loaded up with sample prints from the machine, and they’re of the same high quality you would expect from the Form 3D printers that have been the go-to in the resin printer world. The Prusa SLA also works with big-O Open resins, meaning you’re not tied to a single resin vendor.

This is just the announcement of the Prusa resin printer, but they are taking preorders. The price for the kit — no word on how complex of a kit it is — is $1300, while the assembled printer is $1600, with the first units shipping in January.

Join Hackaday For A Night Of Pre-Maker Faire Hacks

This weekend is the World Maker Faire in New York, and Hackaday will be there looking at the latest and greatest projects from makers around the globe. We’ll also be buying bottles of water for five dollars, but that’s another story entirely.

As always, this year’s World Maker Faire will be held at the wonderful New York Hall of Science, and the lineup is spectacular. There will be cosplay, and Adam Savage will be there with a half dozen Junior Mythbusters. There will be a twenty-six foot tall hydraulic hand trucked in from Burning Man. You’re looking at the greatest event in STEAM education since the Bay Area Maker Faire last May.

Hackaday has a fantastic New York community and we’re holding a meetup this Thursday to sync up with Maker Faire. Guess what?  You’re invited!

We’re teaming up with our friends at Kickstarter to bring you an awesome night of hardware builds, music hacks, snacks, and more. While this is an informal event, we do have a few people who will be bringing their latest hacks to show off. Nick Chelyapov, a designer turned gear head who designed an Arduino-based synthesizer and drum machine. This isn’t a toy, but it’s also not a complicated mess of patch cables and eurorack modules. The Bitty is a real instrument that’s easy enough for anyone to pick up and make bleep bloops.

Also confirmed for this meetup is Nick Yulman, an artist who works with sound and interactive media in a variety of contexts. He’s gearing up to install his robotic musical instruments in the Areté Gallery in Greenpoint, Brooklyn. But this week he’ll be showing us how musical robots helped him stop worrying and love digital music.

This isn’t an event to be missed. You can RSVP for the event over on Eventbrite, and be sure to bring whatever project you’re working on. It’s going to be an entire night of drinks and hacks, just the thing before Maker Faire really gets rolling. Once the weekend hits, find us at the Faire; several of us from the Hackaday crew will be wandering the grounds looking for awesome hardware projects. Stephen Tranovich is even giving a talk about the Hackaday Prize on Sunday at 11. See you at the Faire!

After The Sun Set On San Mateo, LED Takes Over Hackaday’s BAMF Meetup

After this Spring’s Bay Area Maker Faire closed down for Saturday night and kicked everybody out, the fun moved on to O’Neill’s Irish Pub where Hackaday and Tindie held our fifth annual meetup for fellow Maker Faire attendees. How do we find like-minded hackers in a crowded bar? It’s easy: look for tables lit by LEDs and say hello. It was impossible to see everything people had brought, but here are a few interesting samples.

Continue reading “After The Sun Set On San Mateo, LED Takes Over Hackaday’s BAMF Meetup”

Hacking For Learning And Laughs: The Makers Of Oakwood School

The tagline of Bay Area Maker Faire is “Inspire the Future” and there was plenty of inspiration for our future generation. We have exhibits encouraging children to get hands-on making projects to call their own, and we have many schools exhibiting their student projects telling stories of what they’ve done. Then we have exhibitors like Oakwood School STEAM Council who have earned a little extra recognition for masterfully accomplishing both simultaneously.

[Marcos Arias], chair of the council, explained that each exhibit on display have two layers. Casual booth visitors will see inviting hands-on activities designed to delight kids. Less obvious is that each of these experiences are a culmination of work by Oakwood 7th to 12th grade students. Some students are present to staff activities and they were proud to talk about their work leading up to Maker Faire with any visitors who expressed interest.

Continue reading “Hacking For Learning And Laughs: The Makers Of Oakwood School”