Open Source Smart Smoker Brings The Heat (Slowly)

Conceptually, cooking on a grill is simple enough: just crank up the flames and leave the food on long enough for it to cook through, but not so long that it turns into an inedible ember. But when smoking, the goal is actually to prevent flames entirely; the food is cooked by the circulation of hot gasses generated by smoldering wood. If you want a well-cooked and flavorful meal, you’ll need the patience and dedication to manually keep the fuel and air balanced inside the smoker for hours on end.

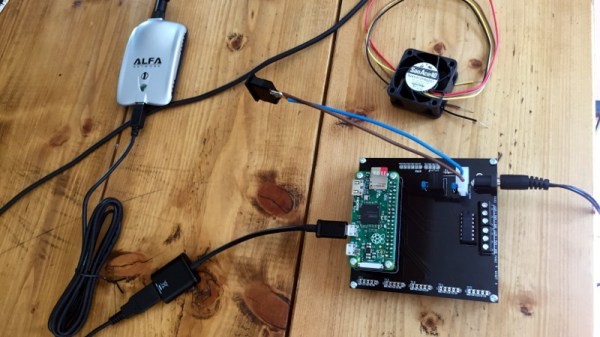
Or in the case of the Smokey Mc Smokerson, you just let the electronics handle all the hard stuff while you go watch TV. Powered by the Raspberry Pi Zero and a custom control board, this open source smoker offers high-end capabilities on a DIY budget. Granted you’ll still need to add the fuel of your choice the old fashioned way, but with automatic air flow control and temperature monitoring, it greatly reduces the amount of fiddly work required to get that perfect smoke.

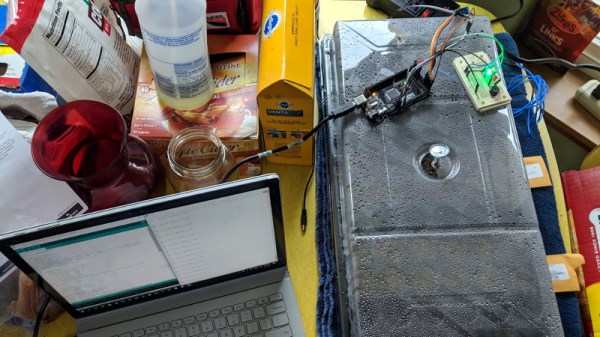
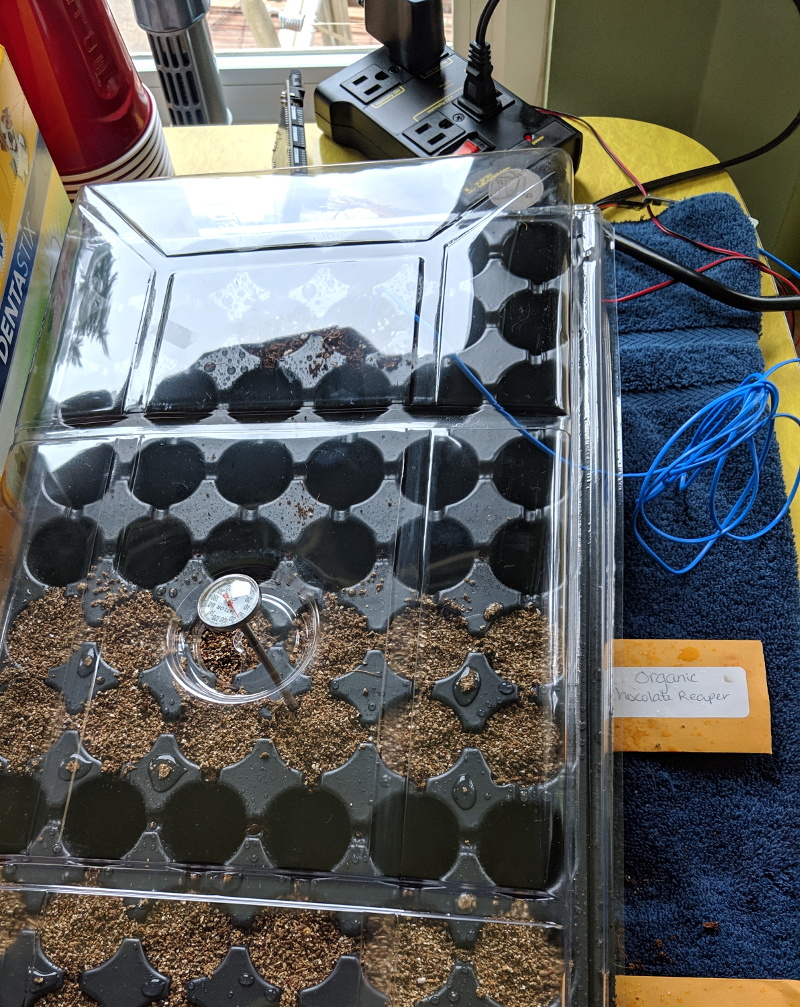
[HackersHub] has been working on Smokey Mc Smokerson for a few months now, and are getting very close to building the first complete prototype. The initial version of the software is complete, and the classy black PCBs have recently arrived. Some simulations have been performed to get an idea of how the smoke will circulate inside of the smoker itself, built from a 55 gallon drum, but technically the controller is a stand-alone device. If you’re willing to makes the tweaks necessary, the controller could certainly be retrofitted to  commercially available smoker instead.

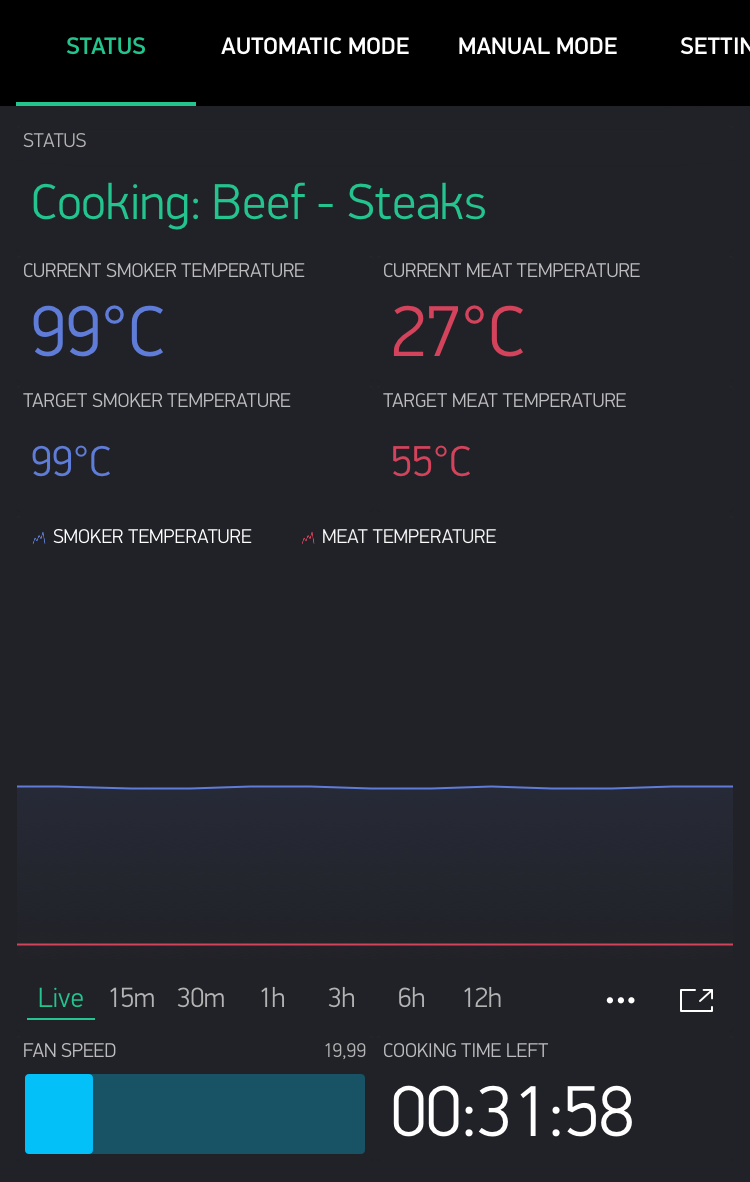
Ultimately, this project boils down to tossing a bunch of temperature sensors at the problem. The software developed by [HackersHub] takes the data collected by the five MAX6675 thermocouples and uses it to determine when to inject more air into the chamber using a PWM-controlled fan at the bottom of the smoker. As an added bonus, all those temperature sensors give the user plenty of pretty data points to look at in the companion smartphone application.

We’ve actually seen a fair number of technologically-augmented grills over the years. From this automotive-inspired “turbocharged” beast to a robotic steak flipper built out of PVC pipes, we can confidently say that not all hackers are living on a diet of microwaved ramen.

Gardening As Nature Intended, With An Arduino

We’re not exactly what you’d call naturalists here at Hackaday, so to us, the idea that hot pepper seeds need to germinate in hot conditions sounds suspiciously like a joke. The sort of thing somebody might tell you right before they try to sell you an elevator pass, or cram you into a locker. But we don’t think [Dean] would have gone through so much trouble if it wasn’t true. You’re still not going to sell us an elevator pass, though. Not again.

According to [Dean], the Carolina Reaper pepper seeds he bought from Puckerbutt Pepper Company (truly a name you can trust) recommend that they be germinated at a temperature between 80 and 85 degrees Fahrenheit for up to eight weeks. To make sure they were maintained at the optimal temperature for as long as possible, he decided to get a heating pad he could place under the seeds to keep them warm. He just needed some way to make sure the heat only kicked on once the soil temperature fell out of the sweet spot.

To get an accurate reading, [Dean] ended up going with a waterproof K-type thermocouple connected to a SainSmart MAX6675 module that could be buried amongst the seeds. When the soil temperature drops below 82.5 F, it kicks on the heating mat through an IoT Relay by Digital Loggers. He even added in a capacitive soil moisture sensor and a couple of LEDs so he could tell from across the room if he needed to water what he loving refers to as his “Hell Berries”

Looking back through the archives, we see a considerable overlap between hacking and gardening. Since success demands the careful control and monitoring of a myriad of variables, it seems the sort of thing that’s ripe for gloriously over-engineered automation. Especially if you’re trying to get the things to sprout off-world.

Build Your Own Portable Arduino Soldering Iron

At this point you’ve almost certainly seen one of these low-cost portable soldering irons, perhaps best exemplified by the TS100, a pocket-sized temperature controlled iron that can be had for as little as $50 USD from the usual overseas suppliers. Whether or not you’re personally a fan of the portable irons compared to a soldering station, the fact remains that these small irons are becoming increasingly popular with hackers and makers that are operating on a budget or in a small workspace.

Believing that imitation is the most sincere form of flattery, [Electronoobs] has come up with a DIY portable soldering iron that the adventurous hacker can build themselves. Powered by an ATMega328p pulled out of an Arduino Nano, if offers the same software customization options of the TS100 but at a considerably lower price. Depending on where you source your components, you should be able to build one of these irons for as little as $15.

The iron features a custom PCB and MAX6675 thermocouple amplifier to measure tip temperature. A basic user interface is provided by two tactile buttons on the PCB as well as an 128×32 I2C OLED display. In a future version, [Electronoobs] says he will look into adding some kind of sensor to detect when the iron is actually being used and put it to sleep when inactive.

The tip is sourced from a cheap soldering station replacement iron, and according to [Electronoobs], is probably the weakest element of the entire build. He’s looking into using replacement TS100 tips, but says he’ll need to redesign his electronics to make it compatible. The case is a simple 3D printed affair, which looks solid enough, but seems likely to be streamlined in later versions.

We’ve seen a number of attempts at DIY soldering irons over the years, but we have to say, this one is probably the most professional we’ve ever seen. It will be interesting to see how future revisions improve on this already strong initial showing.

Continue reading “Build Your Own Portable Arduino Soldering Iron”

Android-based Reflow Brings Solder Profiles To Your Lab

[Andy Brown] is a prolific hacker and ends up building a lot of hardware. About a year back, he built a reflow oven controller. The board he designed used a large number of surface mount parts. This made it seem like a chicken or egg first problem. So he designed a new, easy to build, Android based reflow controller. The new version uses just one, easy to solder surface mount part. By putting in a cheap bluetooth module on the controller, he was able to write an app which could control the oven using any bluetooth enabled Android phone or tablet.

The single PCB is divided into the high voltage, mains powered section separated from the low power control electronics with cutout slots to take care of creepage issues. A BTA312-600B triac is used to switch the oven (load) on and off. The triac is controlled by a MOC3020M optically isolated triac driver, which in turn is driven by a micro controller via a transistor. The beefy 12Amp T0220 package triac is expected to get hot when switching the 1300W load, and [Andy] works through the math to show how he arrived at the heat sink selection. To ensure safety, he uses an isolated, fully encased step down transformer to provide power to the low voltage, control section. One of his requirements was to detect the zero cross over of the mains waveform. Using this signal allows him to turn on the triac for specific angle which can be varied by the micro controller depending on how much current the load requires. The rectified, but unfiltered ac signal is fed to the base of a transistor, which switches every time its base-emitter voltage threshold is reached.

For temperature measurement, [Andy] was using a type-k thermocouple and a Maxim MAX31855 thermocouple to digital converter. This part caused him quite some grief due to a bad production batch, and he found that out via the eevblog forum – eventually sorted out by ordering a replacement. Bluetooth functions are handled by the popular, and cheap, HC-06 module, which allows easy, automatic pairing. He prototyped the code on an ATmega328P, and then transferred it to an ATmega8 after optimising and whittling it down to under 7.5kb using the gcc optimiser. In order to make the board stand-alone, he also added a header for a cheap, Nokia 5110 display and a rotary encoder selector with switch. This allows local control without requiring an Android device.

Gerbers (zip file) for the board are available from his blog, and the ATmega code and Android app from his Github repo. The BoM list on his blog makes it easy to order out all the parts. In the hour long video after the break, [Andy] walks you through solder tip selection, tips for soldering SMD parts, the whole assembly process for the board and a demo. He then wraps it up by connecting the board to his oven, and showing it in action. He still needs to polish his PID tuning and algorithm, so add in your tips in the comments below.

Continue reading “Android-based Reflow Brings Solder Profiles To Your Lab”

Controlling A Hot Plate’s Temperature For The Lab

When you need precise heating — like for the acetone polishing shown above — the control hardware is everything. Buying a commercial, programmable, controller unit can cost a pretty penny. Instead of purchasing one, try creating one from scratch like [BrittLiv] did.

[BrittLiv] is a Chemical and Biological Engineer who wanted something that performs well enough to be relied upon as a lab tool. Her design utilizes a plain, old hot plate and with some temperature feedback to run custom temperature ramps from programs stored on an SD card.

The system she developed was dealing directly with temperatures up to 338°F. The heating element is driven from mains, using an SSR for control but there is also a mechanical switch in there if you need to manually kill the element for some reason. An ATmega328 monitors the heating process via an MAX6675 thermocouple interface board. This control circuitry is powered from a transformer and bridge rectifier inside the case (but populated on a different circuit board).

She didn’t stop after getting the circuit working. The project includes a nice case and user interface that will have visitors to your lab oohing and aahing.

Bang-banging Your Way To A Perfect Cake

bang-bang-oven-control

[Rob Spanton’s] house is equipped with a rather cheap oven, which was discovered while his roommate tried using it to bake part of a wedding cake. If someone took a shower during the baking process, a large portion of unit’s gas pressure was diverted to the boiler, causing the oven to shut off completely. This is obviously not a good situation for baking cakes, so the housemates decided to construct a makeshift controller to keep temperatures in line.

They started by installing a pulley on the oven’s knob, which is connected to a small motor via a long rubber belt. The other end of the belt connects to a small motor, which is controlled by a Pololu 18v7 motor controller. A K-type thermocouple monitors the oven’s temp, feeding the data through a MAX6675 converter to (presumably) [Rob’s] computer.

Since they were in a bit of a time crunch, [Rob] and his roommate [Johannes] decided the best way to keep the oven at a steady temperature was via bang-bang control. While you might imagine that cranking the gas knob between its minimum and maximum settings repeatedly wouldn’t be the ideal way to go about things, their solution worked pretty well. The cake came out perfectly, and the maximum temperature swing throughout the entire baking process was only 11.5°C – which is pretty reasonable considering the setup.

Solder Station Hack Adds Temperature Control

Take that cheap fire stick you call a soldering iron and turn it into a real tool. [Giorgos Lazaridis] turned his 30 watt soldering iron into a temperature controlled soldering station by adding a thermistor just above the tip to monitor how hot things are getting. A MAX6675 takes care of the thermocouple and shoots a digital temperature value off to the PIC 16F88 which controls the unit by taking user input from a potentiometer and displaying the settings on an HD44780 character display. His use of a dissected ‘wall wort’ inside of the ATX power supply carcass used as the case for the station is a clever hack. See it melt some metal in the clip after the break.

This makes a nice upgrade to our solder station guide, which had a temperature controlled iron but lacked the sensor and automation seen here. Continue reading “Solder Station Hack Adds Temperature Control”