How To Achieve Knurling On A Flat Surface

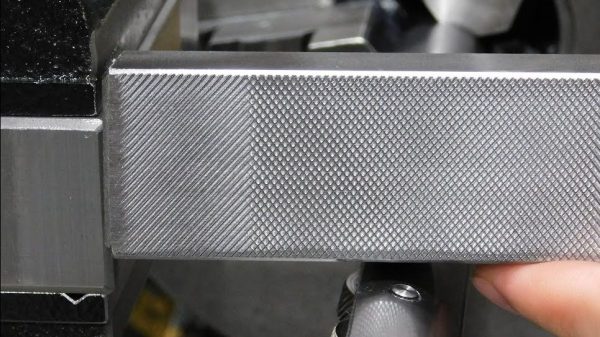
Knurling is a popular way to finish handles of tools and other hardware, with a pattern of crossed lines rolled into metal to provide better grip and an attractive finish. It’s most commonly done on a lathe to round stock, but it can also be achieved on flat surfaces if you have the right tool. Of course, you can make one yourself.

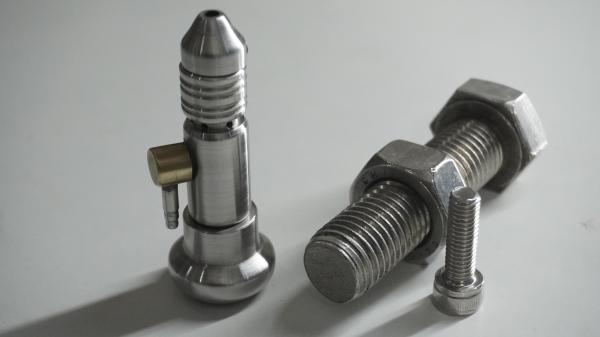
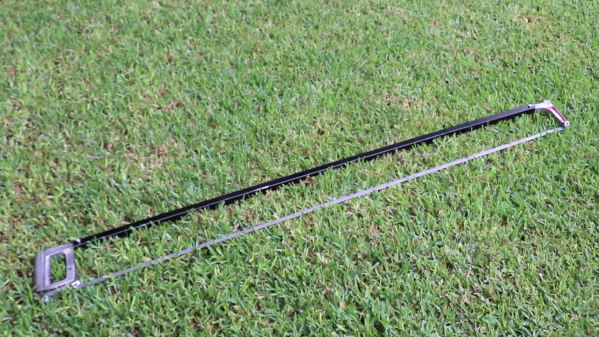
The build is simple, and is based around by creating a special carrier out of a solid piece of steel. It’s a long bar has a space milled out to hold two wheels in the middle. A pair of off-the-shelf knurling wheels are then installed in the bar, with socket head bolts serving as axles.

With the tooling complete, it’s then a simple matter of installing the carrier bar in a lathe and running it back and forth over a flat workpiece. The workpiece is rolled back and forth to allow the wheels to do their work, while also being shifted horizontally to allow the entire flat surface to be worked over.

A nice knurled finish really can elevate the form and function of any tool or other piece of metal craftsmanship. We’ve explored how to create your own knurled knobs before, too.

Continue reading “How To Achieve Knurling On A Flat Surface”

3D Printing Aids Metal Polishing

While a machinist can put a beautiful finish on a piece of metal with their lathe or mill, to achieve the ultimate finish, a further set of polishing procedures are necessary. Successively finer abrasives are used in a process called lapping, which removes as far as possible any imperfections and leaves eventually a mirrored smoothness. It’s not without problems though, particularly at the edge of a piece it can result in rounded-off corners as the abrasive rubs over them. [Adam the machinist] has a solution, and he’s found it with a 3D printer.

To avoid the rounded edges, the solution involves fitting a piece of metal or wood flush with the surface to be lapped, such that the pressure doesn’t act upon the corner. This can be inconvenient, and the solution avoids it by 3D printing a custom piece that fits over the entire machined object providing a flat surface surrounding the edges. We see it being used with a demonstration piece that has three separate surfaces in the same plane to lap,something that would have been challenging without the 3D printed aid.

Lapping isn’t a process we see too often here. But it has cropped up as an extreme overclocking technique.

Continue reading “3D Printing Aids Metal Polishing”

Watching A Boat Get Welded Together Is Workshop ASMR

If you’ve been on the Internet long enough to know about Hackaday, we’ll wager you’re familiar with the concept of autonomous sensory meridian response (ASMR) — a tingling sensation in the scalp that’s said to be triggered by certain auditory stimuli. There are countless videos on YouTube that promise to give you “the tingles” using everything from feather dusters to overly starched shirts, but for us, the tool of choice is apparently a Lincoln Electric Magnum PRO 100SG spool gun in the hands of [Bob].

You’ll want a friend to help wrangle the panels.

Admittedly we can’t promise the latest Making Stuff video will induce a euphoric physical sensation for all viewers, but at the very least, we think you’ll agree that watching [Bob] and his brother methodically welding together the twelve foot hull of what will eventually be a custom jet boat is strangely relaxing.

While we usually associate [Bob] with scratch builds, this time he’s actually working his way through a commercial kit. Sold by Jet Stream Adventure Boats, the kit includes the pre-cut aluminum panels that make up the hull, stringers, and top deck — niceties like a windshield and seats are offered as extras. The engine and jet drive need to be salvaged from an existing personal watercraft (PWC), but that will have to wait for a future video. For now, there’s a boat-load (get it?) of tack welding to be done.

The build process looks to go pretty smoothly, except for when they attempt to put the bow of the boat together. Unable to get the two side panels to meet properly, [Bob] eventually has to contact the manufacturer. After some back and forth, it turns out that a bit must have broken on the CNC when the hull panel went through, as a key cut was made nearly 8 inches (20 cm) too short. He was able to complete the cut with a jigsaw and continue on with the build, but we’re still scratching our heads at how this wasn’t caught before it got shipped out.

It won’t be the first homemade boat we’ve covered, but given [Bob]’s attention to detail, we’re particularly excited to see how this one develops in future videos. Especially since he’s foolishly bravely asked the commenters to come up with a name for his new craft.

Continue reading “Watching A Boat Get Welded Together Is Workshop ASMR”

Hand-Built Metal Mouse Is Beautifully Engraved

Computer mice, like computers themselves, used to be built almost solely in hideous beige designs. These days, things are a bit more stylish, but they’re still largely following a simple plastic formula. [Uri Tuchman] decided to build a fancy metal engraved computer mouse for a little more style on the desktop.

The build starts by gutting a simple three-button scroll mouse, as there’s really no sense in reinventing the wheel where the electronics is concerned. The PCB inside is pulled out and assembled on a brass baseplate, along with standoffs and supports for the mouse wheel as needed. It’s paired with a hefty brass enclosure with a nice gentle slope to sit well in the hand. Or, as well as it can, given the square  metal edges of the finished product.

The build is full of fun details, like [Uri] trying to form a hex shaft by hand, and the work that goes into the engraving is similarly impressive. In any case, it’s a build that would pair wonderfully with a proper steampunk keyboard. Alternatively, if you hate the idea of having to do all that engraving by hand, think about building your own CNC machine. Video after the break.

Continue reading “Hand-Built Metal Mouse Is Beautifully Engraved”

Tiny Pneumatic Tool Made From A Single(-ish) Bolt

We’ve noticed a couple of things about the “Widget from a Single Bolt” genre of metalworking videos. The first thing is that almost all of them need to use a freakishly large bolt, and many of them also rely on other materials to complete the build. And secondly, these builds all pretty much depend on a lathe to transform the bolt into the intended widget.

While this single-bolt pneumatic graving tool build is guilty on that first count, it somehow manages to avoid needing a lathe. Not that [AMbros Custom] wouldn’t have greatly benefited from a lathe to make this somewhat specialized and unusual tool a reality. A graving tool or graver is used during metal engraving, the art of making controlled cuts into flat metal surfaces to render complicated designs. A powered graver like this can make engraving faster and more precise than a traditional manual graver, which is typically powered by light taps with a special hammer.

The lathe-less build [AMbros] undertook was quite ambitious given the number of moving parts and the tight tolerances needed for a pneumatic tool. The real hero here is the hand drill pressed into service as an impromptu lathe; teamed with various tools from files to emery cloth to even a Dremel and an angle grinder, it did a respectable job turning down the various parts. The entire build is shown in the video below, and it’s worth a watch just to see what ingenuity can accomplish when coupled with sheer persistence.

Hats off to [AMbros] for sticking with what was admittedly a problematic build, and here’s hoping a lathe is in his future. With that, he may be able to pull off other impressive “single-bolt” builds, like this combination padlock. Or throw another bolt or two in and pull off this cryptex-like safe.

Continue reading “Tiny Pneumatic Tool Made From A Single(-ish) Bolt”

World's longest hacksaw

Fail Of The Week: A Bigger Hacksaw Isn’t A Better Hacksaw

If we’re being honest, the main reason to buy a power tool is to avoid the pain of using one’s muscles. Oh sure, we dress it up with claims that a power tool will make us more productive, or give better results, but more often than not it’s the memory of how your forearm feels after a day of twisting a screwdriver that makes you buy a cordless driver.

It appears that [Artisan Makes] has a high tolerance for pain, seeing how the main prep tool in his metal shop is a plain old hacksaw. So in an effort to speed up his stock prep, he turned not to a bandsaw or cutoff saw, but instead built the world’s silliest hacksaw. It’s the metalworking equivalent of the two-man bucksaws that lumberjacks used to fell trees before chainsaws came along, and at a meter and half in length, it’s about the size of one too. Modifying the frame of his trusty hacksaw was easy — he just popped the end pieces off and attached them to an extra-long piece of tube stock. Finding a 1.5-meter hacksaw blade was the main challenge; not exactly a big-box store item, that. So a section of metal-cutting bandsaw blade was modified to fit the frame, and it was off to the races.

Or not. The video below tells the tale of woe, which starts with the fact that [Artisan]’s shop is too small for the hilariously long hacksaw. Solving the fixturing problems didn’t soo much to help, though — there was no way to tension the blade enough to get it to stop wobbling during cutting. It was also clear that the huge saw wasn’t able to apply enough downforce on the stock to get good cuts. Maybe with a second set of hands, though…

There are plenty of ways to improve hacksawing in the shop, and while this isn’t one of them, we sure appreciate the chuckle we got out of it. And you really should check out [Artisan Makes]’ channel — his more serious stuff is really good.

Continue reading “Fail Of The Week: A Bigger Hacksaw Isn’t A Better Hacksaw”

Planning Custom Aluminum Enclosures With OpenSCAD

We’ve seen a number of projects over the years that let you create custom enclosures using OpenSCAD, and for good reason. The parametric CAD tool is ideal for generating 3D models based on user-adjustable variables, and if you leverage its integrated Customizer, producing a bespoke box is as easy as moving some sliders around. The resulting files get sent off to the 3D printer, and you’re set. But what if you’re looking for a custom enclosure that’s not so…plastic?

In that case, AlClosure by [0xPIT] might be the answer. Rather than generating STL files intended for your 3D printer, the code is written to help you design an enclosure made from aluminum sheets. The top and bottom panels are intended to be cut from 1.5 mm – 2.5 mm sheets, while the sides are made from thicker 5 mm – 8 mm stock to accept a machined pocket that holds the front and rear inserts.

Since it’s OpenSCAD, much of the design is governed by variables which you can tweak. Obviously the outside dimensions of the enclosure can be changed in a flash, but it’s just as easy to modify the thickness of the aluminum sheet being used, or the size of the screw holes. [0xPIT] has also done a great job of documenting the code itself, so you’ll know exactly what you’re modifying.

Obviously, you’ll need the ability to cut and machine aluminum to actually utilize this project. The code itself is really just a way to conceptualize the design and get your dimensions figured out ahead of time. But as we were recently reminded by the keynote presentation [Jeremy Fielding] gave at the 2021 Remoticon, this sort of early prototyping can often save you a lot of headaches down the line.