A breadboard with a few DIP chips

Minimalist 6502 System Uses A CPU And Not Much Else

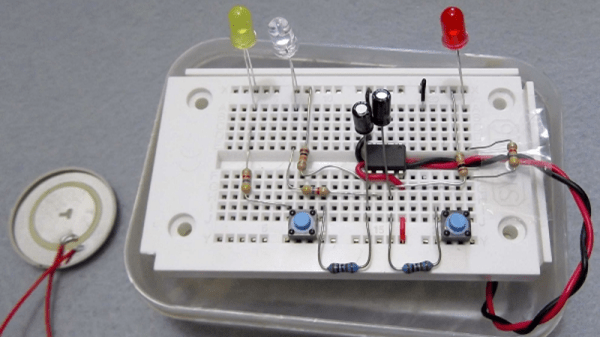
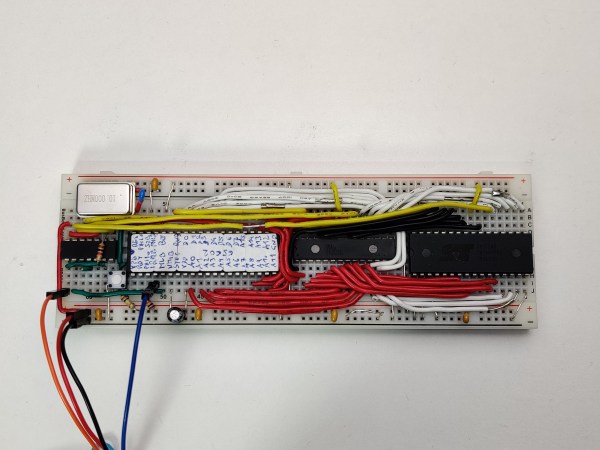
A central processing unit, or CPU, is the heart of any computer system. But it’s definitely not the only part: you also need RAM, ROM and at least some peripherals to turn it into a complete system that can actually do something useful. Modern microcontrollers typically have some or all of these functions integrated into a single chip, but classic CPUs don’t: they were meant to be placed on motherboards along with dozens of other chips. That’s why [c0pperdragon]’s latest project, the SingleBreadboardComputer, is such an amazing design: assisting its 6502 CPU are just four companion chips.

The entire system takes up just one strip of solderless breadboard. Next to the CPU we find 32 KB of SRAM, 32 KB of flash and a clock oscillator. The fifth chip is a 74HC00 quad two-input NAND gate, which is used as a very tiny piece of glue logic to connect everything together. Two of its NAND gates are used for address decoding logic, allowing either the ROM or RAM chip to be selected depending on the state of the CPU’s A15 line as well as blocking the RAM during the low phase of the system clock. The latter function is needed because the address lines are not guaranteed to be stable during the low phase and could cause writes to random memory locations.

The remaining two NAND gates are connected as an RS-flipflop in order to implement a serial output. This is needed because the CPU cannot keep its outputs in the same state for multiple clock cycles, which is required for a serial port. Instead, [c0pperdragon] uses the MLB pin, normally used to implement multiprocessor systems, to generate two-clock pulses, and stores the state in the flipflop for as long as needed. A few well-timed software routines can then be used to transmit and receive serial data without any further hardware.

Currently, the only software for this system is a simple demonstration that sends back data received on its serial port, but if you fancy a challenge you could write programs to do pretty much anything. You could probably find some inspiration in other minimalist 6502 boards, or projects that emulate a complete motherboard in an FPGA.

You Won’t Believe How Much Tech Is Hiding In This Desk

Say what you will about office life: there were definitely some productivity perks, but the coffee is much better at home. Like many of us, [Pierre] has been working from home for the last year or so. And as much as he might enjoy spending so much time in his small Parisian apartment, it lacks many of the amenities of the office such as a scanner, printer, and, you know, a reasonable amount of space in which to work.

Inspired by another build, [Pierre] set out to build his dream desk that is maximum PC power in minimum space. It is chock full of easily-accessible cavities that hide everything you’d expect, plus a few things you don’t, like a flatbed scanner, a printer, a router, and a wireless charging pad. One cavity is dedicated to I/O, and another has three international power sockets. The only thing it doesn’t hide is the 22″ pen display that [Pierre] uses for sketching, signing documents, and occasionally as a second monitor.

A home-brew jig makes consistent dowel drilling much easier.

This desk may look like solid wood, but the top is a veneer that’s glued on to a custom-cut 1mm steel sheet. The inside frame is made of hardwood and so are the legs — one of them has a hidden channel for the only two cords that are even somewhat visible — the power and Ethernet cables. He joined all the frame pieces with dowel rods, and made a 3D-printed and metal-reinforced drilling jig to get the holes just right.

[Pierre] started this build by planning out the components and making meticulous notes about the dimensions of every piece. Then he sketched it and modelled it in FreeCAD to get all the cavities and cable runs correct and ensure good airflow through the desk. After that it was on to woodworking, metalworking, and PCB fab for relocated and hidden display controls and a custom-built amplifier.

It’s obvious that a lot of thought went in to this, and there’s a ton of work appreciate here, so clear off that inferior desk of yours and check out the build video after the break. Wish you had a PC desk? [Pierre] is seriously considering a Kickstarter if enough people show interest.

Are you into minimalism, but don’t want to build something of this magnitude? There’s more than one way to get there.

Continue reading “You Won’t Believe How Much Tech Is Hiding In This Desk”

Someone Get This Minimalist Wooden PC A Martini

It’s interesting to imagine what computers may have looked like throughout different time periods that precede their portability or even their existence altogether. In the 1950s and ’60s, computers still filled entire rooms, but if the age of the PC had arrived earlier one is left to wonder what might a minimalist mid-century PC might look like.

Well, if we were lucky, it would have looked something like [xmorneau]’s cubical computing creation. This DIY beauty is made of scrap oak and a sexy set of hairpin legs. As hot as it looks, [xmorneau] shouldn’t have to worry about overheating — the bottom is completely open except for an intake fan, there’s another fan at the top that exhausts hot air through a mesh grille, and those lovely little legs elevate it four inches off the desk. Our favorite part (after the legs) has to be the secret lid that blends in beautifully.

The cube measures 32cm³ (~12.6in³), so [xmorneau] went with a mini-ATX motherboard, but was able to fit in a full-size graphics card. Everything is mounted internally to wood except for the mobo, which is mounted on a panel of sheet metal that makes up the back wall.

We love the way this looks and are glad to see that this build changed [xmorneau]’s opinion of RGB a little bit, because we can’t help but like it both ways.

Too sophisticated for your taste? Check out this LEGO-Minecraft mashup.

Code For Hackers

Mike and I were talking about two very similar clock projects we’d both built recently: they both use ESP8266 modules to get the time over WiFi and NTP, and they both failed. Mike’s failed because he was visiting relatives in a different timezone with different WiFi credentials, and mine failed because daylight savings time caught me off-guard. In both cases, we hard-coded stuff that could obviously change, but we drew vastly different conclusions.

Mike thought he’d solve his WiFi problem with a fallback to a captive portal, and maybe would have to figure out some web interface for configuring the timezone. A very clean, professional solution. Me? I’ve got good comments in the code, can find the UTC offset (or the WiFi creds) in a few minutes, and flash the new version up simply by fetching a USB cable, for something that happens twice a year. It’s hardly worth the trouble to cobble together a web interface.

There’s an XKCD for everything.

We’ve accidentally embodied a quandary that spans both the hardware and software worlds: should flexibility be exposed to the end-user or to the hacker who can peer under the hood or open up the source code? (And what if the end-user is the hacker?) What are the tradeoffs, in project complexity and in ease of use?

And in this, Mike is on the side of right and good, and I’m the heretic. I don’t always write my code to be extensible or re-usable. I sometimes write it to be quickly re-edited and patched whenever I need to. Is it full of magic numbers? Sure! But I know just where they are and how to change them. Heck, most are even well documented in their own header file. You could probably figure it out just about as fast. Would my father-in-law be able to tweak the timezone? Nope! But this ain’t his project anyway.

Dare to code for hackers! Don’t over-generalize or over-abstract. Less is more. Don’t be afraid to edit code. Tweak, compile, and re-flash when the situation changes. After all, that’s how you got the code there in the first place.

And although I’m on the wrong end of history, in this case I was right. You see, before daylight savings time could come around again, and I could have made use of that captive portal that I didn’t bother coding up anyway, my son entered first grade. Everything needs to be changed, from the hardware to the software. Will I code up the next version with flexible time regimes? As flexible as I need it to be, but not more.

Getting To Know Every Bit Of An ATtiny13

We recently heard it said of a hacker who pulled off a particularly nice VGA hack on an 8-bit microcontroller: “He knows all the bits, personally.” High praise, indeed. If you want to get on a first-name basis with a ton of transistors, then have a look at [Heinz D]’s Vacation Course in ATtiny13 Assembler (original in German, translated into English by robots here).

But be warned, this isn’t the easy way to learn AVRs. Not content with simply stripping away every layer of abstraction, this month-long “course” in AVR assembly starts off programming the chip initially with just two pushbuttons in its native machine language of high and low voltages. But still, especially if you can get a few assignments done in one sitting, you’re writing in the relative splendor of assembly language and uploading code with a proper programmer before long, because there’s a real limit to how much code one can toggle in before going mad.

There’s a beautiful minimalism to this entirely ground-up approach, and maybe it’s an appropriate starting point for learning how the machine works at its lowest level. At any rate, you’ll be able to lord it over the Arduino crew that you were able to get blink.ino up and running with just a pair of mechanical contacts and a battery. Real programmers

And once you’ve mastered AVR assembly language, you can recycle those two buttons to learn I2C or SPI. What other protocols are there that don’t have prohibitive timeouts? What’s the craziest code that you’ve ever entered bit by bit?

Overlooked Minimalism In Assistive Technology

If your eyes are 20/20, you probably do not spend much time thinking about prescription eyeglasses. It is easy to overlook that sort of thing, and we will not blame you. When we found this creation, it was over two years old, but we had not seen anything quite like it. The essence of the Bear Paw Assistive Eating Aid is a swiveling magnet atop a suction cup base. Simple right? You may already be thinking about how you could build or model that up in a weekend, and it would not be a big deal. The question is, could you make something like this if you had not seen it first?

Over-engineered inventions with lots of flexibility and room for expansion have their allure. When you first learn Arduino, every problem looks like a solution for that inexpensive demo board and one day you find yourself wearing an ATMEGA wristwatch. Honestly, we love those just as much but for an entirely different reason. When all the bells and whistles are gone, when there is nothing left but a robust creation that, “just works,” you have created something beautiful. Judging by the YouTube comments of the video, which can be seen below the break, those folks have no trouble overlooking the charm of this device since the word “beard” appears 95 times and one misspelling for a “bread” count of one. Hackaday readers are a higher caliber and should be able to appreciate its elegance.

The current high-tech solution for self-feeding is a robot arm, not unlike this one which is where our minds went when we heard about an invention about eating without using hands, and we will always be happy to talk about robot arms.

Continue reading “Overlooked Minimalism In Assistive Technology”

Tea For Two: A Tiny Tea Timer

The ATtiny85 microcontroller doesn’t have all that much of anything: 8 KB of flash, an 8-bit architecture, and only eight pins (three of which are taken up with power and reset duties). And that’s exactly what makes it a great fit for tiny little projects.

[Mimile]’s Tea Timer has a switch, a button, eight LEDs, and a buzzer. Flip the switch to “set” and button presses run through the desired steeping times. Flip it to “run” and you’re timing. The LEDs blink and the buzzer plays “Tea for Two” in squawky square waves. Wonderful!

But wait, how to control all of this I/O with just five pins? With one pin each for the two switches and one for the buzzer, that leaves only two pins for the eight LED display. [Mimile]’s fun solution is to use a binary counter (a 74HC393) and the remaining two lines to count and reset. That means toggling a pin very fast 255 times to light up all the LEDs. That’s a bizarre way to go, but we like it!

Hackaday has proven unable to resist the siren song of the ATtiny85. Whether teaching it to swear, to speak I2C, or to transmit analog TV signals, there’s just something about this cute little chip that invites you to test your mettle.