Tiny Linux On A No-MMU RISC-V Microcontroller

In the vast majority of cases, running a Linux-based operating system involves a pretty powerful processor with a lot of memory on hand, and perhaps most importantly, a memory management unit, or MMU. This is a piece of hardware which manages virtual memory, seamlessly giving each process its own memory sandbox in which it shouldn’t be able to rain on its neighbours’ parade. If there’s no MMU all is not lost though, and [Uros Popovic] gives us a complete guide to building the MMU-less μClinux on a RISC-V microcontroller.

The result is something of a Linux-from-scratch for this platform and kernel flavour, but it’s so much more than that aside from its step-by-step explanation. It’s probable that most of us have heard something of μClinux but have little direct knowledge of it, and he leads us through its workings as well as its limitations. As examples, standard ELF binaries aren’t suitable for these systems, and programmers need to use memory-safe techniques.

Whether or not any of you will run with this guide and build a tiny MMU-less Linux system, anything which expands our knowledge on the subject has to be a good thing. it’s not the first time we’ve seen a RISC-V microcontroller turned to this task, with a nifty trick to get round the limitations of a particular architecture.

A Tiny RISC-V Emulator Runs Linux With No MMU. And Yes, It Runs DOOM!

It’s something of an article of faith, that to run Linux your computer must include a hardware memory management unit, or MMU. To an extent it’s true, in that for a Linux-based system to shine it must have that hardware, but in fact there has been support for MMU-less Linux for many years now. Prolific hacker [cnlohr] has created an emulated simple RISCV processor without an MMU, and not only does it run Linux, it also runs DOOM.

The videos below the break go into significant depth on writing and debugging an emulator not to mention the inner workings of DOOM, but fear not if it’s not your thing. Everything can be found in a GitHub repository, and there are straightforward instructions should you wish to try it yourself.

All this is entertaining stuff, but it becomes of much more interest when viewed as part of an ongoing chain of projects working on no-MMU Linux for low-end RISC-V microcontrollers. Imagine the prospect of running Linux on a CPU costing relative pennies, and you can see why that’s an interesting prospect. Even if it’s not the most unexpected way to run Linux without an MMU.

Continue reading “A Tiny RISC-V Emulator Runs Linux With No MMU. And Yes, It Runs DOOM!”

Enraged Rabbit Project Is A Filament Cocktail Special

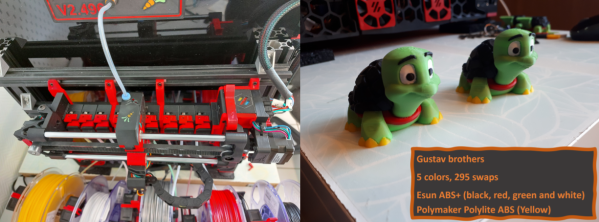
As long as 3D printers have been around, it seems as though many of us have dreamed about nozzle-sharing solutions for multicolor 3D prints. Just because Prusa’s MMU has had the spotlight for some time doesn’t mean that there’s no space to design something original. If you’re craving something new to feast your eyes upon, look no further than the EnragedRabbitProject by [EtteGit]. Built for Voron 3D printers, it’s a scalable filament changing solution designed from the ground up that expands to accommodate up to 9 filaments.

EnragedRabbitProject is broken into four main components. First comes the Enraged Rabbit Carrot Feeder (ERCF), the system that handles filament selection, retraction, and loading. Next, comes the Carrot Patch (ERCP), a spool holder/buffer combo that’s needed per spool. For those unfamiliar with filament changers, unspooling filament is easy, but rewinding it back onto the spool is hard. And since the nozzle will retract a significant length of filament when it switches between filaments, it’s important to manage all this extra loose filament to prevent tangles. A filament buffer is the solution; it’s a clever mechanical addition to the spool holder that will manage the extra filament that gets unwound during these filament changes. Beyond these two systems is the King’s Seat (ERKS) a Voron-2 setup that purges extra filament into beads instead of purge blocks, and finally, the filament sensor, which detects filament presence for filament changes.

It’s sometimes hard to appreciate the reliability of these sorts of CNC systems. On that note, keep in mind that the prints on the project’s landing page are the results of hundreds if not thousands of filament swaps — truly an astonishing feat. Beyond reliability is the project’s presentation. [EtteGit] has kindly posted STEP and STL files for all mechanical components, the Klipper configuration files, and a bill-of-materials that will scale according to the number of filaments you’re installing.

We’re thrilled to see folks continue to innovate on the concept of what it means to be a multi-color or multi-material 3D printer. For other takes on multi-filament setups, have a look at [Paul Paukstelis’] microscope-inspired head changer, and [MihaiDesigns’] removable tool head concept.

Continue reading “Enraged Rabbit Project Is A Filament Cocktail Special”

Lithophanes Ditch The Monochrome With A Color Layer

3D printed lithophanes are great, if a bit monochromatic. [Thomas Brooks] (with help from [Jason Preuss]) changed all that with a tool for creating color lithophanes but there’s a catch: you’ll need a printer capable of creating multi-color prints to do it.

A video (embedded below) begins with an intro but walks through the entire process starting around the 1:26 mark. The lithophane is printed as a single piece and looks like most other 3D printed lithophanes from the front, but the back is different. The back (which is the bottom printed layer) is made of up multiple STL files, one for each color, and together creates something that acts as a color filter. When lit from behind, light passes through everything and results in an image that pops with color in ways that lithophanes normally do not.

The demo print was created with a printer equipped with a Palette 2, an aftermarket device that splices together filament from different spools to create multicolored prints, but we think a Prusa printer with an MMU (multi material upgrade) should also do the trick.

[Thomas] already has a lot of ideas on how to improve the process, but these early results are promising. Need a gift? Lithophanes plus LED strips make great lamps, and adding a cheap clock movement adds that little extra something.

Continue reading “Lithophanes Ditch The Monochrome With A Color Layer”

Cheap Multimeter Leads Come With Extra Ohms, Free!

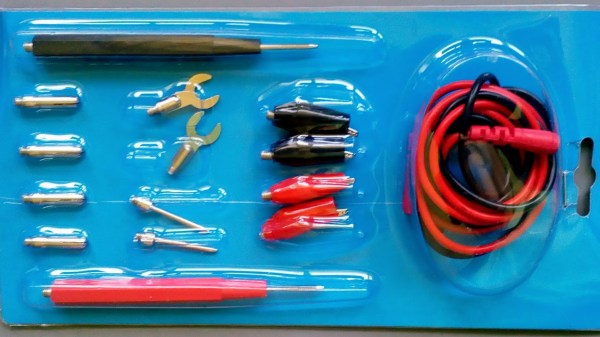
[Nop head] discovered that cheap multimeter leads costing only a few bucks can come with more than one may have bargained for. The first set had a large amount of useful-looking attachments, but the wires used for the leads were steel with a resistance of about one ohm each. With two leads in use, that means any resistance measurement gets two ohms added for free. More seriously, when measuring current, the wires can heat up rapidly. Voltage measurements would be affected the least, but the attachments and lead design expose a large amount of bare metal, which invites accidental shorts and can be a safety hazard with higher voltages.

Are all cheap multimeter leads similarly useless? Not necessarily. [nop head] also purchased the set pictured here. It has no attachments, but was a much better design and had a resistance of only 64 milliohms. Not great, but certainly serviceable and clearly a much better value than the other set.

It’s usually not possible to identify garbage before it’s purchased, but [nop head] reminds us that if you do end up with trash in hand, poor quality counterfeits can be good for a refund. That goes for electronic components, too.

Plastic Model Emulates The First Untethered Spacewalk

Here’s something really wonderful. [Dave Akerman] wrote up the results of his attempt to use a high-altitude balloon to try to re-create a famous image of NASA’s Bruce McCandless floating freely in space with the Earth in the background. [Dave] did this in celebration of the 34th anniversary of the first untethered spacewalk, even going so far as to launch on the same day as the original event in 1984. He had excellent results, with plenty of video and images recorded by his payload.

80’s “Astronaut with MMU” model kit.

Adhering to the actual day of the spacewalk wasn’t the only hurdle [Dave] jumped to make this happen. He tracked down an old and rare “Astronaut with MMU” (Mobile Maneuvering Unit) plastic model kit made by Revell USA and proceeded to build it and arrange for it to remain in view of the cameras. Raspberry Pi Zero Ws with cameras, LoRA hardware, action cameras, and a UBlox GPS unit all make an appearance in the balloon’s payload.

Sadly, [Bruce McCandless] passed away in late 2017, but this project is a wonderful reminder of that first untethered spacewalk. Details on the build and the payload, as well as the tracking system, are covered here on [Dave]’s blog. Videos of the launch and the inevitable balloon burst are embedded below, but more is available in the summary write-up.

Continue reading “Plastic Model Emulates The First Untethered Spacewalk”

Spectre And Meltdown: How Cache Works

The year so far has been filled with news of Spectre and Meltdown. These exploits take advantage of features like speculative execution, and memory access timing. What they have in common is the fact that all modern processors use cache to access memory faster. We’ve all heard of cache, but what exactly is it, and how does it allow our computers to run faster?

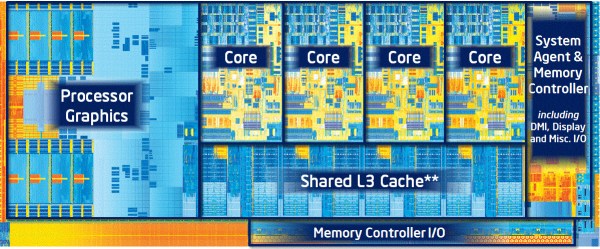
In the simplest terms, cache is a fast memory. Computers have two storage systems: primary storage (RAM) and secondary storage (Hard Disk, SSD). From the processor’s point of view, loading data or instructions from RAM is slow — the CPU has to wait and do nothing for 100 cycles or more while the data is loaded. Loading from disk is even slower; millions of cycles are wasted. Cache is a small amount of very fast memory which is used to hold commonly accessed data and instructions. This means the processor only has to wait for the cache to be loaded once. After that, the data is accessible with no waiting.

A common (though aging) analogy for cache uses books to represent data: If you needed a specific book to look up an important piece of information, you would first check the books on your desk (cache memory). If your book isn’t there, you’d then go to the books on your shelves (RAM). If that search turned up empty, you’d head over to the local library (Hard Drive) and check out the book. Once back home, you would keep the book on your desk for quick reference — not immediately return it to the library shelves. This is how cache reading works.

Continue reading “Spectre And Meltdown: How Cache Works”