Photograph of a BLDC motor controller circuit board

Take A Ride Through The Development Of A Custom BLDC Motor Controller

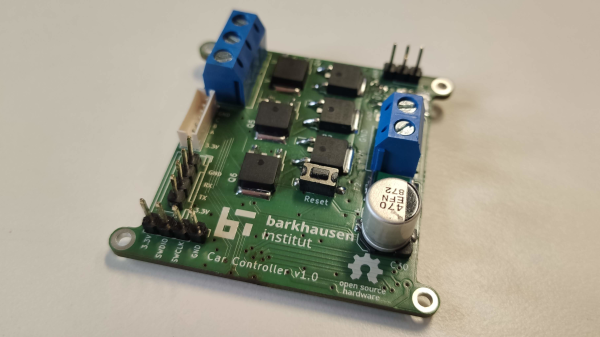
The folks over at the [Barkhausen Institut] are doing research into controlling autonomous fleets of RC cars and had been using off the shelf electronic speed controllers (ESCs) to control the car motors. Unfortunately they required more reliable feedback for closed loop control of the motors, so they created their own open source hardware brushless DC (BLDC) controller.

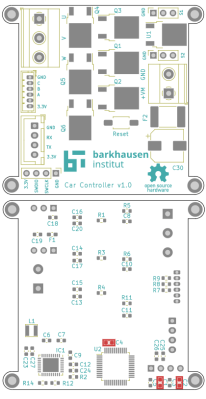
The motor controller they developed uses an STM32 microcontroller that talks to a TMC6140 3 phase MOSFET driver to drive 6 IRLR 2905 MOSFETs. The [Barkhausen Institut] researchers went with the SimpleFOC library as the basis to program the STM32, with installed hall effect sensors indicating motor orientation for their closed loop control.

Designing a functioning BLDC and ESC controllers can be subtle, and their post goes into details about the problems and solutions they came up with to deal with with what was ultimately improper isolation of the MOSFETs interfering with the power rail for the STM32. The source for their BLDC motor controller is available through their GitLab page. For more information on the parent project that uses the BLDC driver, be sure to check out their work on a connected convoy of RC cars.

There’s now a wealth of open source BLDC drivers and projects, many of which we’ve featured in the past, like the Moteus and haptic smart knob, and it’s nice to see other projects explore different options.

DIY TV-B-Gone Is A-OK

Where won’t they put a TV these days? We’ve even seen one creeping behind semi-transparent mirror film in the ladies’ room of a sports bar, though that one didn’t last long. Up until that moment, we had never wished so hard for a TV-B-Gone, especially one as small and powerful as this DIY version by [Shane].

The best thing about [Shane]’s DIY TV-B-Gone is the strength of signal, though the size is nothing to sneeze at. That’s a 10-watt array or IR LEDs out of a security camera, and you can see how much brighter it is than a single IR LED in the video after the break.

Packed inside this minty enclosure is an Arduino Nano, which holds all the TV power-off codes known to hackers and fires them off in quick succession. [Shane] salvaged a MOSFET from an electronic speed controller to drive that LED array, and there’s a voltage booster board to raise the 3.7V lithium battery to 5V. [Shane] hasn’t really had the chance to test this out in public what with the global pandemic and all, but was able to verify a working distance of 40 feet inside the house.

Don’t care for such a raw look? Hide your zapper inside a toy, like this sonic screwdriver version.

Continue reading “DIY TV-B-Gone Is A-OK”

Negative Voltage Pushes AVR To New Heights

If we say that a hacker is somebody who looks at a “solved” problem and can still come up with multiple alternative solutions, then [Charles Ouweland] absolutely meets the grade. Not that we needed more evidence of his hacker cred given what we’ve seen from him before, but he recently wrote in to tell us about an interesting bit of problem solving which we think is a perfect example of the principle. He wanted to drive a salvaged seven segment LED display with an AVR microcontroller, but there was only one problem: the display needs 15V but the AVR is only capable of 5V. So what to do?

As it turns out, the first step to solving the problem was verifying there was actually a problem to begin with. [Charles] did some experimentation and found that the display didn’t actually need 15V to operate, and in fact would light up well enough at just 6.5V. This lowered the bar quite a bit, but it was still too high to power directly from the chip.

There were a few common ways to solve this problem, which no doubt the Hackaday reader is well aware of. But [Charles] wanted to take the path less traveled. More specifically, the path with the least amount of additional components he had to put on his PCB. He set out to find the absolute easiest way to make his 5V AVR light up a 6.5V LED, and ended up coming with a very clever solution that some may not even know is possible.

He reasoned that if he connected the source pins of two BS170 MOSFETs to a voltage of -1.5V, even when the AVR pin was 0V, they would be still be receiving 1.5V. This virtual “step ladder” meant that once the AVR’s pin goes high (5V), the relative voltage would actually be 6.5V and enough to drive his LEDs. Of course the only problem with that is that you need to have a source for -1.5V.

Getting a negative voltage would normally require adding more components to the design (which he set out to avoid in the first place), but then he came up with another clever idea. To pull the trick off, he actually feeds the AVR 6.5V, but raises the ground voltage by 1.5V with the addition of two 1N4007 diodes. This way the AVR gets a voltage within its capabilities and still can provide a relative 6.5V to the LEDs.

One might say [Charles] took the Kobayashi Maru approach, and simply redefined the rules of the game. But such is the power of the confounding negative voltage.

Modified Uke Keeps The Beat With A Solenoid

A classic one-man band generally features a stringed instrument or two, a harmonica in a hands-free holder, and some kind of percussion, usually a bass drum worn like a backpack and maybe some cymbals between the knees. The musician might also knock or tap the sound-boards of stringed instruments percussively with their strumming hand, which is something classical and flamenco guitarists can pull off with surprising range.

The musician usually has to manipulate each instrument manually. When it comes to percussion, [JimRD] has another idea: keep the beat by pounding the soundboard with a solenoid. He built a simple Arduino-driven MOSFET circuit to deliver knocks of variable BPM to the sound-board of a ukulele. A 10kΩ pot controls the meter and beat frequency, and the sound is picked up by a mic on the bridge. So far, it does 3/4 and 4/4 time, but [JimRD] has made the code freely available for expansion. Somebody make it do 5/4, because we’d love to hear [JimRD]  play “Take Five“.

He didn’t do this to his good uke, mind you—it’s an old beater that he didn’t mind drilling and gluing. We were a bit skeptical at first, but the resonance sweetens the electromechanical knock of the solenoid slug. That, and [JimRD] has some pretty good chops. Ax your way past the break to give it a listen.

Got a cheap ukulele but don’t know how to play it? If you make flames shoot out from the headstock, that won’t matter as much. No ukes? Just print one.

Continue reading “Modified Uke Keeps The Beat With A Solenoid”

Swimming Pool Dance Floor Enlightened With Leds

In a well documented blog entry, [Loren Bufanu] presents a project that lit up a glass dance floor covering a swimming pool with RGB strips. We mentioned a video of his project in a Hackaday links but didn’t have any background information. Now we do.

boards in boxThe project took around 450 meters of RGB strips controlled by two Rainbowduinos and driven by sixty-four power Mosfets, sixty-four bipolar transistors, and a few other components. Producing white light from the LEDs draws 8 amps from the power supply.

The Rainbowduino is an ATmega328 Arduino compatible board with two MY9221 controllers. Each  controller handles 12 channels of Adaptive Pulse Density Modulation. In other words, it makes the LEDs flash nicely. [Loren] used the Rainbowduino instead of some alternatives because multiple R’duinos can coordinate their activities over I2C.

The software part of the project did not work as well as the hardware. The light patterns were supposed to follow the music being played. A PC software package intended to drive the R’duinos produced just a muddy mess. Some kludges, including screen captures (!), driven by a batch file tamed the unruliness.

It’s been awhile, but a similar disco dance floor, built by [Chris Williamson] but not over a pool, previously caught our attention. [Chris] is a principle in Terror Tech that recently got a mention on Sparkfun.

The video after the break fortunately does not make a big splash, but is still electrifying.

Continue reading “Swimming Pool Dance Floor Enlightened With Leds”

Learning From Transparent Microchips

Microchips and integrated circuits are usually treated as black boxes; a signal goes in, and a signal goes out, and everything between those two events can be predicted and accurately modeled from a datasheet. Of course, the reality is much more complex, as any picture of a decapped IC will tell you.

[Jim Conner] got his hands on a set of four ‘teaching’ microchips made by Motorola in 1992 that elucidates the complexities of integrated circuitry perfectly: instead of being clad in opaque epoxy, these chips are encased in transparent plastic.

The four transparent chips are beautiful works of engineering art, with the chip carriers, the bond wires, and the tiny square of silicon all visible to the naked eye. The educational set covers everything from resistors, n-channel and p-channel MOSFETS, diodes, and a ring oscillator circuit.

[Jim] has the chips and the datasheets, but doesn’t have the teaching materials and lab books that also came as a kit. In lieu of proper pedagogical technique, [Jim] ended up doing what any of us would: looking at it with a microscope and poking it with a multimeter and oscilloscope.

While the video below only goes over the first chip packed full of resistors, there are some interesting tidbits. One of the last experiments for this chip includes a hall effect sensor, in this case just a large, square resistor with multiple contacts around the perimeter. When a magnetic field is applied, some of the electrons are deflected, and with a careful experimental setup this magnetic field can be detected on an oscilloscope.

[Jim]’s video is a wonderful introduction to the black box of integrated circuits, but the existence of clear ICs leaves us wondering why these aren’t being made now. It’s too much to ask for Motorola to do a new run of these extremely educational chips, but why these chips are relegated to a closet in an engineering lab or the rare eBay auction is anyone’s guess.