A wooden digital clock with a metal knob on one end

Hackaday Prize 2023: Stretch Your Day With This 29-Hour Clock

Modern life can be stressful. Many of us struggle to balance work, family, exercise, and an ever-growing list of hacking projects, all of which claim our attention during the day. If you sometimes feel that those 24 hours just don’t cut it, you might be in luck: [HIGEDARUMA] has built a clock that can stretch your day by up to five hours.

Sadly, [HIGEDARUMA] hasn’t invented time travel (yet). What his clock does instead is slow down its own pace in the evening to push back the midnight hour. When it finally does reach 12:00 a.m., the clock’s pace is accelerated to ensure it’s back in sync with the rest of the world by six in the morning. It might seem silly, but there is a certain logic to it: [HIGEDARUMA] explains that evenings felt much longer when he was a child and that he would like to try and experience that again. Our sense of time may change over our lifetime, even if the actual passage of time doesn’t.

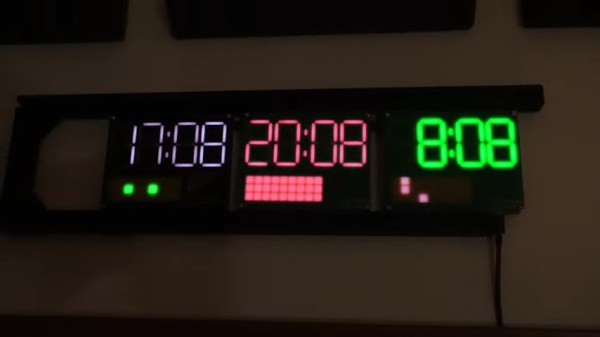
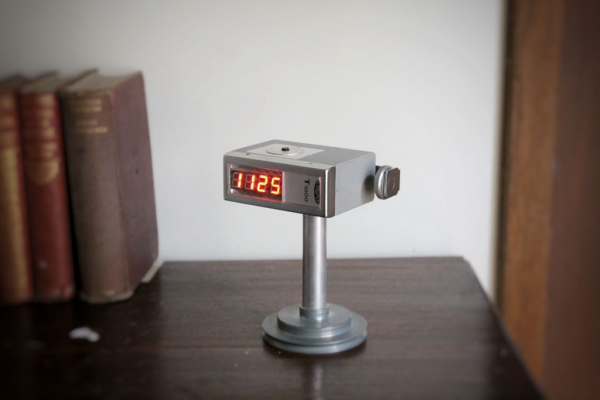
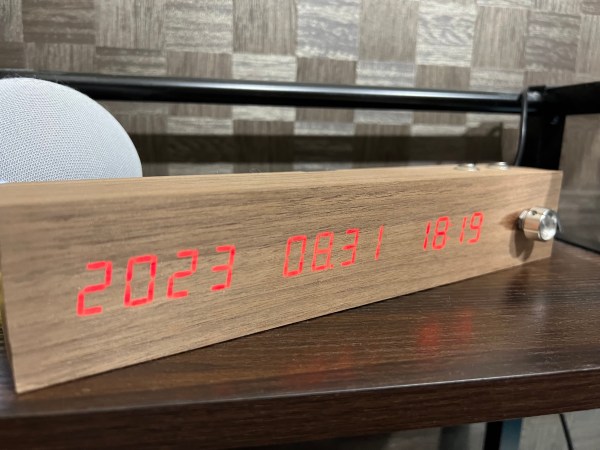
Timescales aside, the 29-hour clock is a neat piece of work from a hardware point of view. The case is made from 4 mm laser-cut MDF with wood-grain foil on the outside. Inside, there’s an ESP32 to run the show, along with an RTC module and three four-digit seven-segment LED displays. A chunky “volume” knob on the front lets you choose how much you’d like your day to be stretched.

We’ve seen clocks with non-linear dials before, as well as extremely linear ones, but this might be the first one with a non-constant pace. It makes us wonder what the passage of time feels like for those frozen in ice for 46,000 years.

Continue reading “Hackaday Prize 2023: Stretch Your Day With This 29-Hour Clock”

Triple Zone Clock Tells Time In Style

Although the cutoff for saying ‘Happy New Year’ is somewhere around today, there’s still plenty of time to reminisce about 2022 and all that we accomplished. Hackaday alum [Jeremy Cook] spent much of last year designing and building a triple-zone PCB clock, dubbed the 742 clock. It is called so because of all the 7-segments, and then 42 from the height in millimeters of each PCB. Also because it’s 24 backwards, and if we may be so bold, because 42.

If this looks familiar, it’s because we covered the single-panel version a few months ago. Much like that one, the triple time zone clock is controlled by a single Wemos D1 mini, and the other two panels are chained to the primary board. This version has a frame made of 20/20 extrusion with nice 3D printed caps on the ends to finish off the look.

As with the single-panel clock, this one uses bared-FR4 PCBs to diffuse the LEDs, and the effect looks really nice. We particularly like the capacitive corners that control the clock and the colors, which change throughout the day when left to their own devices. Be sure to check out the build video after the break.

Are you really into LEDs? Consider building a Berlin clock.

Continue reading “Triple Zone Clock Tells Time In Style”

What’s Cooler Than A 7-Segment Display? A 7200-Segment Display!

If you look around your desk right now, odds are you’ll see a 7-segment display or two showing you some vital information like the time or today’s weather. But think of how much information you could see with over 1,100 digits, like with [Chris Combs’] 7200-segment display.

For [Chris], this project started the same way that many of our projects start; finding components that were too good of a deal to pass up on. For just “a song or two plus shipping”, he was the proud owner of two boxes of 18:88 7-segment displays, 500 modules in total. Rather than sitting and using up precious shelf space, [Chris] decided to turn them into something fancy he could hang on the wall.

the 7200 segment display grayscaling to show the time
The IS31FL3733 can produce 8 levels of dimming 8-bit PWM, allowing [Chris] to display in grayscale
The first challenge was trying to somehow get a signal to all of the individual segments. Solutions exist for running a handful of displays in one device, but there are certainly no off-the-shelf solutions for this many. Even the possible 16 addresses of the IS31FL3733 driver IC [Chris] chose for this project were not enough, so he had to get creative. Fearing potential capacitance issues with simply using an i2C multiplexer, he instead opted to run 3 different i2C busses off of a Raspberry Pi 4, to interface with all 48 controllers.

The second challenge was how to actually wire everything up. The finished display comes out to 26 inches across by 20.5 inches tall, much too large for a single PCB. Instead, [Chris] opted to design a series of self-contained panels, each with 6 of the display modules and an IS31FL3733 to drive them. While the multiplexing arrangement did leave space for more segments on each panel, he opted to go for this arrangement as it resulted in a nice, clean, 4:3 aspect ratio for the final display.

The end result was a unique and beautiful piece, which Chris titled “One-to-Many”. He uses it to display imagery and art related to the inevitability of automation, machines replacing humans, and other “nice heartwarming stuff like that”, as he puts it. There’a video after the break, but if you are interested in seeing the display for yourself, it will be on display at the VisArt’s Concourse Gallery in Rockville, MD from September 3 to October 17, 2021. More info on [Chris’s] website.

This isn’t [Chris’s] first adventure in using 7-segment displays in such a unique way, click here to read about the predecessor to this project that we covered last year.

Continue reading “What’s Cooler Than A 7-Segment Display? A 7200-Segment Display!”

Servo-Powered 7-Segments Choreograph This Chronograph

Good clocks are generally those that keep time well. But we think the mark of a great clock is one that can lure the observer into watching time pass. It doesn’t really matter how technical a timepiece is — watching sand shimmy through an hourglass has its merits, too. But just when we were sure that there was nothing new to be done in the realm of 7-segment clocks, [thediylife] said ‘hold my beer’ and produced this beauty.

A total of 28 servos are used to independently control four displays’ worth of 3D-printed segments. The servos pivot each segment back and forth 90° between two points: upward and flat-faced to display the time when called upon, and then down on its side to rest while its not needed.

Circuit-wise, the clock’s not all that complicated, though it certainly looks like a time-consuming build. The servos are controlled by an Arduino through a pair of 16-channel servo drivers, divided up by HH and MM segments. The Arduino fetches the time from a DS1302 RTC module and splits the result up into four-digit time. Code-wise, each digit gets its own array, which stores the active and inactive positions for each servo. Demo and full explanation of the build and code are waiting after the break.

When it comes to 7-segment displays, we say the more the merrier. Here’s a clock that uses pretty much all of them.

Continue reading “Servo-Powered 7-Segments Choreograph This Chronograph”

Make A Vintage-Looking Clock In A Flash

Now that everyone has a phone with a camera, we would bet that fewer people than ever are in the market for a nice vintage flash unit such as the one [lonesoulsurfer] chose for this cool clock build. But here’s something that never goes out of style — a clock that doubles as a conversation piece.

At the heart of this build is a dirt cheap clock unit meant for cars. It also displays the ambient temperature and has a voltage testing mode(!), which could come in handy someday. Although [lonesoulsurfer] didn’t connect a pair of probes, he did cut a wee hole for the temperature sensor to stick out of. He also cut off the SMD buttons and wired new momentaries to the outside of the case.

Although we really like the look of the textured plastic lens over the 7-segments, our favorite part might be the stand and the way [lonesoulsurfer] implemented it. He made a threaded rod by pounding a hex nut into the end of a piece of aluminium tubing, and then dropped a bolt through the bottom of the flash body before closing it up, so it screws on like a camera to a tripod. Take a second and check out the build video after the break.

We love a good clock so much that we just had a contest to find the coolest ways to tell time. In case you missed it, here are the best of the best.

Continue reading “Make A Vintage-Looking Clock In A Flash”

Measure Your YouTube Importance

How do you hack your motivation? Do you put red marker Xs on a paper calendar every day you exercise? Do you use an egg timer to sprint through dozens of emails? Do you lock all the doors and shut off your data to write some bulletproof code? If you are [Hulk], you build a YouTube Desktop Notifier showing his YouTube subscribers and views. This is his ticket to getting off the couch to make a video about just such a device. There is something poetic about building a mechanism to monitor its own success making a feedback loop of sorts. The Hackaday.io page follows the video, so anyone who wants to build their own doesn’t have to scribble notes while pausing the video which is also posted below the break.

The hardware list is logical, starting with a NodeMCU module programmed through the Arduino IDE. Addressable 7-segment displays show the statistics in red, but you can sub in your preferred color with the back-lighting LEDs. It should be possible to share the CLK pins on the displays if you are important enough to need more digits. [Hulk] already outlined a list of improvements including switching to addressable backlights and adding daily and monthly tracking.

Monitoring online values without a computer monitor is satisfying on a level because it shows what motivates us, whether that is Bitcoin or the weather.

Continue reading “Measure Your YouTube Importance”

Internal 7-segment PS3 Display

[Zach] sent in his temperature controller and display for PS3, and even though it only works with a PS3 fat, we like our PS2 backwards compatibility very much, thank you.

The build stated off with [Zach] putting thermal sensors on the CPU, the RSX, and Northbridge of his PS3. After starting out controlling the fan with his laptop, he moved on to an integrated fan and display controller after seeing this post about a ‘hidden display.’ In the end, one of the coolest looking PS3 mods we’ve ever seen was born.

The build runs off an Arduino Pro that gets the temperatures from the sensors, prints everything to a custom 7-segment display board, and controls the fan. [Zach] thankfully made the Arduino source available and also put up some board files if you’d like to make your own. It’s a pretty impressive build that’s completely invisible when the PS3 is powered off.

Continue reading “Internal 7-segment PS3 Display”