The Nuts And Bolts Of Nuts And Bolts

If you’re a mechanical engineer, the material covered in this video on the basics of bolted joints probably won’t cover any new ground. On the other hand, if you aren’t a mechanical engineer but still need to bring a little of that discipline to your projects, there’s a lot to learn here.

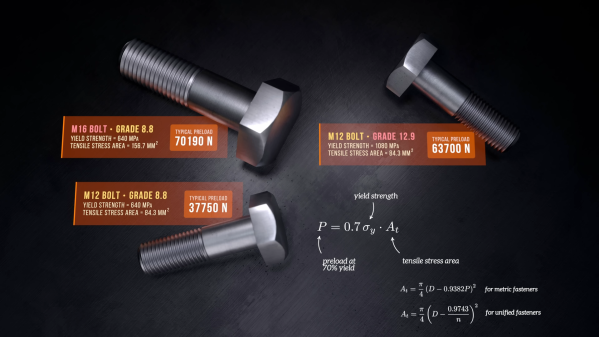
If there’s one takeaway lesson from [The Efficient Engineer]’s excellent examination of the strength of bolted joints, it’s the importance of preload. Preload is the tensile force created by tightening a bolt or a screw, which provides the clamping force that keeps the joined members together. That seems pretty self-obvious, but there’s more to the story, especially with joints that are subject to cycles or loading and unloading. Such joints tend to suffer from fatigue failure, but proper preloading on the bolts in such a joint mitigates fatigue failure because the bolts are only taking up a small fraction of the total cyclical force on the joint. In other words, make sure you pay attention to factory torque specs.

Continue reading “The Nuts And Bolts Of Nuts And Bolts”

Automatic Nut Sorter For A Tidy Workspace

We all have that one drawer or box full of random hardware. You don’t want to get rid of anything because as soon as you do, that’s the one thing you’ll need. But, honestly, you’ll be lucky to find what you need in there, anyway. Enter  [Mr. Innovative’s] nut sorting machine. As you can see in the video below, it will make order out of the chaos, at least for nuts.

You might think the device would need optical recognition software or some other high-tech mechanism. But, in fact, it is nothing more than a motor with a speed controller. The sorting is done by a plastic piece built like stairs. When a nut is too tall to fit under the next step, it slides out into the output hopper. You could probably turn the whole thing with a crank and no electricity at all if you wanted to.

Drilling out the shaft required a bit of machine tool usage, so this might not be a great weekend project without a lathe. Like many of the commenters on the video mentioned, we probably wouldn’t have used a rod holder as a rotating bearing, either, but for as little as something like this would probably operate, it is likely to last a fair amount of time. It would be easy to replace it or even affix a shaft to the motor with a coupler, sidestepping several issues.

Apparently, the device isn’t perfect. You do get some missorts. We imagine that’s from a larger nut pushing a smaller nut on the way to the hopper. The Thingiverse files seem to be missing, but this is something you’d probably adapt to your own design, anyway.

It isn’t as automated, but we’ve seen a gadget that can help sort drill bits, too. Sometimes you want to sort little parts by color, too.

Continue reading “Automatic Nut Sorter For A Tidy Workspace”

Ask Hackaday: What’s In Your Fastener Bin?

A Saturday afternoon. The work week was done, the household chores were wrapped up, and with almost a week left until Christmas, there was just enough wiggle room to deny that there was still a ton of work left to prepare for that event. It seemed like the perfect time to escape into the shop and knock out a quick project, one that has been on the back burner since at least March. I’m nothing if not skilled in the ways of procrastination.

This was to be a simple project — adding an aluminum plate to a plastic enclosure that would serve as an antenna entry point into my shack. Easy as pie — cut out an rectangle of aluminum, cut and drill a few holes, call it a day. Almost all of my projects start out that way, and almost every time I forget that pretty much every one of those builds goes off the rails at exactly the same point: when I realize that I don’t have the fasteners needed. That’s what happened with this build, which had been going swimmingly up to that point — no major screw-ups, no blood drawn. And so it was off to the hardware store I trundled, looking for the right fasteners to finish the job.

Finding hardware has long been where my productivity goes to die. Even though I live a stone’s throw from at least half a dozen stores, each with a vast selection of hardware and most open weekends and nights, the loss of momentum that results from changing from build-mode to procure-mode has historically been deadly to my projects. I’m sure I’m not the only one who has run into this issue, so the question is: what can a hacker do to prevent having to run out for just the right fasteners?

Continue reading “Ask Hackaday: What’s In Your Fastener Bin?”

Printed It: Collet Drill Stop

You’d think that being quarantined in your home would be perfect for hackers and makers like us, as we all have a project or two that’s been sitting on the back burner because we didn’t have the time to tackle it. Unfortunately, some are finding that the problem now is actually getting the parts and tools needed to do the job. When there’s a bouncer and a line outside the Home Depot like it’s a nightclub on Saturday night, even the simplest of things can be difficult to source when making in the time of COVID.

Which is exactly the situation I found myself in recently when I needed to drill a bunch of holes to the same depth. The piece was too big to put in the drill press, and while I contemplated just wrapping the bit in some tape to serve as a makeshift stop, I wasn’t convinced it would be accurate or repeatable enough. It occurred to me that a set of drill stop collars would be easy enough to design and 3D print, but before I fired up OpenSCAD, I decided to see what was already available online.

Which is how I found the “Collet Drill Stop” from Adam Harrison. Rather than the traditional ring and setscrew arrangement, his design uses a printable collet that will clamp down on the bit at an arbitrary position without tools. So not only could I avoid a trip to the store by printing this design out, it looked like it would potentially be an upgrade over what I would have bought.

Of course, it’s wise not to take anything for granted when dealing with 3D printing. The only way I could be sure that Adam’s design would work for me was to commit it to plastic and try it out.

Continue reading “Printed It: Collet Drill Stop”

Mechanisms: The Screw Thread

They hold together everything from the most delicate watch to the largest bridge. The world is literally kept from coming apart by screws and bolts, and yet we don’t often give a thought to these mechanisms. Part of that is probably because we’ve gotten so good at making them that they’re seen as cheap commodities, but the physics and engineering behind the screw thread is interesting stuff.

We all likely remember an early science lesson wherein the basic building blocks of all mechanisms laid out. The simple machines are mechanisms that use an applied force to do work, such as the inclined plane, the lever, and the pulley. For instance, an inclined plane, in the form of a splitting wedge, directs the force of blows against its flat face into a chunk of wood, forcing the wood apart.

Screw threads are another simple machine, and can be thought of as a long, gently sloped inclined plane wrapped around a cylinder. Cut a long right triangle out of paper, wrap it around a pencil starting at the big end, and the hypotenuse forms a helical ramp that looks just like a thread. Of course, for a screw thread to do any work, it has to project out more than the thickness of a piece of paper, and the shape of the projection determines the mechanical properties of the screw.

Continue reading “Mechanisms: The Screw Thread”

Custom Threaded Inserts For 3D Printing

There’s a variety of ways to add threaded holes to 3D printed objects. You can tap a hole, but the plastic isn’t always strong enough. Nut traps work, but aren’t very attractive and can be difficult to get exactly the right size. If you try to enclose them, you have to add a manual step to your printing process, too. You can buy threaded inserts (see video below) but that means some other piece of hardware to have to stock in your shop.

[PeterM13] had a different idea: Cut a piece of threaded stock, put nuts on the end and heat it up to let the nuts reform the plastic. This way the nut traps wind up the perfect size by definition. He used two nuts aligned and secured with thread locker. Then he used a hot air gun to only heat the metal (so as to reduce the chance of deforming the actual part). Once it was hot (about 15 seconds) he pulled the nuts into the open hole, where it melted the plastic which grips the nuts once cooled again.

Continue reading “Custom Threaded Inserts For 3D Printing”