Exploring Woodworking Mysteries With Strain Gauges And Raspberry Pi

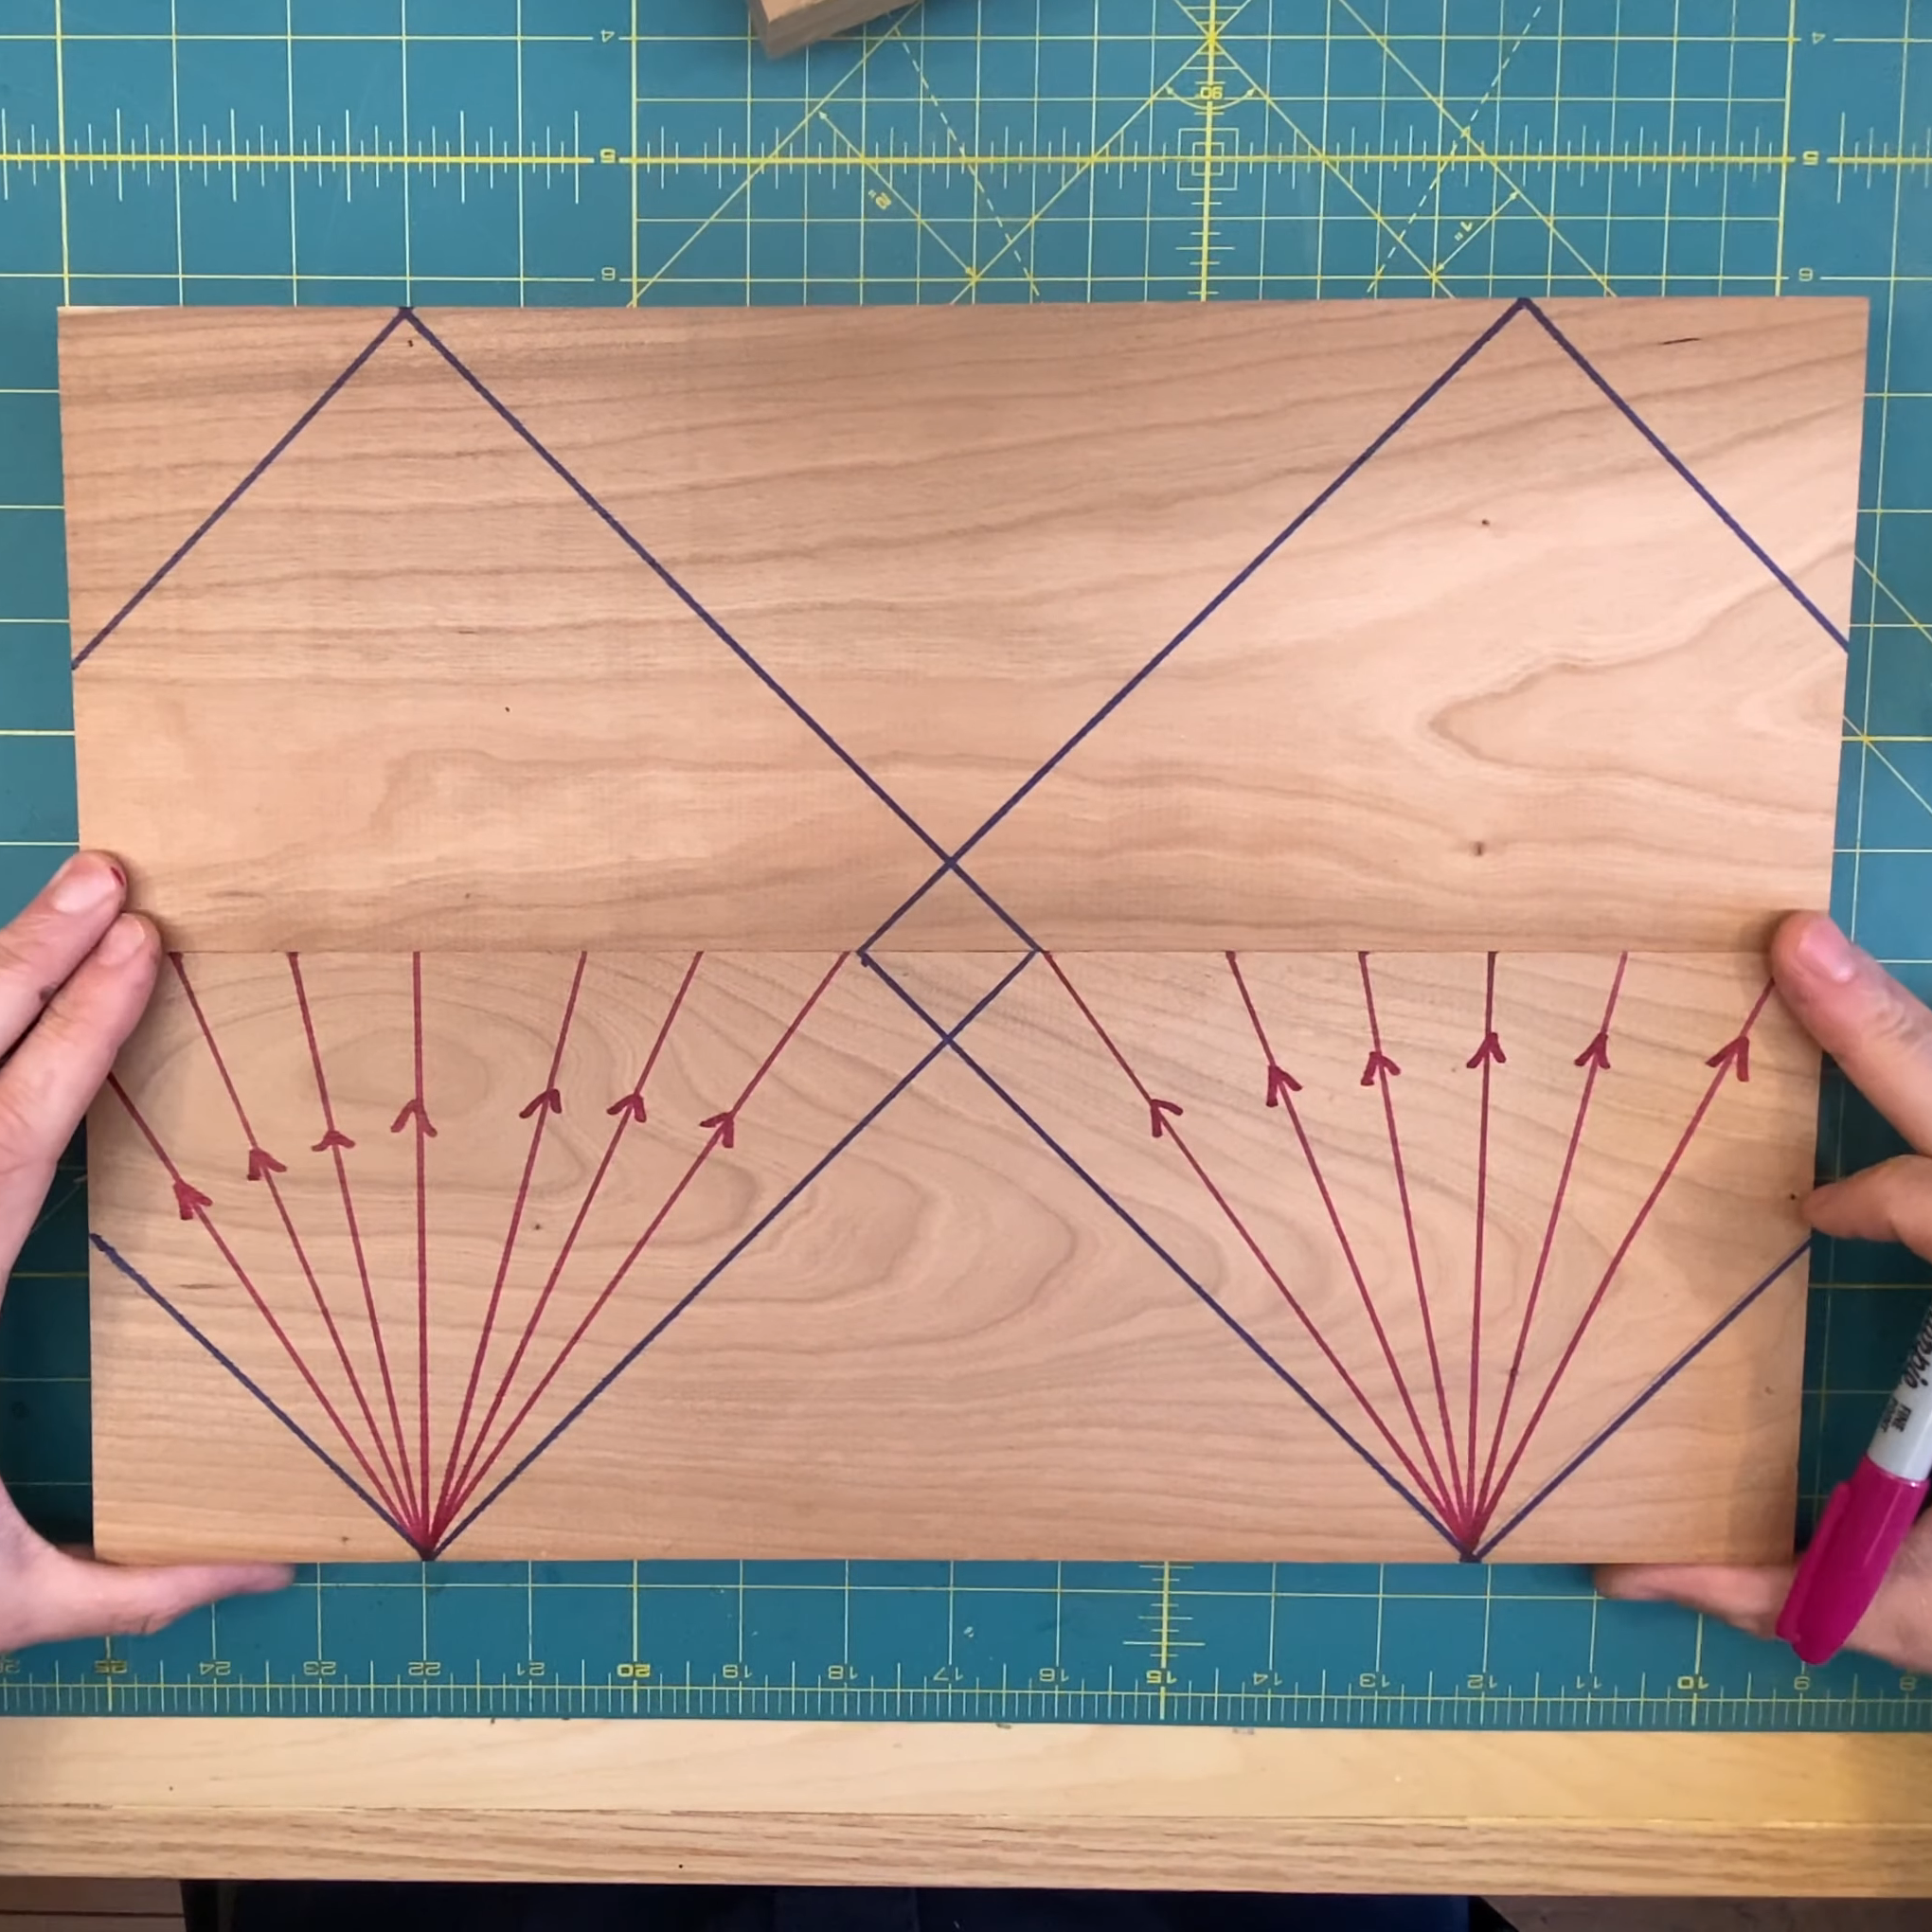
If you’re not a woodworker, you might not have heard of the “45-degree rule.” It goes like this: a clamp exerts a force that radiates out across a triangular region of the wood that forms a right angle — 45 degrees on each side of the clamp’s point of contact. So, to ensure that force is applied as evenly as possible across the entire glue joint, clamps should be spaced so that these force triangles overlap. It’s a handy rule, especially for the woodworker looking to justify the purchase of more clamps; you can never have too many clamps. But is it valid?

Myth busted?

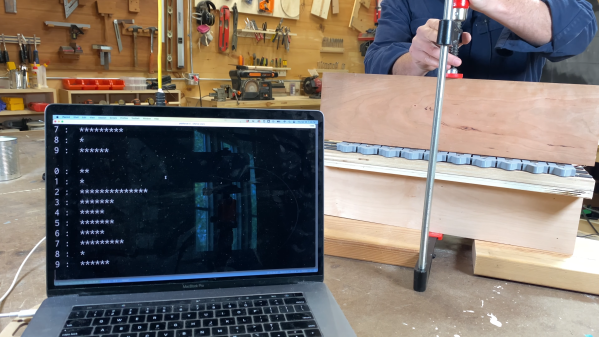
The short answer that [ari kardasis] comes up with in the video below is… sort of. With the help of a wonderfully complex array of strain gauges and a Raspberry Pi, he found that the story isn’t so simple. Each strain gauge lives in a 3D printed bracket that spaces the sensors evenly along the wood under test, with a lot of work going into making the test setup as stiff as possible with steel reinforcement. There were some problems with a few strain gauges, but once he sorted that out, the test setup went into action.

[ari] tested clamping force transmission through pieces of wood of various widths, using both hardwoods and softwoods. In general, he found that the force pattern is much broader than the 45-degree rule suggests — he got over 60 degrees in some cases. Softwoods seemed to have a somewhat more acute pattern than hardwoods, but still greater than the rulebook says. At the end of the day, it seems like clamp spacing of two board widths will suffice for hardwoods, while 1.5 or so will do for softwoods. Either way, that means fewer clamps are needed.

A lot of woodworking is seat-of-the-pants stuff, so it’s nice to see a more rigorous analysis like this. It reminds us a lot of some of the experiments [Matthia Wandel] has done, like load testing various types of woods and glues.

Continue reading “Exploring Woodworking Mysteries With Strain Gauges And Raspberry Pi”

Custom Macro Keyboard Looks Good In Wood

There’s more than one way to make a mechanical macro pad, and this wooden wonder represents one of our favorites. [Tauno Erik] had an old rubber dome rectangle keyboard lying around that still worked, but the poor thing was missing some of its caps. After salvaging the controller, [Tauno Erik] got to work on the tedious task of figuring out the mapping of the matrix, which was made easier with a Python script.

Almost every component of this beauty is wood, including the mounting plate and those thicc and lovely keycaps — their top layer is solid oak, and the bottom bit is birch plywood. In order to interface the ‘caps with the switches, [Tauno Erik] designed and printed connector pieces that sit inside the extra large keycaps and accept the stems of the key switches.

Speaking of switches, we’re not sure if [Tauno Erik] ended up using Cherry green switches, browns, or a mix of both (that would be interesting), but each one is mounted on a custom PCB along with a diode and a pull-up resistor. You can see more build pictures at [Tauno Erik]’s site, and stick around for a visual tour of the completed build after the break.

Wood is a great choice for keycaps, and we imagine they’ll only look better with age and use. A more common use for wood on a keyboard build is in surprisingly comfortable wrist rests.

DIY Grader Box + Rocks = No Need For Shocks

Between the mini bike and the nearby woods, [HowToLou] has a lot for the rest of us to be envious of. Unfortunately, the terrain on the dirt path is too bumpy and uneven for a nice ride. But rather than spend hundreds to buy or rent an official grader box, [Lou] looked at his riding mower and said, I can do that myself (YouTube, embedded below).

This grader box is made from a heavy-duty oak pallet, plus a piece of particle board to complete the rocks box. [Lou] hooks up tow straps to the hooks and drags it behind the riding mower a few times to get the path nice and even. The line of lag bolts busts up the bumps, and the boards smooth out the surface under the weight of several large rocks. We think the result looks great, and doubt that [Lou] could have done any better with a fancy grader box. Check it out in action after the break.

Don’t have a riding mower? This is a pretty good excuse to buy one, but if that’s not in the cards, maybe you could build something suitable out of plywood and bike parts.

Continue reading “DIY Grader Box + Rocks = No Need For Shocks”

Solid Oak Arcade Cabinet: When Particle Board Won’t Do

Having an arcade cabinet of one’s own is a common dream among those who grew up during the video game arcade heyday of the 80s and early 90s. It’s a fairly common build that doesn’t take too much specialized knowledge to build. This cabinet, on the other hand, pulled out all of the stops for the cabinet itself, demonstrating an impressive level of woodworking expertise.

The cabinet enclosure is made with red oak boards, which the creator [Obstreperuss] sawed and planed and then glued together to create the various panels (more details are available on his Imgur album). The Mario artwork on the sides and front aren’t just vinyl stickers, either. He used various hardwoods cut into small squares to create pixel art inlays in the oak faces. After the fancy woodwork was completed, the build was finished out with some USB arcade controllers, a flat-panel screen, and a Raspberry Pi to run the games.

While the internals are pretty standard, we have to commend the incredible quality of the woodworking. It’s an impressive homage to classic arcade machines and we wouldn’t mind a similar one in our own homes. If you’re lacking the woodworking equipment, though, it’s possible to get a refined (yet smaller) arcade cabinet for yourself with a 3D printer instead.

Continue reading “Solid Oak Arcade Cabinet: When Particle Board Won’t Do”

Wood And Carbon Rods Used For This Handsome And Effective Microphone

Anyone who was active in the phreaking scene or was even the least bit curious about the phone system back in the Ma Bell days no doubt remembers the carbon capsule microphone in the mouthpiece of many telephone handsets. With carbon granules sandwiched between a diaphragm and a metal plate, they were essentially sound-driven variable resistors, and they worked well enough to be the standard microphone for telephony for decades.

In an attempt to reduce complicated practices to their fundamentals, [Simplifier] has undertaken this surprisingly high-fidelity carbon microphone build that hearkens back to the early days of the telephone. It builds on previous work that was more proof of concept but still impressive. In both builds, the diaphragm of the microphone is a thin piece of wood, at first carved from a single block of softwood, then later improved by attaching a thin piece of pine to a red oak frame. The electrical side of the mic has four carbon rods running from the frame to the center of the diaphragm, where they articulate in a carbon block with small divots dug into it. As the diaphragm vibrates, the block exerts more or less pressure on the rods, varying the current across the mic and reproducing the sound. It works quite well, judging by the video after the break.

Congratulations to [Simplifier] for another great build and top-notch craftsmanship. We’ve seen homebrew vacuum tubes, conductive glass, and solar cells from him before, which sort of makes him the high-tech version of Primitive Technology. We’re looking forward to whatever comes next. Continue reading “Wood And Carbon Rods Used For This Handsome And Effective Microphone”

Home-Brew CNC Router Mills A Wooden Mouse

First off, we’ll admit that there no real practical reason for wanting a wooden mouse – unless of course the cellulose rodent in question is the one that kicked it all off in “The Mother of All Demos” fifty years ago. Simply putting a shell around the guts of a standard wireless optical mouse is just flexing, but we’re OK with that.

That said, [Jim Krum]’s design shows some impressive skills, both in the design of the mouse and the build quality of his machine. Starting with what looks like a block of white oak, [Jim] hogs out the rough shape of the upper shell and then refines it with a small ball-end mill before flipping it over to carve the other side. His registration seems spot on, because everything matches up well and the shell comes out to be only a few millimeters thick. The bottom plate gets the same treatment to create the complex shape needed to support the mouse guts and a battery holder. He even milled a little battery compartment cover. He used a contrasting dark wood for the scroll wheel and a decorative band to hold the top and bottom together and finished it with a light coat of sealer.

It’s a great look, and functional too as the video below reveals. We’ve seen a few other fancy mice before, like this wood and aluminum model or even one that would look at home on [Charles Babbage]’s desk.

Continue reading “Home-Brew CNC Router Mills A Wooden Mouse”

Custom Case Lends Retro Look To Smart TV

Refits of retro TVs and radios with the latest smart guts are a dime a dozen around Hackaday. And while a lot of these projects show a great deal of skill and respect for the original device, there’s something slightly sacrilegious about gutting an appliance that someone shelled out a huge portion of their paycheck to buy in the middle of the last century. That’s why this all-new retro-style case for a smart TV makes us smile.

GE 806 restored by Steve O'Bannon
1940s GE 806 restored by Steve O’Bannon

Another reason to smile is the attention to detail paid by [ThrowingChicken]. His inspiration came from a GE 806 TV from the 1940s, and while his build isn’t an exact replica, we think he captured the spirit of the original perfectly. From the curved top to the deep rectangular bezel, the details really make this a special build. One may quibble about not using brass for the grille like the original and going with oak rather than mahogany. In the end though, you need to work with the materials and tooling you have. Besides, we think the laser cut birch ply grille is pretty snazzy. Don’t forget the pressure-formed acrylic dome over the screen – here’s hoping that our recent piece on pressure-forming helped inspire that nice little touch.

This project was clearly a labor of love – witness the bloodshed after a tangle with a tablesaw while building the matching remote – and brought some life to an otherwise soulless chunk of mass-produced electronics.

[via r/DIY]