Going Mobile With Your Air Tools

airtank

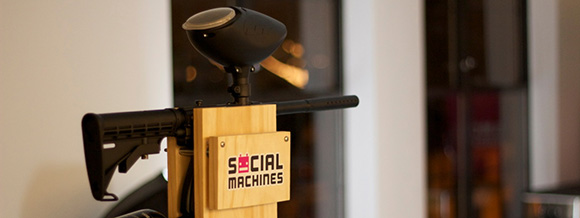
If you’ve ever worked with air tools outside of a shop setting, you know that lugging the air hose around can get more and more annoying the further away you are from the compressor. [headsplosive] posted a video (embedded after the break) showing how to go mobile with your air tools.

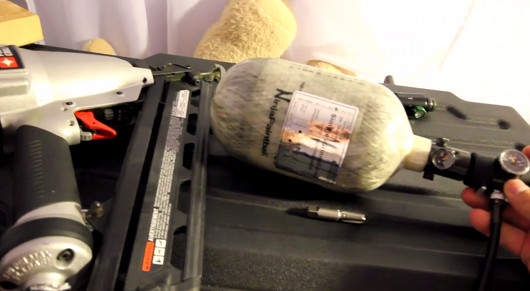
Air tanks made for paintball are high-pressure in a tiny space, and make a very convenient energy source. In this case, [headsplosive] used a 68 cubic inch, carbon fiber wrapped tank rated at 4500psi. The normal regulator only steps that pressure down to 800psi, so he added a second regulator to hit the 120-140psi that air tools need. He then attached a ‘remote line’, or a coiled high-pressure hose, and added a standard air tool coupler at the end.

The yield is pretty impressive. With a half-charge of the tank, he managed to drive 100 two-inch nails. [headsplosive] has a scuba tank handy, and uses that to recharge the paintball tank. He estimates a scuba tank will last you about 2000 shots from a nailer, and only costs about $7.50 to recharge. Not bad at all. We can’t help but wonder how long you’d get out of an air-powered cutoff wheel, or even a hammer drill. While the parts aren’t terribly cheap unless you buy them used, it will still pay for itself in convenience if you have the need.

Continue reading “Going Mobile With Your Air Tools”

Custom Driver Board For Paintball Gun

custom-driver-circuit-for-paintball

[Gabe’s] been wanting to do some embedded development for years, and his other hobby of playing paintball recently provided him with a test project. He’s been working on a custom driver board for his paintball gun.  Don’t be confused by the name, GCode is a mash-up of his name and the fact that he wrote the code for the project. It has nothing to do with the G Code CNC language.

At first this might seem like a trivial hack, but this Viking paintball gun has some serious velocity and throughput so he needs a reliable control that won’t just start shooting randomly. Another thing that [Gabe] took into consideration was monitoring the loading process to make sure the paintball is full seated before firing. All of this is handled by that tiny little Femtoduino board. it interfaces with the guns hardware using the connector board mounted above it.

There are several videos sprinkled throughout the build log. But we found the officially sanctioned 12.5 balls per second mode and the ridiculously fast auto-fire clips the most interesting. It should come in handy when on the run from paintball shotgun wielding opponents.

Continue reading “Custom Driver Board For Paintball Gun”

Hackaday Links: March 8, 2013

Cheap GPS modules

GPS

If you’re making a GPS-enabled project, you may have noticed the commonly available GPS modules are pretty expensive – usually around $50. Here’s one for $8. It’s a U-blox PCI-5S GPS receiver on a PCI Express card. There are test points for serial and USB data, though, so fitting this in your project is a breeze.

Grandfather clock makes a giraffe’s scarf

knit

Here’s a clock project from [Siren Elise Wilhelmsen]. Over the course of 365 days, the clock knits a giant, 2-meter tube of yarn that should be the perfect start for a half-dozen pairs of socks. No video for this, but if you find one, post a comment.

A huge hackerspace for Hotlanta

hotlanta

Atlanta is getting a new hackerspace. It’s called My Inventor Club and they’re starting to move into their space. Judging from [Scott]’s pictures of the new space it’s huge. We can’t wait for the video tour once they’re done moving in.

Ardino and Windows 8

arduino Uno eega

Windows 8 is… weird… and you can’t install unsigned drivers without a lot of rigamarole. This means installing the Arduino IDE is a pain but [Dany] has a solution. Reboot into “test mode” and you can install unsigned drivers without your computer throwing a hissy fit.

Tweet for welts and bruises

IMG_3293

[Zach]’s boss told him to come up with a Twitter-controlled paintball gun. Why he was asked to build this is beyond us, but the build is still cool. It’s powered by an Arduino and was built in just 12 hours. If only there was a video stream…

Hey guys, need some help here.

Alright, I’ve got a little problem with component sourcing. I’m making a ‘shield’ for the Raspberry Pi. Does anyone know where I can get really long female headers for the GPIO pins so the board will fit over the USB and Ethernet jacks? Here’s the project if you’re curious. I think the female part of the header needs to be 14mm high at least to fit over the USB port.

EDIT: Samtec ESQ-113-33-L-D. Here’s their site. This site is amazing. You can actually… find things. Completely unique experience here. Thank you, [Richard].

Sentry Gun Controller-board Upgrade

This open source sentry gun controller board builds on a great concept by getting rid of the Arduino board. The previous version was an Arduino shield, but this upgrade keeps all of the cool features by rolling the necessary parts into one smaller footprint.

The image above doesn’t quite convey the scope of the project. Go take a look at the feature from last year which used the shield version of the controller. That build used a servo-mounted paintball gun in conjunction with a webcam. You can still build the same platform, but use the open-source files to include this board. It has outputs for three servo motors, and can also interface with airsoft or paintball guns which have their own electronic triggers and integrated batteries.

We always like to see the schematic for projects like this one. For your convenience we exported an image from the Eagle package. You can find it, along with the demo video, after the break.

Continue reading “Sentry Gun Controller-board Upgrade”

The Breech Loaded Paintall “Shotgun”

Although this isn’t the first pneumatic air cannon to be featured on HAD, this “paintball shotgun” is certainly one of the coolest.  While most air cannons have little practical use besides looking awesome and being cool to play with, this cannon, according to it’s maker, has actually been used successfully in actual paintball competition.

The system works by preloading a sabot full of paintballs into a section of barrel that can be removed.  The barrel is then slid forward and the sabot/barrel section is then inserted and the gun is loaded.  This configuration is known as a “floating barrel” and seems to work quite well.

The author is quick to point out that this device is not designed to be used against human competitors, but against tanks and such in scenario games. Used properly or not, we can’t vouch for the safety of this device.  One should take extra caution when working with CO2 tanks as they can reach a maximum pressure in the thousands of PSI.

For other pneumatic cannon ideas, check out this other bolt-action miniature potato gun or this “water blob launcher”.

Autonomous Paintball Sentry Gun

What is the best thing about making a computer program that targets and kills anything that enters its sight? Why giving it a weapon, of course! No, we are not talking for real, but the next best thing, an Autonomous Paintball Sentry Gun.

The autonomous part of the device comes from a pc on the sideline and is fed input though a standard webcam. The feed is ran though a processing script where, once accustomed to the background has the option to fire at anything it sees moving, or a nice point n click manual mode.

The Arduino part is in a the role of driving the servo motors for X/Y movement and a trigger and is powered by a fist full of D cell batteries to give plenty of time for fun. Also, be sure to check out our other sentry guns, one using Microchip PIC, and another sporting a super compact computer running Ubuntu

Waterproof DIY Momentary-push Switch

[Patman2700] has a nice scope for his paintball gun that uses a red dot instead of cross-hairs. The problem is that he kept forgetting to turn it off which ended up running the batteries down frequently. His solution to the problem was to get rid of the toggle switch used to turn it on and replace it will a home-made momentary push button switch. Now he presses the switch to aim and doesn’t waste juice when he’s running around, trying not to get pelted with paint.

Since this is used outside he wanted it to be water-tight. The switch is built using materials we’ve seen in previous diy switches; adhesive-backed copper sheets for conductors, foam to keep them separated until pressed, and plastic as a support. Copper is applied to the plastic base, with a ring of foam separating the base from the second layer of copper. When squeezed, the two layers of copper come in contact to complete the circuit. To make it work a bit better [Patman2700] added a dab of solder in the center of the bottom copper layer so there is less distance between conductors, and used extra foam to build up a bump in the center of the assembly for a better ‘button’ feel. The whole thing is encased in shrink-wrap with the seams sealed with super glue to keep moisture at bay.