Innovating A Backyard Solar Battery System

Ever on the lookout for creative applications for tech, [Andres Leon] built a solar powered battery system to keep his Christmas lights shining. It worked, but — pushing for innovation — it is now capable of so much more.

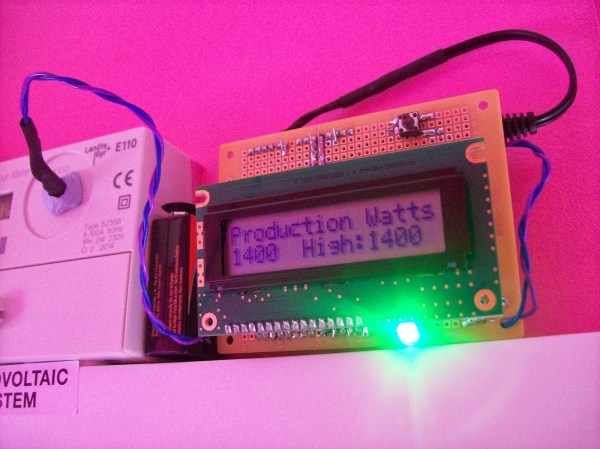
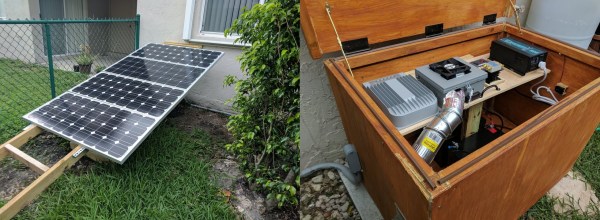
The shorthand of this system is two, 100 amp-hour, deep-cycle AGM batteries charged by four, 100 W solar panels mounted on an adjustable angle wood frame. Once back at the drawing board, however, [Leon] wanted to be able track real-time statistics of power collected, stored and discharged, and the ability to control it remotely. So, he introduced a Raspberry Pi running Raspbian Jessie Lite that publishes all the collected data to Home Assistant to be accessed and enable control of the system from the convenience of his smartphone. A pair of Arduino Deuemilanoves reporting to the Pi control a solid state relay powering a 12 V, 800 W DC-to-AC inverter and monitor a linear current sensor — although the latter still needs some tinkering. A in-depth video tour of the system follows after the break!

Continue reading “Innovating A Backyard Solar Battery System”

Panelizing Boards The Easy Way

For reasons that will remain undisclosed until some time in the future, I recently had a need to panelize a few PCBs. Panelization is the art of taking PCB designs you already have, whether they’re KiCad board files, Eagle board files, or just Gerbers, and turning them into a single collection of PCBs that can be sent off to a fab house.

Now this is panel racing

If you’re still wondering what this means, take a look at the last board you got from OSH Park, Seeed, Itead, or Dirty PCBs. Around the perimeter of your board, you’ll find some rough spots. These are ‘mouse bites’ and tabs, places where the boards are strung together to form a gigantic rectangular panel sent off to a manufacturer. You can check out this great interview with [Laen] from OSH Park to get an idea of how this works, but the basic process is to take a bunch of Gerbers, add tabs and mouse bites, solve the knapsack problem, and send the completed panel off to a board house.

Panelizing boards is something most of us won’t have to do often. Really, you only want a panel of boards when you’re manufacturing something. For small-scale production and prototypes, bare boards will do just fine. Simply by virtue of the fact that panelizing boards is far less common than throwing some Gerbers at OSH Park or Seeed, there aren’t many (good) tutorials, and even fewer (good) tools to do so. This is how you panelize boards quickly and easily using Open Source tools.

Continue reading “Panelizing Boards The Easy Way”

Glitchy Synthesizer Meets Honeycomb LED Matrix

Don’t watch [Jason Hotchkiss]’s video if flashing lights or bleepy-bloopy synthesizer noises give you seizures. Do watch, however, if you’re interested in a big honeycomb-shaped LED matrix being driven at audio frequencies through a dedicated square-wave synthesizer that’s built in.

The LED panel in question is housed in a snazzy laser-cut, honeycomb-shaped bezel: a nice change from the standard square in our opinion. The lights are 1/2 watt (whoa!) whites, and the rows and columns are driven by transistor drivers that are in turn controlled by shift registers. We’re not entirely sure how the matrix is driven — we’d love to see a circuit diagram — but it looks like it’s some kind of strange, non-scanning mode where all of the column and row drives are on at once. Whatever, it’s art.

And it’s driven by logic chips making audio-frequency square waves. Two of these are fed into an LFSR and into an R-2R DAC and then into the shift registers. The output is chaos, but the audio and the visuals do seem to influence each other. It’s an audio-visual embodiment of some of my wildest Logic Noise fantasies. Pretty cool. Enjoy the video.

Continue reading “Glitchy Synthesizer Meets Honeycomb LED Matrix”

Automate Git And Upgrade Your Battle Station With A Custom Peripheral

[mfaust] wakes up in the morning like a regular person, goes to work like a regular person, types in tedious commands for his software versioning utilities like a regular person, and then, as a reward, gets his coffee, just like rest of us. However, what if there was a way to shorten the steps, bringing us all closer to the wonderful coffee step, without all those inconvenient delays? Well, global industry is trying its best to blot out the sun, so mornings are covered there. [Elon Musk’s] thinktank proposed the hyperloop, which should help with the second step. [mfaust] built a control station for his versioning software. Raise your cup of joe high for this man’s innovative spirit.

He first laid out all the buttons, LED lights, and knobs he’d like on a panel to automate away his daily tasks. Using photoshop he ended up with a nice template. He laminated it to the top of a regular project box and did his best to drill holes in the right places without a workshop at his command. It’s pretty good looking!

Since this is the sort of thing an Arduino is best at he, in a mere two tries, wired everything up in such a way that it would all cram into the box. With everything blinking satisfactorily and all the buttons showing up on the serial out, he was ready for the final step.

Being a proficient and prolific enough developer to need a control panel in the first place, like a sort of software DJ, he wrote a nice interface for it all. The Arduino sits and waits for serial input while occasionally spitting out a packet of data describing its switch status. A Java daemon runs in the background of his computer. When the right bits are witnessed, a very nicely executed on screen display reports on the progress of his various scripts.

Now he can arrive at the hyperloop terminal during the appropriate work time slot in Earth’s perpetual night. After which he simply walks up to his computer, flips a few switches, glances quickly at the display for verification, and goes to drink some nice, hydroponically grown, coffee. Just like the rest of us.

Two-Axis Solar Tracker

Solar panels are an amazing piece of engineering, but without exactly the right conditions they can be pretty fickle. One of the most important conditions is that the panel be pointed at the sun, and precise aiming of the panel can be done with a solar tracker. Solar trackers can improve the energy harvesting ability of a solar panel by a substantial margin, and now [Jay] has a two-axis tracker that is also portable.

The core of the project is a Raspberry Pi, chosen after [Jay] found that an Arduino didn’t have enough memory for all of the functionality that he wanted. The Pi and the motor control electronics were stuffed into a Pelican case for weatherproofing. The actual solar tracking is done entirely in software, only requiring a latitude and longitude in order to know where the sun is. This is much easier (and cheaper) than relying on GPS or an optical system for information about the location of the sun.

Be sure to check out the video below of the solar tracker in action. Even without the panel (or the sun, for that matter) the tracker is able to precisely locate the panel for maximum energy efficiency. And, if you’d like to get even MORE power from your solar panel, you should check out a maximum power point tracking system as well.

Continue reading “Two-Axis Solar Tracker”

Power Meter

Solar Panel System Monitoring Device Using Arduino

[Carl] recently upgraded his home with a solar panel system. This system compliments the electricity he gets from the grid by filling up a battery bank using free (as in beer) energy from the sun. The system came with a basic meter which really only shows the total amount of electricity the panels produce. [Carl] wanted to get more data out of his system. He managed to build his own monitor using an Arduino.

The trick of this build has to do with how the system works. The panel includes an LED light that blinks 1000 times for each kWh of electricity. [Carl] realized that if he could monitor the rate at which the LED is flashing, he could determine approximately how much energy is being generated at any given moment. We’ve seen similar projects in the past.

Like most people new to a technology, [Carl] built his project up by cobbling together other examples he found online. He started off by using a sketch that was originally designed to calculate the speed of a vehicle by measuring the time it took for the vehicle to pass between two points. [Carl] took this code and modified it to use a single photo resistor to detect the LED. He also built a sort of VU meter using several LEDs. The meter would increase and decrease proportionally to the reading on the electrical meter.

[Carl] continued improving on his system over time. He added an LCD panel so he could not only see the exact current measurement, but also the top measurement from the day. He put all of the electronics in a plastic tub and used a ribbon cable to move the LCD panel to a more convenient location. He also had his friend [Andy] clean up the Arduino code to make it easier for others to use as desired.

Next Week In NYC: How The Age Of Machine Consciousness Is Transforming Our Lives

I’ve developed or have been involved with a number of imaging technologies, everything from DIY synthetic aperture radar, the MIT thru-wall radar, to the next generation of ultrasound imaging devices. Imagery is cool, but what the end-user often wants is some way by which to get an answer as opposed to viewing a reconstruction. So let’s figure that out.

We’re kicking-off a discussion on how to apply deep learning to more than just beating Jeopardy champions at their own game. We’d like to apply deep learning to hard data, to imagery. Is it possible to get the computer to accurately provide the diagnosis?

I helped to organize a seminar series/discussion panel in New York City on November 13th (you know, for those readers who are closer to New York than to Munich). This discussion panel includes David Ferrucci (the guy who lead the IBM Watson program), MIT Astrophysicist Max Tagmark, and the person who created genetic sequencing on a chip: Jonathan Rothberg.  As the vanguard of creativity and enthusiasm in everything technical we’d like the Hackaday community to join the conversation.

Continue reading “Next Week In NYC: How The Age Of Machine Consciousness Is Transforming Our Lives”