DEFCON 22: The Badge Designers

If you go to DEFCON next year (and you should), prepare for extreme sleep deprivation. If you’re not sleep deprived you’re doing it wrong. This was the state in which we ran into [LosT] and [J0nnyM@c], the brains behind the DEFCON 22 badge and all of the twisted tricks that torture people trying to solve the badge throughout the weekend. They were popular guys but wait around until late into the night and the throngs of hint-seekers subside just a bit.

Plans, within plans, within plans are included in the “crypto” which [LosT] talks about in the interview above. We were wondering how hard it is to produce a badge that is not only electrically perfect, but follows the planned challenge to a ‘T’. This includes things like holding off soldering mask from some pads, and different ones on a different version of the badge. Turns out that you just do as well as you can and then alter the puzzle to match the hardware.

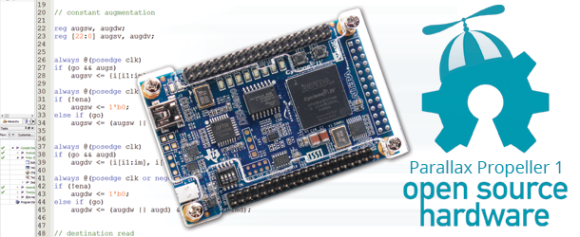
Speaking of hardware. A late snafu in the production threw the two into a frenzy of redesign. Unable to use the planned chip architecture, [J0nnyM@c] stepped up to transition the badges over to Propeller P8X32a chips, leveraging a relationship with Parallax to ensure they hardware could be manufactured in time for the conference.

If you haven’t put it together yet, this is that same chip that Parallax just made Open Source. The announcement was timed to coincide with DEFCON.

view of front and back

Hands-On DEFCON 22 Badge

It took a measly 2-hours in line to score myself entry to DEFCON and this nifty badge. I spent the rest of the afternoon running into people, and I took in the RFIDler talk. But now I’m back in my room with a USB cord to see what might be done with this badge.

First the hardware; I need a magnifying glass but I’ll tell you what I can. Tere are huge images available after the break.

  • Parallax P8X32A-Q44
  • Crystal marked A050D4C
  • Looks like an EEPROM to the upper right of the processor? (412W8 K411)
  • Something interesting to the left. It’s a 4-pin package with a shiny black top that has a slightly smaller iridesent square to it. Light sensor?
  • Tiny dfn8 package next to that has numbers (3336 412)
  • Bottom left there is an FTDI chip (can’t read numbers)
  • The DEFCON letters are capacitive touch. They affect the four LEDs above the central letters.

I fired up minicom and played around with the settings. When I hit on 57600 8N1 I get “COME AND PLAY A GAME WITH ME”.

Not sure where I’m going from here. I don’t have a programmer with me so not sure how I can make a firmware dump. If you have suggestions please let me know in the comments!

Continue reading “Hands-On DEFCON 22 Badge”

Parallax Propeller 1 Goes Open Source

OpenPropellerProjectOpenSourceProp1Banner

Parallax has embraced open source hardware by releasing the source code to its Propeller 1 processor (P8X32A). Designed by [Chip Gracey] and released in 2006, the 32-bit octal core Propeller has built up a loyal fan base. Many of those fans have created development tools for the Propeller, from libraries to language ports. [Ken, Chip], and the entire Parallax team have decided to pay it forward by releasing the entire source to the Propeller.

The source code is in Verilog and released under GNU General Public License v3.0. Parallax has done much more than drop 8-year-old files out in the wild.  All the configuration files necessary to implement the design on an Altera Cyclone IV using either of two different target boards have also been included. The DE0-Nano is the low-cost option. The Altera DE2-115 dev board is more expensive, but it also can run the upcoming Propeller 2 design.

The release also includes sources for the mask ROM used for booting, running cogs, and the SPIN interpreter. [Chip] originally released this code in  2008. The files contain references to PNut, the Propeller’s original code name.

We’re excited to see Parallax taking this step, and can’t wait to see what sort of modifications the community comes up with. Not an Altera fan? No problem – just grab the source code, your favorite FPGA tools, and go for it! Starved for memory? Just add some more. 8 cogs not enough? Bump it up to 16.  The only limits are the your imagination and the resources of your target device.

Interested in hacking on a real Propeller? If you’re in Las Vegas, you’re in luck. A Propeller is included on each of the nearly 14,000 badges going to DEFCON 22 attendees. While you’re there, keep an eye out for Mike and The Hackaday Hat!

Quick And Dirty RFID Door Locks Clean Up Nice

homemade RFID Door Locks

[Shawn] recently overhauled his access control by fitting the doors with some RFID readers. Though the building already had electronic switches in place, unlocking the doors required mashing an aging keypad or pestering someone in an adjacent office to press a button to unlock them for you. [Shawn] tapped into that system by running some wires up into the attic and connecting them to one of two control boxes, each with an ATMega328 inside. Everything functions as you would expect: presenting the right RFID card to the wall-mounted reader sends a signal to the microcontroller, which clicks an accompanying relay that drives the locks.

You may recall [Shawn’s] RFID phone tag hack from last month; the addition of the readers is the second act of the project. If you’re looking to recreate this build, you shouldn’t have any trouble sourcing the same Parallax readers or building out your own Arduino on a stick, either. Check out a quick walkthrough video after the jump.

Continue reading “Quick And Dirty RFID Door Locks Clean Up Nice”

Fire Breathing Jack-O-Lantern Of Death

[Rick] is at it again, this week he has conjured up an even more dangerous Halloween hack. Thankfully [Rick] has included a warning of just how dangerous this hack can be, especially if children are around. Don’t do this hack unless you know what you’re doing and you can do it safely.

For [Rick]’s number four hack of the month he gives us the Fire Breathing Jack-O-Lantern of death! This isn’t a new idea but it is a very unique and simple implementation. We always love seeing the ingenuity of hackers to repurpose existing commercial products. In this case, [Rick] uses an automated air freshener which dispenses a flammable spray for the pumpkins breath if you dare get too close, but not so close as to get burned. The trigger distance is controlled by an Arduino and a Parallax Ping))) sensor so as to fire only when people are farther than 3 feet but closer than 5 feet. You can get a copy of the Arduino sketch from his blog posting.

A small candle is used to ignite the flammable spray, which shoots out 5 to 10 inches from the pumpkin’s mouth when triggered by the ultrasonic sensor. It couldn’t be simpler. The most challenging part was getting the large air freshener dispenser in the pumpkin with the flames coming out the mouth. A little extra whacking at the pumpkin fixed the fit, but planning for a larger pumpkin would be advised.

Theoretically the Arduino shouldn’t trigger and throw flames if people are too close, but when kids are running around they may come right into the target area unexpectedly. If this hack is used in the right place it would make for a great Halloween display item and could be used safely.

After the break you can watch [Rick’s] flame breathing Jack-o-Lantern build tutorial.

Continue reading “Fire Breathing Jack-O-Lantern Of Death”

JTAGulator Finds Debug Interfaces

jtagulator

[Joe Grand] has come up with a tool which we think will be useful to anyone trying to hack a physical device: The JTAGulator. We touched on the JTAGulator briefly during our DEF CON coverage, but it really deserves a more in-depth feature. The JTAGulator is a way to discover On Chip Debug (OCD) interfaces on unfamiliar hardware.

Open any cell phone, router, or just about any moderately complex device today, and you’ll find test points. Quite often at least a few of these test points are the common JTAG / IEEE 1149.1 interface.

JTAG interfaces have 5 basic pins: TDI (Test Data In), TDO (Test Data Out), TCK (Test Clock), and TMS (Test Mode Select), /TRST (Test Reset) (optional).

If you’re looking at a PCB with many test points, which ones are the JTAG pins? Also which test points are which signals? Sometimes the PCB manufacturer will give clues on the silk screen. Other times you’re on your own. [Joe] designed the JTAGulator to help find these pins.

Continue reading “JTAGulator Finds Debug Interfaces”

Portable Gaming Console Uses SSD1289 And Propeller

building-a-portable-video-game

[Samir] dabbles in hobby electronics and decided to put his skills to the test by building this portable gaming console (Note: this site uses an HTTPS address which cannot be used through Google Tranlator. It does work for the Chrome browser translator). The image above is a screenshot from his Breakout-style game. The paddle at the bottom is controlled with the touchscreen. You move it back and forth to keep the ball from traveling past the bottom edge (it bounces off of the red borders on the sides and top).

The main PCB is larger than the 3.2″ LCD footprint, but [Samir] made sure to include a lot of peripherals to make up for it. The board sports a Parallax Propeller chip to run the games. It interfaces with the SSD1289 screen (this is a cheap and popular choice) but that really eats up a lot of the IO pins. To control the game the touchscreen can be used as we’ve already mentioned. But there are two other options as well. There is an expansion port which uses a shift register (74HC165) to serialize the input. For prototyping this allowed [Samir] to use an Atari joystick. He also rolled a Bluetooth adapter into the project which we would love to see working with a Wii remote. Rounding out the peripherals are an SD card slot, audio jack for sound, and an RTC chip for keeping time.

There are several videos included in the post linked above. After the break we’ve embedded the game-play demo from which this screenshot was taken.

Continue reading “Portable Gaming Console Uses SSD1289 And Propeller”