Hackaday Prize 2023: Gen5X A Generatively Designed 5-Axis 3D Printer

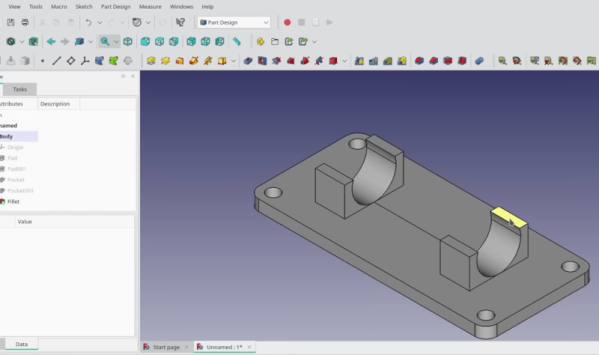
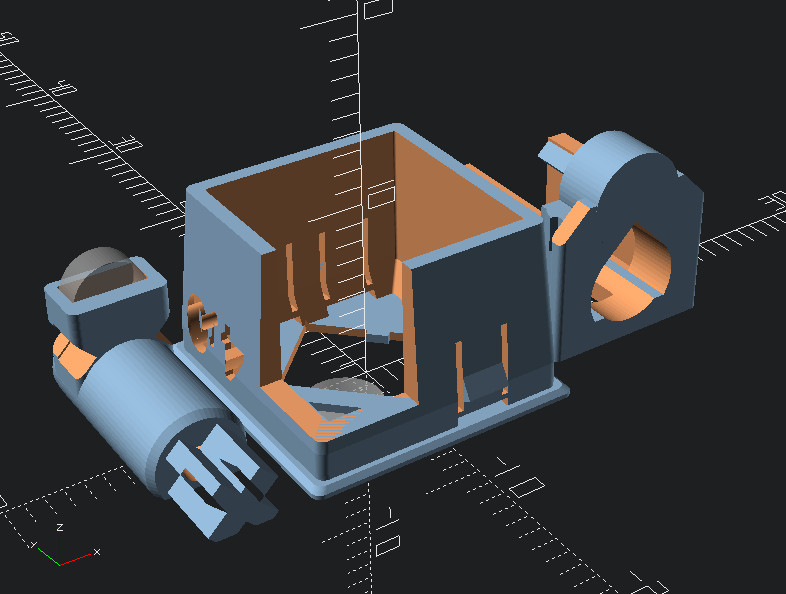
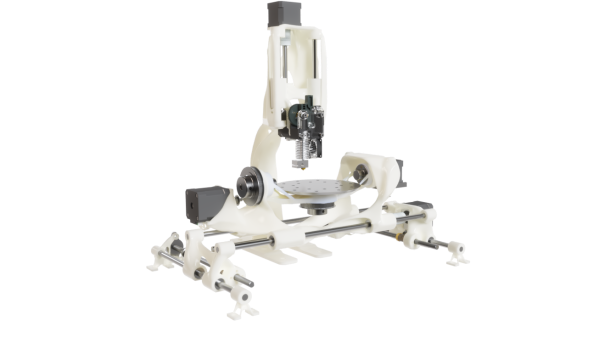
[Ric Real] is entering the 2023 Hackaday Prize with the Gen5X, a generatively designed 3D printed five-axis 3D printer. The concept is not a new one, with the type of construction being seen a few times here and there. In addition to the usual three directions of motion, we’re familiar with, with the cartesian bot design, these types of machines add an additional two rotation axes, one which can swing the build platform front and back around the X-axis, and a second that provides rotation around the Z-axis. These combined motions give rise to some very interesting capabilities, outside of our familiar 3D printing design constraints.

As for the generative side of things, this is a largely theoretical idea. Essentially the concept is that the machine’s design can be iteratively updated and optimised for performance to fit into the constraints of available hardware such as motors and other ‘vitamins’ needed to create the next generation of machines. The design files should be parameterised enough such that this optimisation process can be automated, potentially via input from AI, but we suspect we’re a way off from that yet. Whether this project as yet satisfies any of these lofty goals remains to be seen, but do keep an eye on it if you’re so inclined. There is a Fusion 360 project here to dig into, but if you’re not interested in the research side of the project, but just want to build a 5-axis machine to play with, then you can find the project source on the GitHub Page.

If this feels familiar, you’d be on the right track, as we covered at least one other 5D printer recently. We have also touched upon generative design at least once. We’re sure we will see more on this topic in the future.

Continue reading “Hackaday Prize 2023: Gen5X A Generatively Designed 5-Axis 3D Printer”

FreeCAD Is Simple, According To This Tutorial

Remember learning to tie your shoes or ride a bike? Like many things, that’s easy once you know how to do it, but seems impossible before you learn. [NovaSpirit] asserts that Freecad is simple, and provides a simple walkthrough to create a part in the video below.

If this were riding a bike, this tutorial would be akin to watching someone ride a bike to pick up tips. You’d probably still want to have someone explain details to you before you attempt it yourself.

Continue reading “FreeCAD Is Simple, According To This Tutorial”

Parametric Design With Tinkercad

Tinkercad is like the hamburger helper of 3D design. You hate to admit you use it, and you know you should put in more effort, but — darn it — it’s easy, and it tastes pretty good. While I use a number of CAD programs for serious work, sometimes, when I just want a little widget like a flange for my laser cutter’s exhaust, it is just easier to do it in a few minutes with Tinkercad. However, I heard someone complaining the other day that it wasn’t of any use anymore because they took away custom shape generators. That statement is only partially true. Codeblocks allow you to easily create custom parametric items for use in Tinkercad.

A Tinkercad-designed flange

There was a time when you could write Javascript to create custom shapes, and it is true that they removed that feature. However, they replaced it with Codeblocks which is much easier to use for their target audience — young students — and still very powerful.

If you’ve used parametric design in a professional package or even used something like OpenSCAD, you probably don’t need to be sold on the benefit. This is, of course, a simple form of it, but the idea is to define things as mathematical relationships. As an example, suppose you have a front panel with two rows of four holes for switches evenly spaced and centered. That would be easy to draw. But if you later decide the top row needs five holes and the bottom only needs three, it will be a fair amount of work. But if you have the math defining it right, you change a few variables, and the computer does the rest. Continue reading “Parametric Design With Tinkercad”

Custom Printed Knobs In Just A Few Lines Of Code

While not everyone is necessarily onboard for the CAD-via-code principle behind OpenSCAD, there’s no denying the software lends itself particularly well to parametric designs. Using a few choice variables, it’s possible to make a model in OpenSCAD that can be easily tweaked by other users — even if they have zero prior experience with CAD.

Take for example this parametric-knob-maker written by [aminGhafoory]. The code clocks in at less than 100 lines, but if you’re looking to spin up your own version, all you really need to pay attention to are the clearly labeled variables up at the top. Just plug in your desired diameter and height, fiddle around a bit with the values that get fed into the grip generating function, and hit F7 to export it to an STL ready for printing.

Now admittedly, all the knobs generated with this code will look more or less the same. But that’s the beauty of open source, should you want to print out some wild looking knobs, you can at least use this code as a basis to build on. With the core functionality in place, you just need to concern yourself with writing a new function to generate a grip texture more to your liking.

Of course, if you want to make your OpenSCAD designs even easier for others to modify, you’ll want to look into its impressive customizer capability which replaces manually edited variables with friendly sliders and text input boxes. Projects like the Ultimate Box Maker we looked at back in 2018 are an excellent example of how powerful OpenSCAD can be if you give your design the proper forethought.

3D Printed Magnetic Switches Promise Truly Custom Keyboards

While most people are happy to type away at whatever keyboard their machine came with, for the keyboard enthusiast, there’s no stone to be left unturned in the quest for the perfect key switch mechanism. Enter [Riskable], with an innovative design for a 3D printed mechanism that delivers near-infinite adjustment without the use of springs or metallic contacts.

The switching itself is performed by a Hall effect sensor, the specifics of which are detailed in a second repository. The primary project simply represents the printed components and magnets which make up the switch mechanism. Each switch uses three 4 x 2 mm magnets, a static one mounted on the switch housing and two on the switch’s moving slider. One is mounted below the static magnet oriented to attract it, while the other is above and repels it.

With this arrangement the lower magnet provides the required tactility, while the upper one’s repulsive force replaces the spring used in a traditional mechanism. [Riskable] calls it the magnetic separation contactless key switch, but we think “revolutionary” has a nicer ring to it.

The part which makes this extra-special is that it’s a fully parametric OpenSCAD model in which the separation of the magnets is customisable, so the builder has full control of both the tactility and return force of the keys. There’s a video review we’ve posted below that demonstrates this with a test keypad showing a range of tactility settings.

We have a resident keyboard expert here at Hackaday in the shape of our colleague [Kristina Panos], whose Keebin’ With Kristina series has introduced us to all that is interesting in the world of textual input. She plans on taking a keyboard made of these clever switches on a test drive, once she’s extruded the prerequisite number of little fiddly bits.

Continue reading “3D Printed Magnetic Switches Promise Truly Custom Keyboards”

Illustrated Kristina with an IBM Model M keyboard floating between her hands.

Keebin’ With Kristina: The One Where Shift Happens

It’s been an exciting few weeks for me personally on the clacking front. I got a couple of new-to-me keyboards including my first one with ALPS switches, an old TI/99A keyboard with Futaba MD switches, and a couple of what are supposed to be the original Cherry switches (oh man they clack so nicely!) But enough about my keyboard-related fortuitousness, and on to the hacks and clacks!

Putting My Pedals to the Metal

Kinesis Savant Elite triple foot pedal. It's a keyboard for your feet!I picked up this Kinesis Savant Elite triple foot pedal from Goodwill. It works fine, but I don’t like the way it’s programmed — left arrow, right arrow, and right mouse click. I found the manual and the driver on the Kinesis website easily enough, but I soon learned that you need a 32-bit computer to program it. Period. See, Kinesis never wrote an updated driver for the original Savant Elite pedal, they just came out with a new one and people had to fork over another $200 or figure something else out.

I’m fresh out of 32-bit computers, so I tried running the program in XP-compatibility mode like the manual says, but it just doesn’t work. Oh, and the manual says you can brick it if you don’t do things correctly, so that’s pretty weird and scary. It was about this time that I started to realize how easy it would be to open it up and just replace the controller with something much more modern. Once I got inside, I saw that all three switches use JST plugs and right angle header. Then I though hey, why not just re-use this set-up? I might have to make a new board, but it how awesome would it be to plug these pedals’ JSTs into my own board?

Continue reading “Keebin’ With Kristina: The One Where Shift Happens”

New Video Series: Designing With Complex Geometry

Whether it’s a 3D printed robot chassis or a stained glass window, looking at a completed object and trying to understand how it was designed and put together can be intimidating. But upon closer examination, you can often identify the repeating shapes and substructures that were combined to create the final piece. Soon you might find that the design that seemed incredibly intricate when taken as a whole is actually an amalgamation of simple geometric elements.

This skill, the ability to see an object for its principle components, is just as important for designing new objects as it is for understanding existing ones. As James McBennett explains in his HackadayU course Designing with Complex Geometry, if you want to master computer-aided design (CAD) and start creating your own intricate designs, you’d do well to start with a toolbox of relatively straightforward geometric primitives that you can quickly modify and reuse. With time, your bag of tricks will be overflowing with parametric structures that can be reshaped on the fly to fit into whatever you’re currently working on.

His tool of choice is Grasshopper, a visual programming language that’s part of Rhino. Designs are created using an interface reminiscent of Node-RED or even GNU Radio, with each interconnected block representing a primitive shape or function that can be configured through static variables, interactive sliders, conditional operations, and even mathematical expressions. By linking these modules together complex structures can be generated and manipulated programmatically, greatly reducing the time and effort required compared to a manual approach.

As with many powerful tools, there’s certainly a learning curve for Grasshopper. But over the course of this five part series, James does a great job of breaking things down into easily digestible pieces that build onto each other. By the final class you’ll be dealing with physics and pushing your designs into the third dimension, producing elaborate designs with almost biological qualities.

Of course, Rhino isn’t for everyone. The $995 program is closed source and officially only runs on Windows and Mac OS. But the modular design concepts that James introduces, as well as the technique of looking at large complex objects as a collection of substructures, can be applied to other parametric CAD packages such as FreeCAD and OpenSCAD.

Designing with Complex Geometry is just one of the incredible courses offered through HackadayU, our pay-as-you-wish grad school for hardware hackers. From drones to quantum computing, the current list of courses has something for everyone.

Continue reading “New Video Series: Designing With Complex Geometry”