Spilled OJ Does A Number On Zelda Game Boy Cartridge

When [Taylor Burley] first opened up the cartridge for The Legend of Zelda: Oracle of Seasons, it certainly didn’t look like it had been dunked in corrosive orange juice. But looks can be deceiving, and while the game’s owner certainly did an admirable job of cleaning up the surface of the PCB, the cartridge was no longer functional. Clearly, this was a sticky situation.

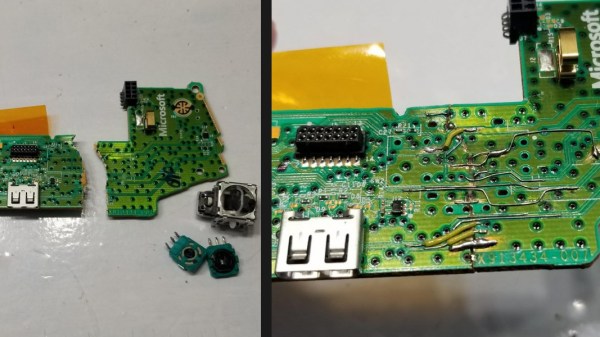
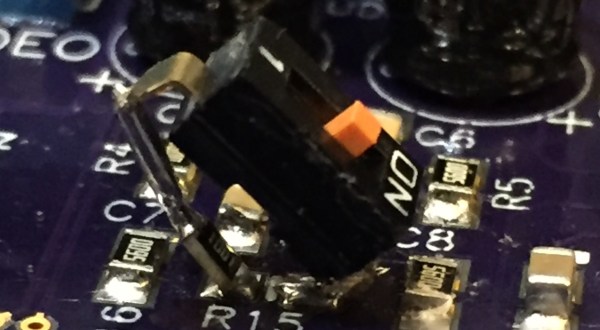
After removing all of the components from the PCB, [Taylor] was quickly able to piece together what had happened. Despite the vigorous cleaning the game received after the spill, juice had found its way under each IC on the board. Left to sit in these nooks and crannies for who knows how long, the juice started to eat away at the traces on the PCB. Getting the game back up and running would naturally require considerable board repairs, but they don’t call him Solderking for nothing.

Corrosion lurking under each chip.

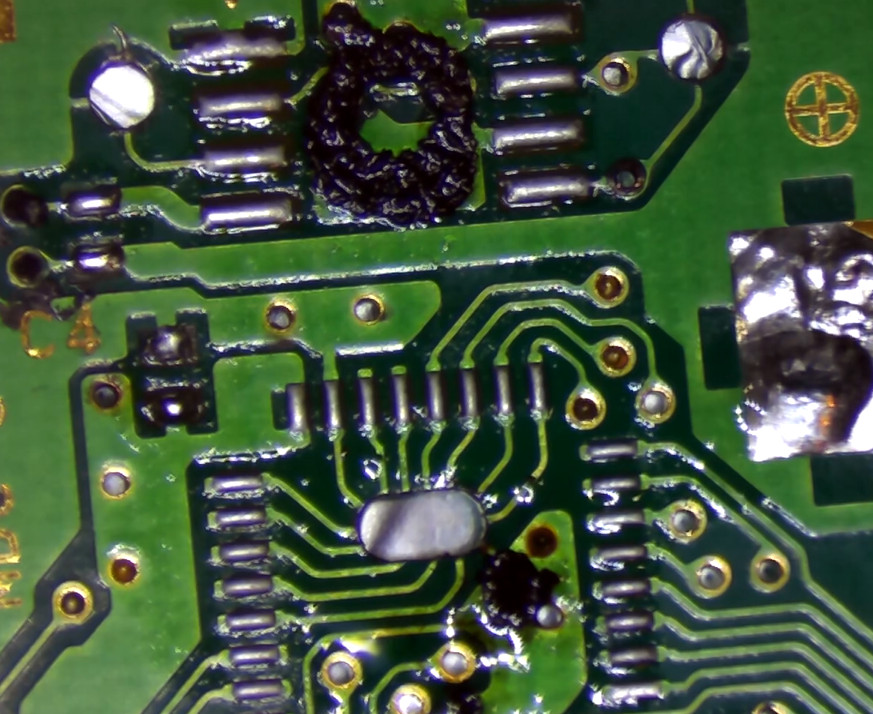
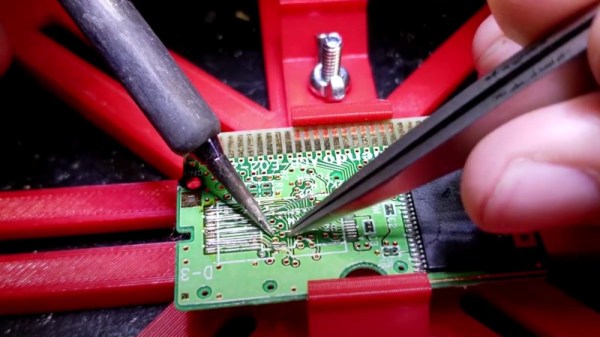
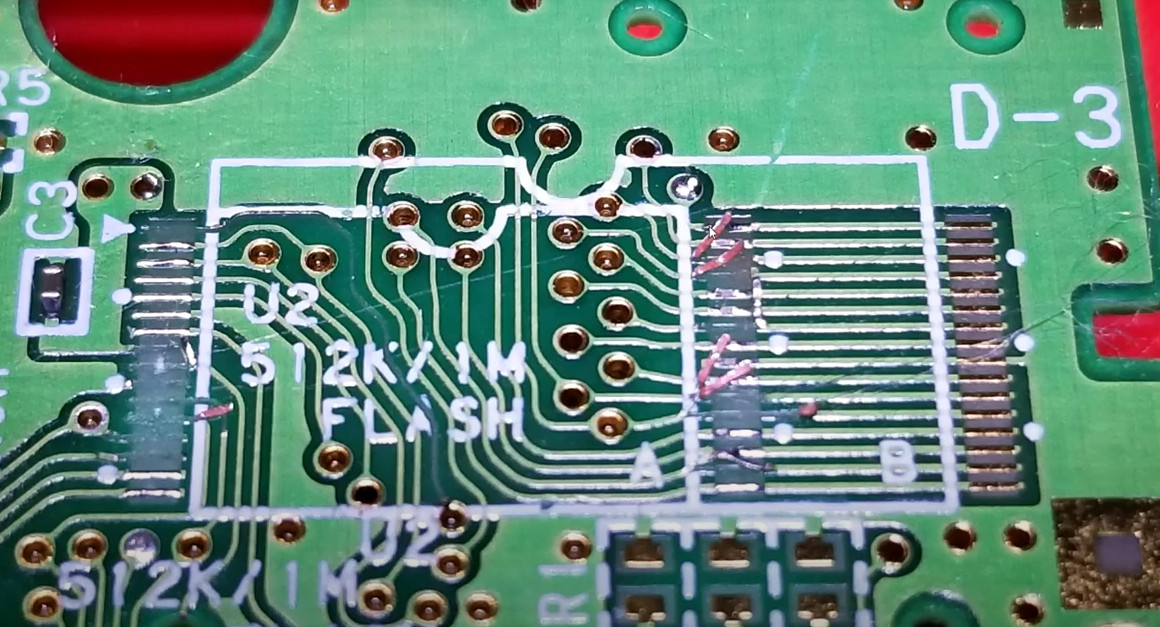
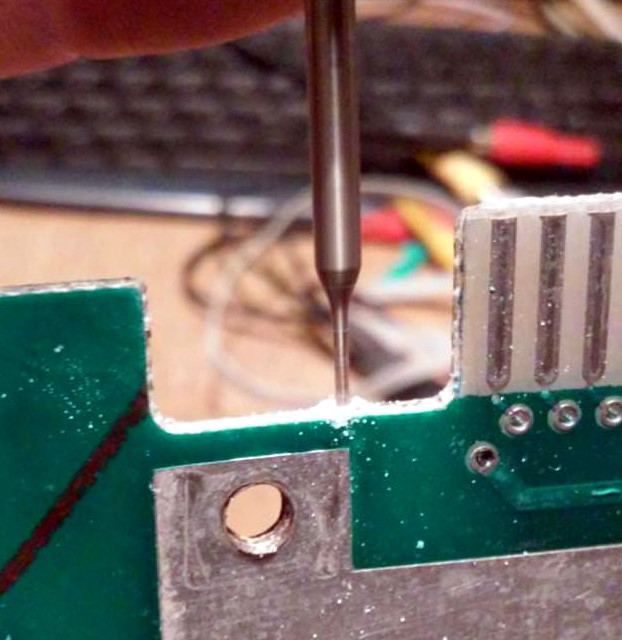
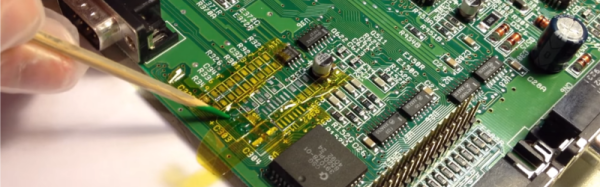
In the video below, you can see [Taylor] methodically scraping away the corrosion on the board before he starts recreating damaged connections with solid 30 gauge wire. Using tweezers and viewing the action through a digital microscope, he deftly bends the wire around to fit the shapes of the original traces and tacks the new conductors down with solder. He even goes ahead and repairs the traces that go to various test points on the cartridge; it’s a completely unnecessary extravagance, but we’re certainly not complaining. There’s a relaxing quality to watching him work, so we were in no rush to see his latest video end.

After fixing the board back up, he replaces all the components and takes it for a test drive on an original Game Boy Color. Confirming that Link’s 2001 outing is working as expected, he finishes the job with a few coats of spray-on conformal coating. With any luck, the next time this particular cartridge has to go face-to-face with some spilled juice, it will roll right off.

This isn’t the first time we’ve seen [Taylor] laboriously rebuild a Game Boy cartridge, and it certainly isn’t the first time we’ve seen him pull off some particularly impressive feats of soldering, either. His work always reminds us that patience and a steady hand can really do wonders.

Continue reading “Spilled OJ Does A Number On Zelda Game Boy Cartridge”

Steady Hand Brings GBA Cart Back From The Grave

The flash chips used in Game Boy Advance (GBA) cartridges were intended to be more reliable and less bulky than the battery-backed SRAM used to save player progress on earlier systems. But with some GBA titles now hitting their 20th anniversary, it’s not unheard of for older carts to have trouble loading saves or creating new ones. Perhaps that’s why the previous owner tried to reflow the flash chip on their copy of Golden Sun, but as [Taylor Burley] found after he opened up the case, they only ended up making the situation worse.

A previous repair attempt left the PCB badly damaged.

When presented with so many damaged traces on the PCB, the most reasonable course of action would have been to get a donor cartridge and swap the save chips. But a quick check on eBay shows that copies of Golden Sun don’t exactly come cheap. So [Taylor] decided to flex his soldering muscles and repair each trace with a carefully bent piece of 30 gauge wire. If you need your daily dose of Zen, just watch his methodical process in the video below.

While it certainly doesn’t detract from [Taylor]’s impressive soldering work, it should be said that the design of the cartridge PCB did help out a bit, as many of the damaged traces had nearby vias which gave him convenient spots to attach his new wires. It also appears the PCB was designed to accept flash chips of varying physical dimensions, which provided some extra breathing room for the repairs.

Seeing his handiwork, it probably won’t surprise you to find that this isn’t the first time [Taylor] has performed some life-saving microsurgery. Just last year he was able to repair the PCB of an XBox controller than had literally been snapped in half.

Continue reading “Steady Hand Brings GBA Cart Back From The Grave”

Putting The Magic Smoke Back In A Cooked Scooter

When [Vitor Melon] found out there was a custom firmware (CFW) available for his Xiaomi Mijia M365 Pro electric scooter that would increase his top end speed, naturally he installed it. Who wouldn’t want a little more performance out their hardware? But while the new firmware got the scooter running even better than stock, he does have a cautionary tale for anyone who might decide to ride their Mijia a bit harder than the fine folks at Xiaomi may have intended.

Now to be clear, [Vitor] does not blame the CFW for the fact that he cooked the control board of his Mijia. At least, not technically. There was nothing necessarily wrong with the new code or the capabilities it unlocked, but when combined with his particular riding style, it simply pushed the system over the edge. The failure seems to have been triggered by his penchant for using the strongest possible regenerative breaking settings on the scooter combined with a considerably higher than expected velocity attained during a downhill run. Turns out that big 40 flashing on the display wasn’t his speed, but an error code indicating an overheat condition. Oops.

Results of the PCB repair.

After a long and embarrassing walk home with his scooter, complete with a passerby laughing at him, [Vitor] opened the case and quickly identified the problem. Not only had the some of the MOSFETs failed, but a trace on the PCB had been badly burned through. Judging by the discoloration elsewhere on the board, it looks like a few of its friends were about to join in the self-immolation protest as well.

After a brief consultation with his graybeard father, [Vitor] replaced the dead transistors with higher rated versions and then turned his attention to the damaged traces. A bit of wire and a generous helping of solder got the main rail back in one piece, and he touched up the areas where the PCB had blackened for good measure.

A quick test confirmed the relatively simple repairs got the scooter up and running, but how was he going to prevent it from happening again? Reinstalling the original firmware with its more conservative governor was clearly no longer an option after he’d tasted such dizzying speeds, so instead he needed to find out some way to keep the controller cooler. The answer ended up being to attach the MOSFETs to the controller’s aluminum enclosure using thermal pads. This allows them to dissipate far more heat, and should keep a similar failure from happening again. You might be wondering why the MOSFETs weren’t already mounted this way, but unfortunately only Xiaomi can explain that one.

With their rapidly rising popularity hackers have been coming up with more and more elaborate modifications for electric scooters, and thanks to their wide availability on the second hand market, it’s likely the best is still yet to come when it comes to these affordable vehicles.

Patience Beats Rage-Quit In Shattered Xbox Controller Repair

There are negative-one hacks to this project. Someone lost at their game, lost their temper, then raged at their Xbox controller with some horsepower. The result is that [Taylor Burley] gets a free controller with a non-responsive joystick out of the deal, and since he had nothing to lose, he decided to heat up the iron and bring the controller back to life.

The majority of the project is told in pictures and through the narration in the video below. In removing the joystick, [Taylor] opts for the technique of doping the connections with fresh solder (we assume containing lead for easier melting) before reaching for the desoldering wick. The diagnosis stage is brief because when the joystick lifts away, the PCB falls apart into two separate pieces! The next step was to glue the two halves together with cyanoacrylate to get into the nooks and crannies, then epoxy to provide structure. Solder bridges were not going to jump that gap, so he used 30ga wire and attached it wherever he could scrape away some solder mask. Best of all, it worked when he reattached the joystick. Job well done.

Xbox controllers are not a scarce commodity, so people do not spend their idle hours fixing them, but not many people can claim experience. Maybe someday the stakes will be higher and he will have the courage to repair vintage electronics. We won’t rant on how things aren’t built to last, and how we don’t train people to fix things. Today, we want to focus on someone who used their time to repair and learn.

Continue reading “Patience Beats Rage-Quit In Shattered Xbox Controller Repair”

Restoring An Atari 800 XL That’s Beyond Restoring

Sometimes the best way to get a hacker to do something is to tell them that they shouldn’t, or even better can’t, do it. Nothing inspires the inquisitive mind quite like the idea that they are heading down the road less traveled, if for nothing else to say that they did it. A thrown gauntlet and caffeine is often all that stands between the possible and the impossible.

Preparing the PCB for epoxy injection

So when [Drygol] heard a friend comment he had an old Atari 800 XL that was such poor shape it couldn’t be repaired, he took on the challenge of restoring the machine sight unseen. Luckily for us, his pride kept him from backing down when he saw the twisted and dirty mess of a computer in person. He’s started documenting the process on his blog, and while this is only the first phase of the restoration, the work he’s done already is impressive enough that we think you’ll want to follow him along on his quest.

There’s no word on what happened to this miserable looking Atari, but we wouldn’t be surprised if it was run over by a truck. The board was cracked and twisted, with some components missing entirely. The first step in this impossible restoration was straightening the PCB, which [Drygol] did by clamping it to some aluminum bar stock and heating the whole board up to 40C (104F) for a few days. Once the got most of the bend out, he used a small drill bit to put holes in the PCB laminate and inject epoxy to add some strength. It’s an interesting technique, and the results seem to speak for themselves.

Once the board was straight, he went through replacing blown passive components and broken chip sockets. All the ICs were pulled and treated to an isopropyl alcohol and acetone bath in an ultrasonic cleaner to get them looking like new again. The CPU was cooked and needed to get swapped out, but otherwise it was smooth sailing, and before long he had the machine booted up. While most would have been satisfied to just get this far, [Drygol] considers this to be the easy part.

He next straightened out the metal shielding with a mallet, sanded it down, and sprayed it with a new zinc coating. The plastic around the keyboard and the metal trim pieces were also removed, cleaned, and refinished where necessary. Rather than going for perfection, [Drygol] intentionally left some issues so the machine didn’t look 100% pristine. It’s supposed to be a functional computer, not a museum piece behind glass.

We’ll have to wait until the next entry in this series to see how he repairs the absolutely devastated case. Any rational person would just use a case from a donor machine, but we’ve got a feeling [Drygol] might have something a little more impressive in mind.

In the meantime we’ve got plenty of incredible restorations to keep you occupied, from this sunken VIC-20 to a Pi-packing Osborne.

PCB Solder Pad Repair & Cleanup

What do you do when your motherboard is covered in electrolytic grime, has damaged pads and traces that are falling apart? You call [RetroGameModz] to work their magic with epoxy and solder.

While this video is a bit old, involved repair videos never go out of style. What makes this video really special is that it breaks from the common trend of “watch me solder in silence” (or it’s close cousin, “watch me solder to loud music”). Instead, [RetroGameModz] walks you through what they’re doing, step by step in their repair of a motherboard. And boy do they have their work cut out for them: the motherboard they’re working on has definitely seen better days. Specifically, it was better before corrosion from a leaking electrolytic capacitor and the well-meaning touch of its owner.

After a quick review of the damage, all of the components are removed from the battle zone. Then the cleaning begins, taking special precautions not to rip pads up. After everything’s cleaned up, things get really interesting. [RetroGameModz] starts to make their own pads from raw copper using the old pads as templates to replace the missing ones on the motherboard. After a bit of epoxy, it’s hard to tell that the pads were handmade, they fit in so well.

This epoxy trick is also used to deal with some heavily damaged traces, cool! During this repair, [RetroGameModz] used an epoxy that is heat resistant up to 315°C for 60 seconds. If you ever find any kind of epoxy on the market that is specified to be heat resistant up to more than 315°C, [RetroGameModz] would be quite happy if you could leave some info in the comment section, as they’ve found high-temperature epoxies quite difficult to source.

This goes to show that some repairs really should be done by professionals. [RetroGameModz] surely agrees, stating that “If you are not a repair technician and your motherboard has stopped working, it would be in the best of your own interest not to attempt a repair that you really cannot handle.” Good advice. But, we can never resist trying to fix things ourselves before handing things off to the more experienced. Call it a vice, or a virtue; we’ll call it fun.

What do you think? Are there some repairs you rely on technicians for? Or do you fix everything yourself? Let us know in the comments.

Continue reading “PCB Solder Pad Repair & Cleanup”

Tombstone Brings New Life To Board

Making revisions to existing PCBs with surface mount components often leads to creative solutions, and this insertion of a switch over a tombstoned resistor is no exception. According to [kubatyszko], “this is an FPGA-based Amiga clone. R15 serves as joint-stereo mixing signal between channels to make it easier on headphone users (Amiga has 4 channels, 2 left and 2 right). Removing R15 makes the stereo 100% ‘original’ with fully independent channels. Didn’t want to make it permanent so I decided to put a switch.”

Whether [kubatyszko] intends it or not, this solution is not going to be permanent without some additional work to mechanically secure the switch. We’ve tried this sort of thing before and it sometimes results in the contact area of the resistor being ripped off the substrate and separated from the rest of the resistor, rendering it useless. However, the creative use of the pads to get some additional functionality out of the board deserves some kudos.

We love creative fixes for board problems but it’s been a really long time since we’ve seen several of them collected in one place. We’d love to hear your favorite tricks so let us know in the comments below.