EEPROM Hack To Fix Autodetection Issues

Autodetection of hardware was a major part of making computers more usable for the average user. The Amiga had AutoConfig on its Zorro bus, Microsoft developed Plug And Play, and Apple used NuBus, developed by MIT. It’s something we’ve come to take for granted in the modern age, but it doesn’t always work correctly. [Evan] ran into just this problem with a video capture card that wouldn’t autodetect properly under Linux.

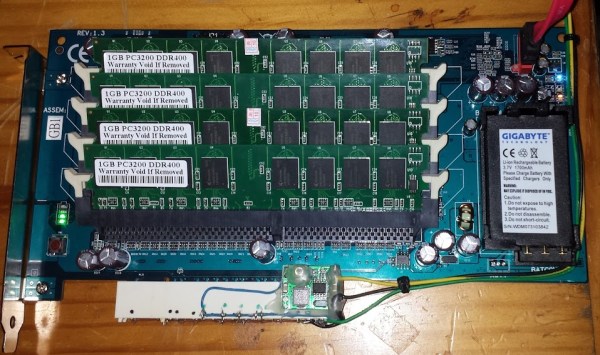
The video capture card consisted of four PCI capture cards with four inputs each, wired through a PCI to PCI-E bus chip for a total of sixteen inputs. Finding the cause of the problem wasn’t too difficult – the driver was detecting the card as a different model with eight inputs, instead of the sixteen inputs actually present on the card. The driver detects the device plugged in by a unique identifier reported by the card. The code on the card was identical to the code for a different model of card with different hardware, causing the issue.

As a quick test, [Evan] tried fudging the driver selection, forcing the use of a driver for a sixteen-input model. This was successful – all sixteen inputs could now be used. But it wasn’t a portable solution, and [Evan] would have to remember this hack every time the card needed to be reinstalled or moved to a different computer.

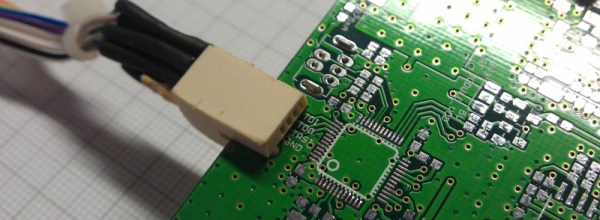
Looking further at the hardware, [Evan] discovered the card had four 24c02 EEPROM chips on board – one for each PCI card on board. Dumping the contents, they recognised the unique identifier the driver was using to determine the card’s model. It was then a simple job to change this value to one that corresponded with a sixteen-input card to enable functional autodetection by burning a new value to the EEPROM. [Evan] then published the findings to the LinuxTVWiki page. Continue reading “EEPROM Hack To Fix Autodetection Issues”

Local Hacker Discovers Card Edge Connectors

When [turingbirds] was looking around for the absolute minimum connector for a JTAG adapter, he wanted something small, that didn’t require expensive adapters, and that could easily and reliably connect a few JTAG pins to a programmer. This, unsurprisingly, is a problem that’s been solved many times over, but that doesn’t mean there isn’t room for improvement. [turingbirds] found his better solution by looking at some old card edge connectors.

Instead of 0.1″ pitch pin headers, weirder and more expensive connectors, the Tag Connect, or even pogo pins, [turingbirds] came up with a JTAG adapter that required no additional parts, had a small footprint, and could be constructed out of trash usually found behind any busy hackerspace or garage. The connector is based on the venerable PCI connector, chopped up with a Dremel and soldered to a JTAG or ISP programmer.

This is simply a card edge connector, something the younglings seem to have forgotten. Back in the day, card edge connectors were a great way to connect peripherals, ports, and anything else to the outside world. They were keyed, and you could only put them in one way. They were relatively cheap, and with a big coil of ribbon cable, you could make custom adapters easily. For low-speed connections that will only be used a few times, it’s very hard to beat a card edge connector.

Of course the connector itself is only half of the actual build. To turn a chopped up PCI connector into a JTAG adapter, [turingbirds] made footprint and part files for his favorite PCB design tool. In this case it’s Eagle, and the libraries that will plop one of these connectors down are available on GitHub.

Is this the latest and greatest way to plug a programmer into a board? No, because this has been around for 30 or 40 years. It does, however, put a programming port on a PCB with zero dollars in components, a minimum of board footprint, and uses parts that can be salvaged from any pile of old computers.

Arduino (PCI) Express

It is almost impossible these days to find a PC with old ISA card slots. Full size PCI card slots are in danger of going the same way. Many PCs today feature PCI Express connectors. PCI Express offers a lot of advantages including a small size, lower pin count, and a point-to-point serial bus topology that allows multiple simultaneous transfers between different pairs of end points. You’ll find PC Express connectors in things other than PCs too, including a lot of larger embedded systems.

If you ever wanted to prototype something on PCI Express, you’d usually turn to an FPGA. However, [moonpunchorg] posted a workable design for an Arduino on a mini PCI Express board. (As [imroy264] points out in the comments, the board is using the USB port present on the PCI-E connector.) The design files use KiCAD so it should be fairly easy to replicate or change. Naturally, there are pins on the edges to access I/O ports and power. You do need to use ISP to program the Arduino bootloader on the chip.

The board appears to a host computer as a SparkFun as a Pro Micro 3.3V board, and from there you could easily add function to a computer with a PCI Express slot using nothing more than the Arduino IDE. The board is known to work with the VIA VAB-600 Springboard and VIA VAB-820 boards, although it is likely to work with other PCI Express hosts, too.

Tiny X86 Systems With Graphics Cards

The Intel Edison is out, and that means there’s someone out there trying to get a postage-stamp sized x86 machine running all those classic mid-90s games that just won’t work with modern hardware. The Edison isn’t the only tiny single board computer with an x86 processor out there; the legends told of another, and you can connect a graphics card to this one.

This build uses the 86Duino Zero, a single board computer stuffed into an Arduino form factor with a CPU that’s just about as capable as a Pentium II or III, loaded up with 128 MB of RAM, a PCI-e bus, and USB. It’s been a while since we’ve seen the 86Duino. We first saw it way back at the beginning of 2013, and since then, barring this build, nothing else has come up.

The 86Duino Zero only has a PCI-e x1 connector, but with an x16 adapter, this tiny board can drive an old nVidia GT230. A patch to the Coreboot image and a resistor for the Reset signal to the VGA was required, but other than that, it’s not terribly difficult to run old games on something the size of an Arduino and a significantly larger graphics card.

Thanks [Rasz] for sending this one in.

Continue reading “Tiny X86 Systems With Graphics Cards”

A Non-Infinite But Arbitrariliy Large Number Of Video Feeds

It’s pretty common to grab a USB webcam when you need something monitored. They’re quick and easy now, most are plug-and-play on almost every modern OS, and they’re cheap. But what happens when you need to monitor more than a few things? Often this means lots of cameras and additional expensive hardware to support the powerful software needed, but [moritz simon geist] and his group’s Madcam software can now do the same thing inexpensively and simply.

Many approaches were considered before the group settled on using PCI to handle the video feeds. Obviously using just USB would cause a bottleneck, but they also found that Ethernet had a very high latency as well. They also tried mixing the video feeds from Raspberry Pis, without much success either. Their computer is a pretty standard AMD with 4 GB of RAM running Xubuntu as well, so as long as you have the PCI slots needed there’s pretty much no limit to what you could do with this software.

At first we scoffed at the price tag of around $500 (including the computer that runs the software) but apparently the sky’s the limit for how much you could spend on a commercial system, so this is actually quite the reduction in cost. Odds are you have a desktop computer anyway, and once you get the software from their Github repository you’re pretty much on your way. So far the creators have tested the software with 10 cameras, but it could be expanded to handle more. It would be even cooler if you could somehow incorporate video feeds from radio sources!

Continue reading “A Non-Infinite But Arbitrariliy Large Number Of Video Feeds”

iram

PCI I-RAM Working Without A PCI Slot

[Gnif] had a recent hard drive failure in his home server. When rebuilding his RAID array, he decided to update to the ZFS file system. While researching ZFS, [Gnif] learned that the file system allows for a small USB cache disk to greatly improve his disk performance. Since USB is rather slow, [Gnif] had an idea to try to use an old i-RAM PCI card instead.

The problem was that he didn’t have any free PCI slots left in his home server. It didn’t take long for [Gnif] to realize that the PCI card was only using the PCI slot for power. All of the data transfer is actually done via a SATA cable. [Gnif] decided that he could likely get by without an actual PCI slot with just a bit of hacking.

[Gnif] desoldered a PCI socket from an old faulty motherboard, losing half of the pins in the process. Luckily, the pins he needed still remained. [Gnif] knew that DDR memory can be very power-hungry. This meant that he couldn’t only solder one wire for each of the 3v, 5v, 12v, and ground pins. He had to connect all of them in order to share the current load. All in all, this ended up being about 20 pins. He later tested the current draw and found it reached as high as 1.2 amps, confirming his earlier decision. Finally, the reset pin needed to be pulled to 3.3V in order to make the disk accessible.

All of the wires from his adapter were run to Molex connectors. This allows [Gnif] to power the device from a computer power supply. All of the connections were covered in hot glue to prevent them from wriggling lose.

Yamaha SW60XG Hack Lets You Use It As A Standalone MIDI Device

yamaha-sw60xg-hack

This is a Yamaha XG card, the SW60XG to be exact. It’s an audio card for a PC which extends the MIDI standard to include over six hundred instruments. By today’s standards the almost twenty year old card isn’t all that powerful, but it is interesting to see it used as a standalone device.

[Benji Kimba] posted the video overview of his project which you can watch after the break. The image above is found at about 2:35 seconds and about twenty seconds later you get a look at how he patched into the conductors on the edge connector on both sides followed by the MIDI in and out connections. Finally, we get a look at a proper schematic at the four minute mark which details the pull-up resistors, hardware reset circuit, and the optoisolator he added for the MIDI connections themselves.

Continue reading “Yamaha SW60XG Hack Lets You Use It As A Standalone MIDI Device”