Souped-Up Reflective Sensor Uses Itself For Wireless Programming

Proximity sensors are common enough in automation projects that we hardly give them a second thought — pick something with specs that match the job and move on. But they can be fussy to get adjusted just right, a job made more difficult if they’re located in some out-of-the-way corner.

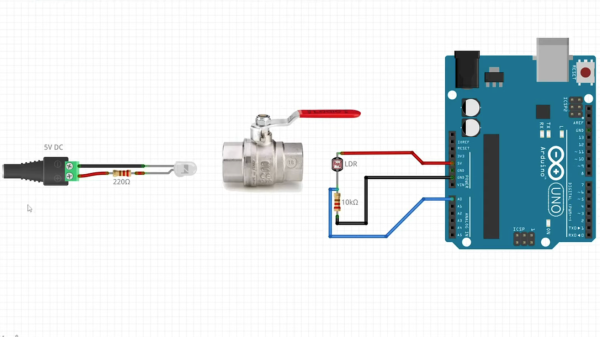
But where lies a challenge, there’s also an opportunity, as [Ido Gendel] shows us with this remote-controlled proximity sensor. The story behind this clever little hack starts with an off-the-shelf sensor, the kind with an IR LED and a phototransistor pointed in the same direction that gives a digital output when the light bouncing back into the phototransistor exceeds a certain threshold. It was setting the threshold that gave [Ido]’s client trouble, so [Ido] decided to build a programmable drop-in replacement to make the job easier.

The first try at this used an OBP732 reflective transmitter and an ATtiny202 microcontroller and had three pads on the PCB for programming. This still required physical contact for programming, though, so [Ido] had the idea to use the sensor for wireless IR programming. The microcontroller on version two was switched to an ATtiny212, and a couple of components were added to control the power of the LED so the sensor could do double duty. A programmer using the same sensor and a USB-to-UART adapter completes the system, and allows the sensor threshold to be set just by shining the programmer in its general direction from up to 25 cm away.

We think that getting multiple uses from a single sensor is pretty clever, so hats off for this one. It’s not the first time we’ve featured one of [Ido]’s projects, but it’s been quite a while — this one-clock-cycle-a-day Shabbat clock was the most recent, but you can clearly see the roots of the sensor project in this mouse pointer data encoder that goes all the way back to 2015.

A diagram showing an LED on the left, a lever-style plumbing valve in the center, and an Arduino Uno on the right.

Plumbing Valves As Heavy Duty Analog Inputs

Input devices that can handle rough and tumble environments aren’t nearly as varied as their more fragile siblings. [Alastair Aitchison] has devised a brilliant way of detecting inputs from plumbing valves that opens up another option. (YouTube) [via Arduino Blog]

While [Aitchison] could’ve run the plumbing valves with water inside and detected flow, he decided the more elegant solution would be to use photosensors and an LED to simplify the system. This avoids the added cost of a pump and flow sensors as well as the questionable proposition of mixing electronics and water. By analyzing the change in light intensity as the valve closes or opens, you can take input for a range of values or set a threshold for an on/off condition.

[Aitchison] designed these for an escape room, but we can see them being great for museums, amusement parks, or even for (train) simulators. He says one of the main reasons he picked plumbing valves was for their aesthetics. Industrial switches and arcade buttons have their place, but certainly aren’t the best fit in some situations, especially if you’re going for a period feel. Plus, since the sensor itself doesn’t have any moving parts, these analog inputs will be easy to repair should anything happen to the valve itself.

If you’re looking for more unusual inputs, check out the winners of our Odd Inputs and Peculiar Peripherals contest or this typewriter that runs Linux.

Continue reading “Plumbing Valves As Heavy Duty Analog Inputs”

Small sensor built into audio jack, held in tweezers

Measuring LED Flicker, With Phototransistor And Audio App

No one likes a flickering light source, but lighting is often dependent on the quality of a building’s main AC power. Light intensity has a close relation to the supply voltage, but bulb type plays a role as well. Incandescent and fluorescent bulbs do not instantly cease emitting the instant power is removed, allowing their output to “coast” somewhat to mask power supply inconsistencies, but LED bulbs can be a different story. LED light output has very little inertia to it, and the quality of both the main AC supply and the bulb’s AC rectifier and filtering will play a big role in the stability of an LED bulb’s output.

Mobile phone spectrum analyzer pointed at light source
The DIY photosensor takes the place of the microphone input.

[Tweepy] wanted to measure and quantify this effect, and found a way to do so with an NPN phototransistor, a resistor, and a 3.5 mm audio plug. The phototransistor and resistor take the place of a microphone plugged into the audio jack of an Android mobile phone, which is running an audio oscilloscope and spectrum analyzer app. The app is meant to work with an audio signal, but it works just as well with [Tweepy]’s DIY photosensor.

Results are simple to interpret; the smoother and fewer the peaks, the better. [Tweepy] did some testing with different lighting solutions and found that the best performer was, perhaps unsurprisingly, a lighting panel intended for photography. The worst performer was an ultra-cheap LED bulb. Not bad for a simple DIY sensor and an existing mobile phone app intended for audio.

Want a closer look at what goes into different LED bulbs and how they tick? We have you covered. Not all LED bulbs are the same, either. Some are stripped to the bone and others are stuffed with unexpected goodness.

Turntable Turns Waveform Generator

In need of a waveform generator for another project, [David Cook] crammed out the old turntable to modify it for a handy hack: By adding a simple reflectance sensor to the pickup he turned it into a waveform generator that optically plays back arbitrary waveforms from printed paper discs.

Continue reading “Turntable Turns Waveform Generator”

Optical Data Transfer Project At Local School’s Family Science Night

optical-data-at-family-science-night

[Dave] wanted to show off a project at his 4th-grade son’s school during their family science night. We haven’t heard of an event like this before but it sounds like a fabulous idea! He had a new laser he wanted to include in the project, and noticed that his son was learning about how ASCII maps letters to binary number when the idea struck. He ended up building an optical data transfer system that demonstrates binary code.

This presents a fantastic learning opportunity as the project invited the school kids to select encoded strips like the ones seen above to form a secret message. The laser is pointed at a photosensor which is being read by a Raspberry Pi board. The Python code looks for a baseline and then records increases and decreases in intensity. Since the translucent tokens have either holes or black lines for 0 and 1 the baseline approach does away with the need to clock in the data. [Dave] reports that everyone who tried out the experiment was fully engaged at the prospect of pushing pieces of tape through the sensor and watching their secret message appear on a monitor.

He was motivated to write about this project after reading about data transfer using an LCD screen and photosensor.

Building A Spectrophotometer

What can you make with a toilet paper roll, duct tape, and a graphing calculator? A stand for your homemade spectrometer. This is neither as pretty nor as accurate as a precision scientific instrument, but that doesn’t mean it’s useless. In fact, it works perfectly well for rudimentary observations. Light is shined through a sample solution, passes through a diffraction grating, then shows up as bands of color on the projection surface seen above. The photosensor mounted on the cardboard tube was pulled from a night-light, and is read using the ruler and the multimeter. This results in two data units that are used to graph the results. As long as you’re running test samples as a control this simple setup will yield useful information for the scientist on a shoe-string budget.

[via BoingBoing]