PIC-Powered Game Console Is Blocky Goodness

Picking up new skills in the electronics field is often best served by the classic mantra – “learn by doing”. [Juan] and [Leo] did just that, deciding to build a handheld game console for a University project, and delivering the PGC-32.

Built as a final project for the Digital Systems Design course at Cornell University, the PGC-32 takes on a daunting chunk of functionality, and pulls it off in time to get the grades. The team coded a basic block-based game for the hardware, and control is switchable between the analog stick and a built-in accelerometer. Gameplay is displayed on a 320 x 280 color TFT display. Learning to code a basic game is useful, as it teaches student engineers to consider important concepts like timing, race conditions, interrupts, and display routines.

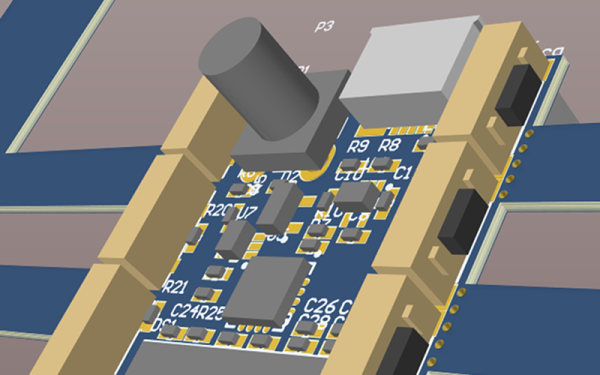
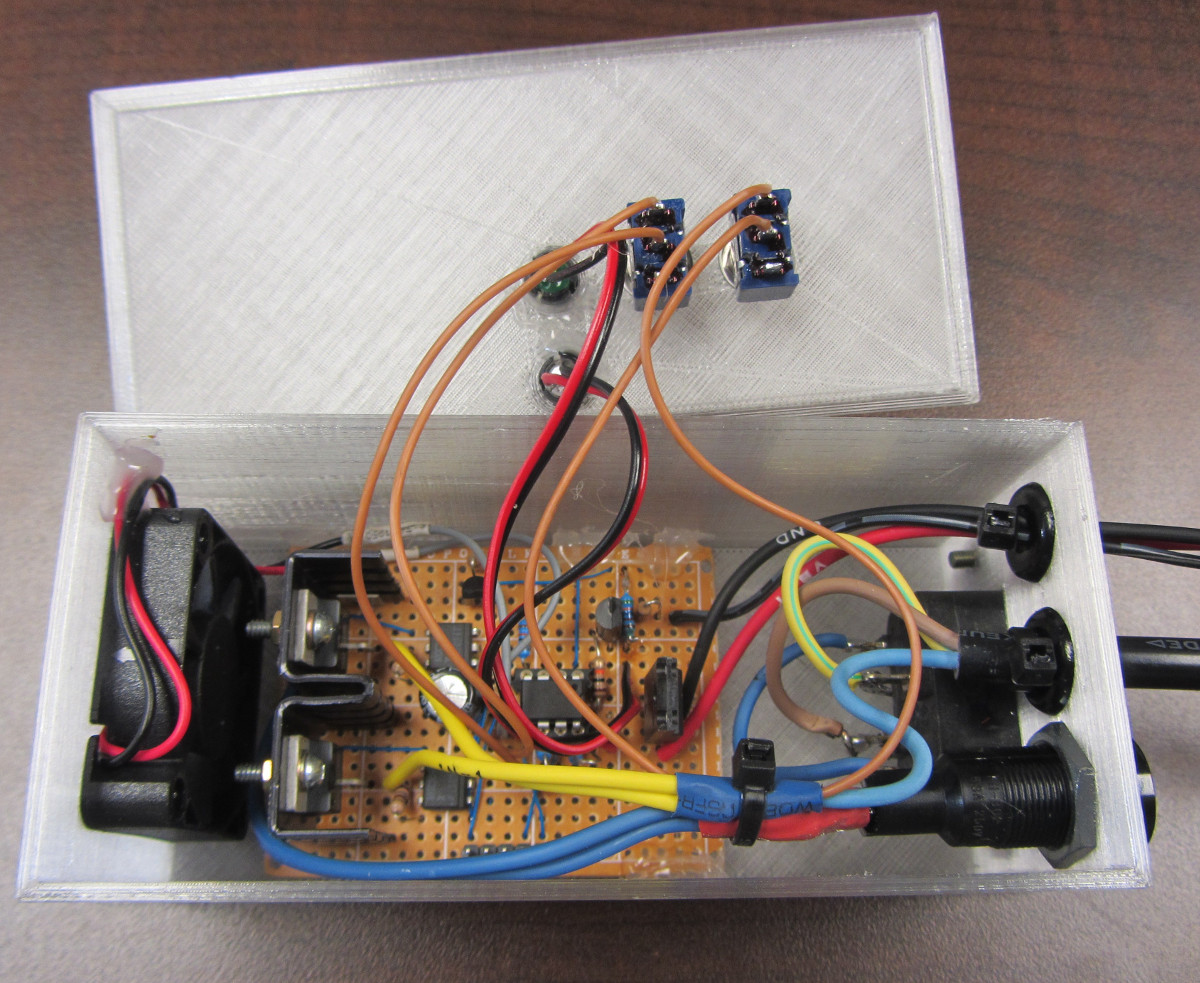
As a university project, it is well documented and the team step through each detail in their code with explanations as to how and why things are done. The internals are particularly neat, too, with a tidy PCB layout and 3D printed case holding everything together.

We’ve seen plenty of work from Cornell’s courses before, too – like this sleep quality monitor.  Video after the break.

Continue reading “PIC-Powered Game Console Is Blocky Goodness”

How Big Is Your Oscilloscope? One Inch?

We are anxious to see the finished product of [Mark Omo’s] entry into our one square inch project. It is a 20 megasample per second oscilloscope that fits the form factor and includes a tiny OLED screen. We will confess that we started thinking if you could use these as replacements for panel meters or find some other excuse for it to exist. We finally realized, though, that it might not be very practical but it is undeniably cool.

There are some mockup PCB layouts, but the design appears feasible. A PIC32MZ provides the horsepower. [Mark] plans to use an interleaved mode in the chip’s converters to get 20 megasamples per second and a bandwidth of 10 MHz. It appears he’ll use DMA to drive the OLED. In addition to the OLED and the PIC, there’s a termination network and a variable gain stage and that’s about it.

Continue reading “How Big Is Your Oscilloscope? One Inch?”

There Is A Cost To Extended Lifetime Products. It’s 7.5%.

Silicon and integrated circuits come and go, but when it comes to extended lifetime support from a company, it’s very, very hard to find fault with Microchip. They’re still selling the chip — new — that was the foundation of the Basic Stamp. That’s a part that’s being sold for twenty-five years. You can hardly find that sort of product support with a company that doesn’t deal in high-tech manufacturing.

While the good times of nearly unlimited support for products that are decades old isn’t coming to an end, it now has a cost. According to a press release from Microchip, the price of these old chips will increase. Design something with an old chip, and that part is suddenly going to cost you 7.5% more.

The complete announcement (3MB PDF), states, in part:

…in the case of extended lifecycle product offerings, manufacturing, assembly and carrying costs are increasing over time for
these mature technology products and packages. Rather than discontinue our mature product, Microchip will continue to support our
customer needs for product availability, albeit increasing the prices in line with increased cost associated with supporting mature
product lines….

For all orders received after 31 August, pricing for the products listed will be subject to an increase of 7.5%

The PDF comes with a list of all the products affected, and covers the low-end ATtinys, ATMegas, and PICs that are used in thousands of tutorials available online. The ATtiny85 is not affected, but the ATMega128 is. There are a number of PICs listed, but a short survey reveals these are low-memory parts, and you really shouldn’t be making new designs with these anyway.

Simulate PIC And Arduino/AVR Designs With No Cloud

I’ve always appreciated simulation tools. Sure, there’s no substitute for actually building a circuit but it sure is handy if you can fix a lot of easy problems before you start soldering and making PCBs. I’ve done quite a few posts on LTSpice and I’m also a big fan of the Falstad simulator in the browser. However, both of those don’t do a lot for you if a microcontroller is a major part of your design. I recently found an open source project called Simulide that has a few issues but does a credible job of mixed simulation. It allows you to simulate analog circuits, LCDs, stepper and servo motors and can include programmable PIC or AVR (including Arduino) processors in your simulation.

The software is available for Windows or Linux and the AVR/Arduino emulation is built in. For the PIC on Linux, you need an external software simulator that you can easily install. This is provided with the Windows version. You can see one of several videos available about an older release of the tool below. There is also a window that can compile your Arduino code and even debug it, although that almost always crashed for me after a few minutes of working. As you can see in the image above, though, it is capable of running some pretty serious Arduino code as long as you aren’t debugging.

Continue reading “Simulate PIC And Arduino/AVR Designs With No Cloud”

Vintage Headphones Bluetooth Conversion Goes The Extra Mile

[KaZjjW] wanted to retrofit a pair of nicely styled vintage headphones to be able to play wirelessly over Bluetooth. In principle this is an easy task: simply stick a Bluetooth audio receiver on the line-in, add a battery, and you’re all set. However, [KaZjjW] wanted to keep the aesthetic changes to the headphones at an absolute minimum, retaining the existing casing and volume control, whilst cramming the electronics entirely inside and out of sight.

With the inherent space constraints inside the cups of the headphones, this proved to be quite a challenge. The existing volume potentiometer which hung half outside the case was remounted on an ingenious hinge made of two PCBs, with the pot floating next to a surface mounted switch. This allowed it to not only control the volume, but also act as an on/off switch for the Bluetooth. The only other existing cuts in the casing were a circular hole for the audio cable, and a slit for the cable strain relief. These worked perfectly for an LED status indicator and micro-USB battery charging.

The main chip used for receiving audio over Bluetooth was the BM62 by Microchip. It’s a great all-in-one solution for this kind of project as it has built-in battery charging, an on-board DAC and audio amp, as well as a serial control interface. In part 2 of the project log, the process of programming the BM62 was documented, and it was painful – it’s a shame that the software support lets it down. But a hacker will always find a way, and we’ve seen some pretty neat hacks for reprogramming existing chips in off-the-shelf Bluetooth headphones.

Two PCBs for the pot button hinge, one for the LED and micro-USB connector, as well as one for the Bluetooth receiver and a PIC. That’s four PCBs in a pretty small space, enabled by some commendable design effort both electronically and mechanically. It certainly paid off, as the finished product looks very slick.

Continue reading “Vintage Headphones Bluetooth Conversion Goes The Extra Mile”

Put The 3D Printer To Sleep So You Can Rest Easy

At this point you’ve probably already heard the news: cheap Chinese 3D printers sometimes catch fire. Now we can’t say we’re shocked to find out that absolute bottom of the barrel gear wasn’t designed to the highest standards (gotta cut those corners someplace), but that doesn’t change the fact that there are thousands of hackers and makers out there who are in possession of one of these suspect machines. Just tossing them to the curb is hardly the hacker way, so we’ve got to find ways to make the best of the hand dealt to us.

After sleeping with one eye (and maybe one nostril) open during some overnight prints, Hackaday.io user [TheGrim] wanted a way to make sure his Alunar Anet A6 didn’t stay powered on any longer than necessary. So he came up with a way of using the printer’s own endstop switch to detect if the print has completed, and cut the power.

The idea is simple, but of course the real trick is in the implementation. By adding a “Home” command to his ending G-Code in Cura, [TheGrim] reasoned he could use the Y endstop switch to determine if the print had completed. It was just a matter of reading the state of the switch and acting on it.

In the most basic implementation, the switch could be used to control a relay on the AC side of the power supply. But [TheGrim] doesn’t trust relays, and he wanted to pack in a couple “smart” features so he ended up using a PIC microcontroller and two 12 amp TRIACs. There’s also a couple of LEDs and toggle switches to serve as the user interface, allowing you to enable and disable the automatic shutdown and get status information about the system.

Will cutting the juice to the PSU prevent another terrible fire? It’s debatable. But it certainly can’t hurt, and if it makes [TheGrim] feel more confident about running his machine, then so be it. We’d still advise anyone with a 3D printer at home to brush up on their fire safety knowledge.

Headlight Mod For An Audi A3

If you have a car that is getting on in years, it may be missing some of the latest frills and features that the latest models sport. [Muris] has a slightly dated Audi A3 8P which did not have an AUTO setting for the headlights. In the newer models, this feature turns on the headlights when the ambient light falls below a threshold level (overcast conditions or when going through a tunnel), or when the windshield wipers are turned on. The light sensor is integrated behind the rear view mirror in a special mount, requiring an expensive windshield upgrade if he were to opt for the factory retrofit. Instead, he decided to build his own Automatic Headlights Sensor upgrade for his Audi A3.

His local regulations require the car headlights to be on all the time when the vehicle is in motion. So adding this feature may seem moot at first sight. But [Muris] programmed the headlights to be powered at 70% during daytime conditions and switch to 100% when his sensor detects low ambient light conditions. In the power save mode, all of the other non-essential lights (number plate, tail light) are also turned off to hopefully extend their life. He achieved this by using the VCDS (VAG-COM Diagnostic System) – a widely used aftermarket diagnostics tool for VW-Audi Group vehicles. His tiny circuit switches the lights between the two power settings.

His plan was to install the device without disturbing the original wiring or light switch assembly in any way. The low-powered device consists of a PIC micro-controller, an LDR (light dependent resistor) for light sensing and a low current relay which switches between the two modes. Setting the threshold at which the circuit switches the output is adjusted by a variable trimpot acting as a voltage divider with the LDR. [Muris] wired up a short custom harness which let him install this circuit between the default light switch and the car electronics. After switching on power, he has 15 seconds to enable or disable his unit by toggling the light switch five times, and that status gets stored in memory. The tiny board is assembled using SMD parts and is protected with a heatshrink sleeve. The circuit would work equally well with a lot of other cars, so If you’ve got one which could do with this feature upgrade, then [Muris] has the Eagle CAD files and code available for download on his blog.

Check out the video below where he runs a demo, describes his circuit in detail and then proceeds to assemble the PCB without using a vise or a third hand to hold the PCB. That’s a fancy watch he’s sporting at 00:50 s down the video.

Continue reading “Headlight Mod For An Audi A3”