Rescue An Old Washing Machine With Modern Controls

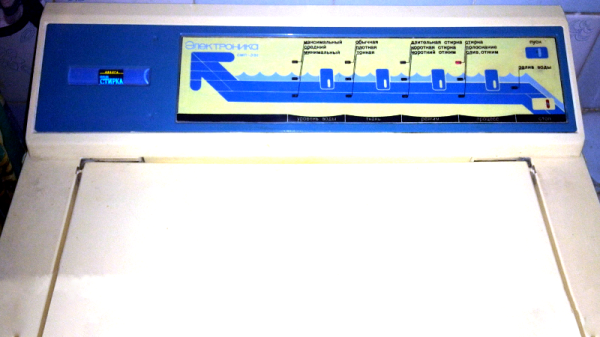
The humble washing machine is an appliance that few of us are truly passionate about. They’re expected to come into our lives and serve faithfully, with a minimum of fuss. In the good old days, it was common for a washing machine to last for well over 20 years, and in doing so ingratiate itself with its masters. Sadly now while the simple mechanical parts may still be serviceable, the electronics behind the scenes can tend to fail. This is a Russian story (Google Translate link) about giving a new brain to an old friend.

The machine in question is known as an Oriole, and had served long and hard. Logic chips and entire controllers had been replaced, but were continuing to fail. Instead, a replacement was designed to keep the machine operational for some time yet. Rather than relying on recreating the full feature set of the machine it was decided to eliminate certain things for simplicity. Settings for different fabric types or wash modes were eliminated, which is an easy choice if like most people all your washes are done in the same mode anyway. A water level sensor was found to be no longer functioning properly and was simpler to eliminate than repair.

The brain is a PIC microcontroller, with an ESP12 acting as a webserver for monitoring and control. Additionally, a glass lens was taken from some former medical equipment and neatly installed in the control panel of the machine before an OLED display, giving the machine far more feedback than before. Control is still done with the machine’s original buttons. Temperature sensors were added as well to allow the machine to shut itself down in the event of an overheating problem. It’s all tied together on what looks to be a classic single-sided homebrew PCB.

It’s a great project that shows it’s easy to bring modern electronic might to bear on vintage mechanical hardware, with great results. A washing machine lives to see another day, another load – and the landfill remains just that much lighter, to boot.

We’ve seen controller builds for old washing machines before, too – like replacing mechanical control with an Arduino.

[Thanks to Tirotron for sending this in!]

Fully-functional Oscilloscope On A PIC

When troubleshooting circuits it’s handy to have an oscilloscope around, but often we aren’t in a lab setting with all of our fancy, expensive tools at our disposal. Luckily the price of some basic oscilloscopes has dropped considerably in the past several years, but if you want to roll out your own solution to the “portable oscilloscope” problem the electrical engineering students at Cornell produced an oscilloscope that only needs a few knobs, a PIC, and a small TV.

[Junpeng] and [Kevin] are taking their design class, and built this prototype to be inexpensive and portable while still maintaining a high sample rate and preserving all of the core functions of a traditional oscilloscope. The scope can function anywhere under 100 kHz, and outputs NTSC at 30 frames per second. The user can control the ground level, the voltage and time scales, and a trigger. The oscilloscope has one channel, but this could be expanded easily enough if it isn’t sufficient for a real field application.

All in all, this is a great demonstration of what you can accomplish with a microcontroller and (almost) an engineering degree. To that end, the students go into an incredible amount of detail about how the oscilloscope works since this is a design class. About twice a year we see a lot of these projects popping up, and it’s always interesting to see the new challenges facing students in these classes.

Continue reading “Fully-functional Oscilloscope On A PIC”

Sensing Soil Moisture: You’re Doing It Wrong!

If you compulsively search online for inexpensive microcontroller add-ons, you will see soil moisture measurement kits. [aka] built a greenhouse with a host of hacked hardware including lights and automatic watering. What caught our attention among all these was Step 5 in their instructions where [aka] explains why the cheap soil sensing probes aren’t worth their weight in potting soil. Even worse, they may leave vacationers with a mistaken sense of security over their unattended plants.

The sensing stakes, which come with a small amplifier, work splendidly out of the box, but if you recall, passing current through electrodes via moisture is the recipe for electrolysis and that has a pretty profound effect on metal. [Aka] shows us the effects of electrolysis on these probes and mentions that damaged probes will cease to give useful information which could lead to overworked pumps and flooded helpless plants.

There is an easy solution. Graphite probes are inexpensive to make yourself. Simply harvest them from pencils or buy woodless pencils from the art store. Add some wires and hold them with shrink tube, and you have probes which won’t fail you or your plants.

Here’s some garden automation if this only whet your whistle, and here’s a robotic friend who takes care of the weeds for you.

PCB Tesla Coil Is Perfect Desk Toy

A Tesla coil easily makes it to the top spot on our list of “Mad Scientist” equipment we want for the lab, second only to maybe a Jacob’s Ladder. Even then, it’s kind of unfair advantage because you know people only want a Jacob’s Ladder for that awesome sound it makes. Sound effects not withstanding, it’s Tesla coil all the way, no question.

Unfortunately, winding your own Tesla coil is kind of a hassle. Even on relatively small builds, you’ll generally need to setup some kind of winding jig just to do the secondary coil, which can be a project in itself. So when [Daniel Eindhoven] sent his no-wind Tesla coil into the tip line, it immediately got our attention.

The genius in his design is that the coils are actually etched into the PCB, completely taking the human effort out of the equation. Made up of 6 mil traces with 6 mil separation, the PCB coil manages to pack a 25 meter long, 160 turn coil into an incredibly compact package. As you might expect, such a tiny Tesla coil isn’t exactly going to be a powerhouse, and in fact [Daniel] has managed to get the entirely thing running on the 500 mA output of your standard USB 2.0 port.

In such a low-power setup, [Daniel] was also able to replace the traditional spark gap pulse generator with a PIC18F14K50 microcontroller, further simplifying the design. An advantage of using a microcontroller for the pulse generator is that it’s very easy to adjust the coil’s operating frequency, allowing for neat tricks like making the coil “sing” by bringing its frequency into the audible range.

For those looking to build their own version, [Daniel] has put the PCB schematic and firmware available for download on his site. He also mentions that, in collaboration with Elektor magazine, he will be producing a kit in the near future. Definitely something we’ll be keeping an eye out for.

Incidentally, this isn’t the first time [Daniel] has demonstrated his mastery of high voltage. He scared impressed us all the way back in 2010 with his 11,344 Joule capacitor bank, perfect for that laptop-destroying rail gun you’ve been meaning to build.

Continue reading “PCB Tesla Coil Is Perfect Desk Toy”

Microchip ICD4 REview

[Mike] is an avid PIC developer and replaced his ICD3 debugger for an ICD4. He made a video with his impressions and you can see it below. [Mike] found the heavy aluminum case with a sexy LED attractive, but wondered why he was paying for that in a development tool. He was also unhappy that they replaced the ICD3 cable connections with new connectors. Finally, he wished for the pin out to be printed on the case.

On the other hand, the ICD4 will also do JTAG and handle the Atmel parts (which Microchip acquired). [Mike] opens the box and shows the inside of the device before actually using it for the intended task.

Continue reading “Microchip ICD4 REview”

Garage Distance Sensor Kicks Tennis Ball To Curb

Those with small garages might be familiar with the method of hanging a tennis ball from a ceiling to make sure they don’t hit the back wall with their car. If the car isn’t in the garage, though, the tennis ball dangling from a string tends to get in the way. To alleviate this problem, [asaucet] created a distance sensor that can tell him when his car is the perfect distance from the garage wall.

At the heart of the distance sensor is an HC-SR04 ultrasonic rangefinder and a PIC16F88 microcontroller. [asaucet] uses a set of four LEDs to alert the driver how close they are to the garage wall. [asaucet] also goes into great detail about how to use an LCD with this microcontroller for setting up the project, and the amount of detail should be enough to get anyone started on a similar project.

While this isn’t a new idea, the details that [asaucet] goes into in setting up the microcontroller, using the distance sensor, and using an LCD are definitely worth looking into. Even without this exact application in mind, you’re sure to find some helpful information on the project page.

Continue reading “Garage Distance Sensor Kicks Tennis Ball To Curb”

Digitool Helps Debugging

Logic analyzers used to be large boxes full of high-speed logic and a display monitor. Today, they are more likely to be a small box with a USB port that feeds data to a PC application. [Juan Antonio Rubia Mena] wanted something more self-contained, so he built Digitool. Built around a PIC18F2525, the device can measure frequency up to 10 MHz and inject square waves up to 1 MHz into the circuit under test. Oh yeah. It also has a simple four-channel logic analyzer that displays on a tiny LCD.

The 500,000 sample per second rate and the 1024 sample buffer isn’t going to put any logic analyzer vendors out of business, but it is still enough to help you figure out why that SPI or I2C logic is messed up. It looks like a fun project that could have some usefulness.

Continue reading “Digitool Helps Debugging”