This Found-Sound Organ Was Made With Python And A Laser Cutter

Some readers will no doubt remember attaching a playing card to the front fork of their bicycle so that the spokes flapped the card as the wheel rotated. It was supposed to sound like a motorcycle, which it didn’t, but it was good, clean fun with the bonus of making us even more annoying to the neighborhood retirees than the normal baseline, which was already pretty high.

[Garett Morrison]’s “Click Wheel Organ” works on much the same principle as a card in the spokes, only with far more wheels, and with much more musicality. The organ consists of a separate toothed wheel for each note, all turning on a common shaft. Each wheel is laser-cut from thin plywood, with a series of fine teeth on its outer circumference. The number of teeth, as calculated by a Python script, determines the pitch of the sound made when a thin reed is pressed against the spinning wheel. Since the ratio of teeth between the wheels is fixed, all the notes stay in tune relative to each other, as long as the speed of the wheels stays constant.

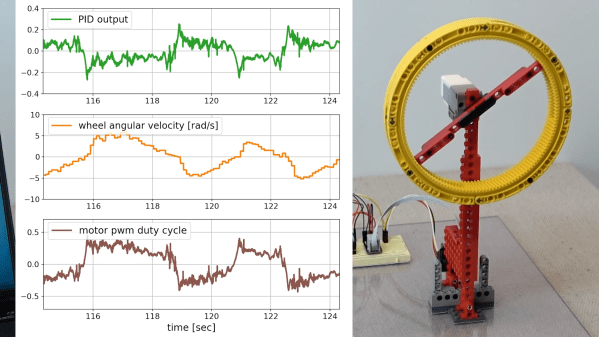
The proof-of-concept in the video below shows that speed control isn’t quite there yet — playing multiple notes at the same time seems to increase drag enough to slow the wheels down and lower the pitch for all the notes. There appears to be a photointerrupter on the wheel shaft to monitor speed, so we’d imagine a PID loop to control motor speed might help. That and a bigger motor that won’t bog down as easily. As for the sound, we’ll just say that it certainly is unique — and, that it seems like something [Nicolas Bras] would really dig.

Continue reading “This Found-Sound Organ Was Made With Python And A Laser Cutter”

PET Bottles Diligently Turned Into Filament

While the price of 3D printers has come down quite a lot in the past few years, filament continues to be rather pricey especially for those doing a lot of printing. This has led to some people looking to alternatives for standard filament, including recycling various forms of plastic. We’ve seen plenty of builds using various materials, but none so far have had this level of quality control in the final project.

What sets this machine apart from others is that it’s built around an Arduino Nano and includes controls that allow the user to fine-tune a PID controller during the conversion of the recycled plastic into filament. Different plastic bottles have different material qualities, so once the machine is started it can be adjusted to ensure that the filament produced has the exact specifications for the printer. The PCB is available for download, and the only thing that needs to be done by hand besides feeding the machine to start it is to cut the plastic into strips for the starter spool. There is also a separate 3D printed tool available to make this task easy, though.

Not only could this project save printing costs, but it also keeps harmful plastics out of landfills and other environments. Recycling plastic tends to be quite difficult since producing new plastic is incredibly cheap, and the recycled material can’t be used as often as other materials such as aluminum. But there are still plenty of people out there trying to reuse as much of it as they can.

Continue reading “PET Bottles Diligently Turned Into Filament”

Mini Falcon 9 Uses NASA Software

[T-Zero Systems] has been working on his model Falcon 9 rocket for a while now. It’s an impressive model, complete with thrust vectoring, a microcontroller which follows a predetermined flight plan, a working launch pad, and even legs to attempt vertical landings. During his first tests of his model, though, there were some issues with the control system software that he wrote so he’s back with a new system that borrows software from the Space Shuttle.

The first problem to solve is gimbal lock, a problem that arises when two axes of rotation line up during flight, causing erratic motion. This is especially difficult because this model has no ability to control roll. Solving this using quaternion instead of Euler angles involves a lot of math, provided by libraries developed for use on the Space Shuttle, but with the extra efficiency improvements the new software runs at a much faster rate than it did previously. Unfortunately, the new software had a bug which prevented the parachute from opening, which wasn’t discovered until after launch.

There’s a lot going on in this build behind-the-scenes, too, like the test rocket motor used for testing the control system, which is actually two counter-rotating propellers that can be used to model the thrust of a motor without actually lighting anything on fire. There’s also a separate video describing a test method which validates new hardware with data from prior launches. And, if you want to take your model rocketry further in a different direction, it’s always possible to make your own fuel as well.

Continue reading “Mini Falcon 9 Uses NASA Software”

Building Reaction Wheels With Python And LEGO

Reaction wheels are useful things, typically used by satellites to keep themselves oriented the right way up in space. Turning the reaction wheel creates an equal and opposite torque in the spacecraft, allowing it to point and rotate itself accurately. The same technique also works here on Earth, and [Brick Experiment Channel] decided to build one out of LEGO to control an inverted pendulum.

The initial design using a small LEGO wheel on an inverted pendulum was only able to work reliably over a 4-degree angle from the vertical. Upgrading the wheel to a larger, heavier one enabled the wheel to instead work over a 28-degree range instead.

A MPU9250 inertial measurement unit was pressed into service for control of the reaction wheel, fitted to the base of the pendulum and read by a Raspberry Pi. The Pi takes accelerometer and gyroscope readings, and then controls the motor on the pendulum with a PID controller to keep the inverted pendulum upright.

The video goes into a great deal of detail on what it takes to make the pendulum run smoothly. From changes to the control coefficients to measuring the motor’s back EMF, [Brick Experiment Channel] demonstrates everything required to make the pendulum robust to outside perturbances.

The inverted pendulum is a great way to learn about control theory, as we’ve seen time and again.

Continue reading “Building Reaction Wheels With Python And LEGO”

Filament Dry Box Design Goes Way Over The Top

There’s a fine line between simple feature creep and going over the top when it comes to project design. It’s hard to say exactly where that line is, but we’re pretty sure that this filament dry box has at least stepped over it, and might even have erased it entirely.

Sure, we all know the value of storing 3D printer filament under controlled conditions, to prevent the hygroscopic plastics from picking up atmospheric moisture. But [Sasa Karanovic] must really, REALLY hate the printing artifacts that result. Starting with a commercially available dry box that already had a built-in heating element, [Sasa] took it to the next level by replacing the controller and display with an ESP32. He added a fan to improve air circulation inside the enclosure and prevent stratification, as well as temperature and humidity sensors. Not satisfied with simply switching the heating element on and off at specific setpoints, he also implemented a PID loop to maintain a constant temperature. And of course, there’s a web UI and an API available for third-party control and monitoring.

The video below details [Sasa]’s design thoughts and goes into some detail on construction and performance. And while we may kid that this design is over-the-top, what really comes through is that this is a showcase for design ideas not only for one application, but for hardware projects in general. There are certainly simpler heated dry box designs, and zero-cost solutions as well, but sometimes going overboard has its own value too.

Continue reading “Filament Dry Box Design Goes Way Over The Top”

Pico Does PID

If you wanted to, say, control a temperature you might think you could just turn on a heater until you reach the desired temperature and then turn the heater off. That sort of works, but it is suboptimal — you’ll tend to overshoot the goal and then as the system cools down, you’ll have to catch up and the result is often a system that oscillates around the desired value but never really settles on the correct temperature. To solve that, you can use a PID — proportional integral derivative — loop and that’s what [veebch] has done with a Rasberry Pi PICO and Micropython.

The idea is to control an output signal based on the amount of difference between the actual temperature and the desired temperature (the proportional error). In addition, the amount is adjusted based on the long term error (integral) and any short term change (the derivative). You can also see a video about using the control loop to make a better sous vide burger, below. Continue reading “Pico Does PID”

Fail Of The Week: Magnetic Levitation

We are big fans of the little desktop magnetic levitation setups that float a small object on a magnet. As [3D Printed Life] points out, they look like magic. He was surprised that the commercial units use analog electronics. He decided to build a digital version but didn’t know what he was getting into. He details his journey in the video you can see below.

Along with a custom control board, he decided to wind his own electromagnets. After finding that tedious he built a simple coil winder to automate some of the work.

Continue reading “Fail Of The Week: Magnetic Levitation”