PLA-F Blends PLA And ABS

In the early days of 3D printing, most people used ABS plastic. It is durable and sticks well to simple surfaces. However, it smells and emits fumes that may be dangerous. It also tends to warp as it cools which causes problems when printing. PLA smells nicer and since it is made from corn is supposed to be less noxious. However, PLA isn’t as temperature resistant and while it will stick better to beds without heat, it also requires more airflow to set the plastic as it prints. [Kerry Stevenson] recently reviewed PLA-F which is a blend of the two plastics. Is it the best of both worlds? Or the worst?

[Kerry]  did several tests with interesting results. He did a temperature test tower and found the material printed well between 190 and 240 °C. He did note some stringing problems, though.

Continue reading “PLA-F Blends PLA And ABS”

Aesthetic DIY Bluetooth Speakers

DIY Bluetooth speaker projects are always a staple here at Hackady. In our latest feature of DIY audio builds, we have [Patrick’s] vinyl cylindrical speaker.

He found a pretty inexpensive Bluetooth audio amplifier on AliExpress. However, the amplifier module oddly enough had a few missing components that were critical to its operation, so he had to do a little bit of re-work. Not something you generally expect to do when you purchase a pre-made module, but he was certainly up to the task.

He noticed the board amp module was missing a battery protection circuit even though there was space on the board laid out for those components (maybe an older board revision?). To remedy this problem, he added his own battery protection circuit to prevent any unwanted catastrophes. Secondly, he noticed a lot of distortion at high volumes and figured that some added capacitance on the power supply would help fix the distortion. Luckily, that did the trick.

Finally, and not quite a mistake on the manufacturer’s part this time, but an improvement [Patrick] needed for his own personal use. He wanted the amp module’s board-level LED indicator to be visible once the enclosure was fitted around the electronics. So, he used the built-in status trigger as a digital signal for a simple transistor circuit powering a much brighter ring LED that could be mounted onto the enclosure. That way, he could utilize the firmware for triggering the board-level status indicator for his own ring LED without any software modifications to the amp module.

Now, all that was left was to construct the enclosure he had 3D-printed and fit all the electronics in their place. We’ve gotten pretty used to the always impressive aesthetics of [Patrick’s] designs, having covered a project of his before, and this build is certainly no exception. Great job!

While you’re here, take a look at some other DIY Bluetooth speaker projects on Hackaday.

Continue reading “Aesthetic DIY Bluetooth Speakers”

Printed It: Print-in-Place PCB Gripper

The goal of Printed It is to showcase creations that truly embrace the possibilities offered by desktop 3D printing. The most obvious examples are designs that can be printed quickly and cheaply enough that they’re a valid alternative to commercially available products. But as previous entries into the series have shown, there are also technical considerations. Is it simply a duplicate of something that could be produced via traditional means, or does the design really benefit from the unique nature of 3D printing?

A perfect example is the Print-in-Place PCB Holder/Gripper created by SunShine. This design is able to hold onto PCBs (or really, whatever you wish) without any additional components. Just pull it off the bed, and put it to work. While having to add a rubber band or generic spring would hardly be an inconvenience, there’s always something to be said for a design that’s truly 100% printable.

The secret is the dual flat spiral springs integrated into the device’s jaws. While most of the common thermoplastics used in desktop 3D printing are relatively stiff, the springs have been designed in such a way that they can be printed in standard PLA. The backside of the jaws have teeth that mesh together, so the energy of the springs is combined to provide a clamping force. Serrations have been added to the jaws to catch the edge of the PCB and help stabilize it.

Visually, it’s certainly striking. The design largely eschews right angles, giving it an almost biological appearance. Many have compared it to the head of a mantis, or perhaps some piece of alien technology.

There’s no question that the design leverages the strengths of 3D printing either; there’s no other way to produce its intricate interlocking components, especially without the use of any sort of fasteners. In short, this design is an ideal candidate for Printed It. But there’s still one question to answer: does it actually work?

Continue reading “Printed It: Print-in-Place PCB Gripper”

IWings For The New Apple Power Adaptor

You might remember the old Apple MagSafe adaptor with the cute little fold out “wings” that served not only as a pragmatic cable management tool, but in our experience also expedited the inevitable and frayed end of your charger. Apple seems to have remedied the latter by opting for removable USB-C cables in latest designs, but the complete omission of a pop-out cable spooling contraption is problematic.

[Eric], an industrial designer, took it upon himself to design a 3D printed add on for the new generation of chargers. His video is certainty one of those satisfying accounts, where the whole process from conceptional sketch to a working Hack is neatly self-contained in a single video.  The design is largely based off the original version, implemented in PLA together with piano wire serving as the hinge pin. We think this is a very good example of how 3D printers can be used to personalise and tweak commercial products to suite particular needs.

If you are looking for a more general 3D printed cable management tool, check out this geared cable winder we featured earlier.

3D-Printed Tools Turn Bench Vise Into Expedient Press Brake

Chances are pretty good that most of us have used a bench vise to do things far beyond its intended use. That’s understandable, as the vise may be the most powerful hand tool in many shops, capable of exerting tons of pressure with the twist of your wrist. Not taking advantage of that power wouldn’t make any sense, would it?

Still, the clamping power of the vise could sometimes use a little finesse, which is the thinking behind these 3D-printed press brake tools.  [Brauns CNC] came up with these tools, which consist of a punch and a die with mating profiles. Mounted to the jaws of the vise with magnetic flanges, the punch is driven into the die using the vise, forming neat bends in the metal. [Braun] goes into useful detail on punch geometry and managing springback of the workpiece, and handling workpieces wider than the vise jaws. The tools are printed in standard PLA or PETG and are plenty strong, although he does mention using his steel-reinforced 3D-printing method for gooseneck punches and other tools that might need reinforcement. We’d imagine carbon-fiber reinforced filament would add to the strength as well.

To be sure, no matter what tooling you throw at it, a bench vise is a poor substitute for a real press brake. Such machine tools are capable of working sheet metal and other stock into intricate shapes with as few setups as possible, and bring a level of power and precision that can’t be matched by an improvised setup. But the ability to make small bends in lighter materials with homemade tooling and elbow grease is a powerful tool in itself.

Continue reading “3D-Printed Tools Turn Bench Vise Into Expedient Press Brake”

Annealing 3D Prints: A Scientific Approach

We’ve all been taught the scientific method: Form a hypothesis, do some experiments, gather some data, and prove or disprove the hypothesis. But we don’t always do it. We will tweak our 3D prints a little bit and think we see an improvement (or not) and draw some conclusions without a lot of data. Not [Josef Prusa], though. His team printed 856 different parts from four different materials to generate data about how parts behaved when annealed. There’s a video to watch, below.

Annealing is the process of heating a part to cause its structure to reorganize. Of course, heated plastic has an annoying habit of deforming. However, it can also make the parts firmer and with less inner tension. Printed parts tend to have an amorphous molecular structure. That is to say, they have no organization at all. The temperature where the plastic becomes soft and able to reorganize is the glass transition temperature.

Continue reading “Annealing 3D Prints: A Scientific Approach”

Hackaday Links Column Banner

Hackaday Links: December 15, 2019

When you’re right, you’re right. Back in January, we predicted that exoskeletons were about to break out as a mainstream product, and gave several examples of prototypes poised to become products. So it was with interest that we read about Sarcos Robotics and their new Guardian XO, a cyber suit aimed at those doing heavy lifting tasks. The wearable, full-body exoskeleton is supposed to amplify the wearer’s effort 20-fold, making a 200-pound load feel like lifting 10 pounds. It runs untethered for two hours on hot-swappable battery packs, and will be offered for lease to civilian heavy industries and the military for $100,000 a year. Honestly, it seems like you could hire a fair number of meat-robots for that sum, but still, it’s an interesting technology and a promising development.

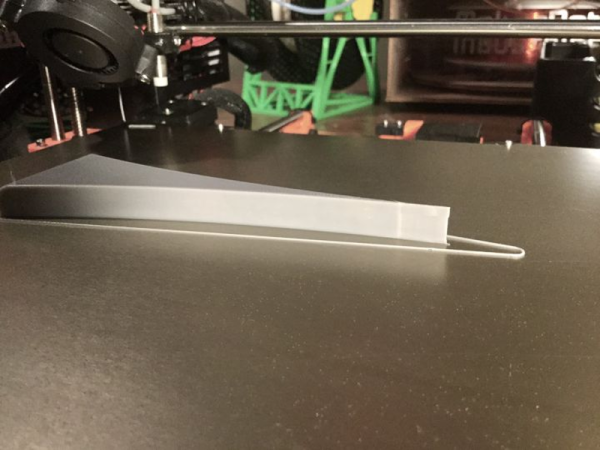
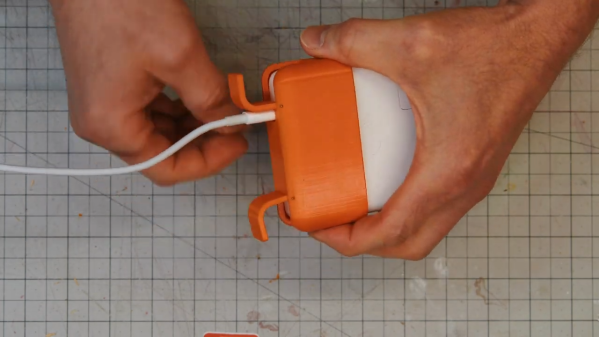
Aficionados of 3D printing know all too well the limitations of the technology. While we’ve come a long way with things like a print in place, multiple materials, embedded electronics, and even direct 3D printing of complex mechanisms like electric motors, there’s been a long-standing obstacle to turning the 3D printer into the replicators of the Star Trek universe: batteries. But even that barrier is falling, and a new paper shows just how far we’ve come to printing batteries right into our designs. Using an off-the-shelf Prusa Mk 3 and specially formulated lithium iron phosphate/PLA and silicon dioxide/PLA filaments, the group was able to print working batteries in one shot. It’s exciting news because previous 3D-printed batteries required special printers or laborious post-processing steps. We’ll be watching for developments here.

Speaking of laboratory work, anyone who has been around labs is probably familiar with LabVIEW, the de facto standard for programming data capture and automation applications in the laboratory setting. The graphical programming language makes it easy to throw together a quick interface, and many lab-rats regret not having the expensive, proprietary environment available for their after-hours hacking. That might no longer be true, though, with special LabVIEW licensing for non-commercial users. It looks like there are two levels: LabVIEW Home Edition and a Community Edition of LabVIEW, which is currently in Beta. Either way, it’s good news for LabVIEW fans.

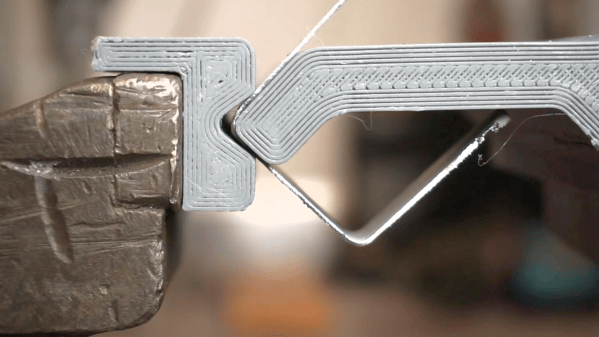
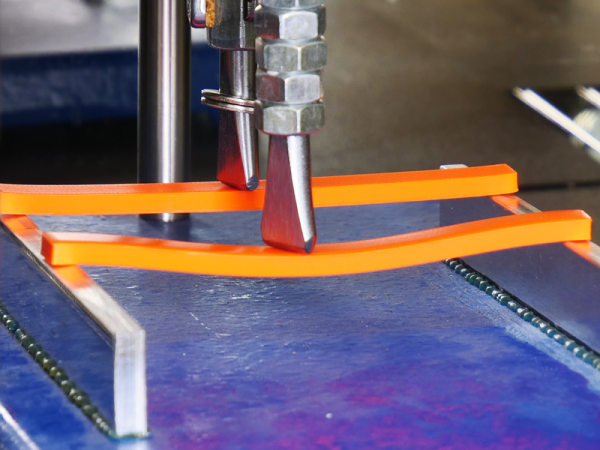
Friend of Hackaday Eric Strebel released a video the other day that we just had to comment on. It has nothing to do with electronics – unless you’re into circuit sculpture, that is. In the first of a two-part series, Eric covers the basics of modeling with brass and copper, using both wire and tubing. He has some great tips, like work-hardening and straightening copper wire by stretching it, and the miniature roll bender seen at 7:40 looks like something that could easily be 3D-printed. We recently did a Hack Chat on circuit sculpture with Mohit Bhoite, and saw his Supercon talk on the subject, so this video really got the creative juices flowing.

If you’re local to the Elkhorn, Wisconsin area, consider stopping by the Elkhorn Mini Maker Faire on February 15 and 16. Elkhorn looks like it has a nice central location between Milwaukee and Madison, and doesn’t appear too far from Chicago either, which is probably why they drew 1,200 people to the inaugural Faire last year. They’re looking to get that up to 2,000 people this year and over 150 booths, so if you’ve got something hackish to show off, check it out. The organizers have even set up a Hackaday.io event page to coordinate with the Hackaday community, so drop them a line and see what you can do to pitch in.

And finally, this one has us scratching our head. Activist group Extinction Rebellion (XR) has claimed they’ve “decommissioned” thousands of electric scooters in French cities. Why they’ve done this is the puzzler; they claim that the scooters-for-hire are an “ecological disaster” due to the resources needed to produce them compared to their short lifespan. We haven’t done the math. What is interesting, though, is the mode of decommissioning: XR operatives simply defaced the QR code on the scooters, rendering them un-rentable with the vendor’s smartphone app. Scooter companies might want to look into alternative rental methods if this keeps up.