An Affordable Home Made Vacuum Chamber

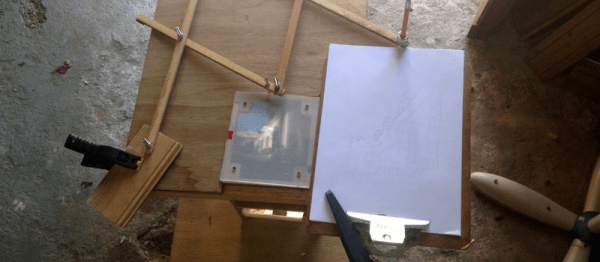
The term “vacuum” means many different things depending whether you are working on space equipment, scientific instruments, or even internal combustion engines. In our sphere it is so often used as a means to draw bubbles out of resin castings, for which it is a relatively easily achievable partial vacuum. It’s something [Fab] is using, in a vacuum chamber made from Plexiglass.

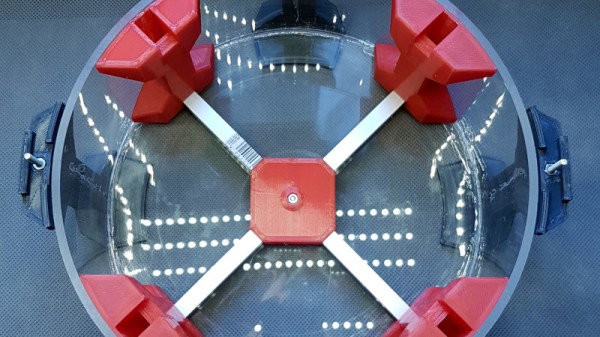
A simple Plexiglass box would collapse under the air pressure on its own, so to mitigate that it’s made from a piece of tube, and with an internal frame of aluminium extrusion with 3D printed joints to strengthen it from the inside. A pressure sensor allows regulation of the pump that drives the vacuum, and connections are made to the chamber using pneumatic hose connectors. It’s not immediately clear how it is sealed, whether there are nay gaskets or other sealant, or whether air pressure pushing the parts together provides enough of a seal.

We’ve featured a lot of vacuum chambers made for this purpose over the years, and we’d be interested to know what vacuum pump is being used here. If  you’re curious too and want to build your own, perhaps you could try a fridge compressor.

RGB Disk Goes Interactive With Bluetooth; Shows Impressive Plastic Work

[smash_hand] had a clear goal: a big, featureless, white plastic disk with RGB LEDs concealed around its edge. So what is it? A big ornament that could glow any color or trippy mixture of colors one desires. It’s an object whose sole purpose is to be a frame for soft, glowing light patterns to admire. The disk can be controlled with a simple smartphone app that communicates over Bluetooth, allowing anyone (or in theory anything) to play with the display.

The disk is made from 1/4″ clear plastic, which [smash_hand] describes as plexiglass, but might be acrylic or polycarbonate. [smash_hands] describes some trial and error in the process of cutting the circle; it was saw-cut with some 3-in-1 oil as cutting fluid first, then the final shape cut with a bandsaw.

The saw left the edge very rough, so it was polished with glass polishing compound. This restores the optical properties required for the edge-lighting technique. The back of the disc was sanded then painted white, and the RGB LEDs spaced evenly around the edge, pointing inwards.

The physical build is almost always the difficult part in a project like this — achieving good diffusion of LEDs is a topic we talk about often. [smash_hands] did an impressive job and there are never any “hot spots” where an LED sticks out to your eye. With this taken care of, the electronics came together with much less effort. An Arduino with an HC-05 Bluetooth adapter took care of driving the LEDs and wireless communications, respectively. A wooden frame later, and the whole thing is ready to go.

[smash_hands] provides details like a wiring diagram as well as the smartphone app for anyone who is interested. There’s the Arduino program as well, but interestingly it’s only available in assembly or as a raw .hex file. A video of the disk in action is embedded below.

Continue reading “RGB Disk Goes Interactive With Bluetooth; Shows Impressive Plastic Work”

Building A Bioactive Vivarium From An IKEA Shelf

Pets are often worth a labour of love. [leftthegan] — in want of a corn snake — found that Sweden’s laws governing terrarium sizes made all the commercial options to too small for a fully-grown snake. So they took matters into their own hands, building a bioactive vivarium for their pet!

[leftthegan] found an IKEA Kallax 4×4 shelving unit for a fair price, and after a few design iterations — some due to the aforementioned regulations — it was modified by adding a shelf extension onto the front and cutting interior channels for cabling. For the vivarium’s window, they settled on plexiglass but strongly recommend glass for anyone else building their own as the former scratches and bends easily — not great if their snake turns out to be an escape artist! In the interim, a 3D printed handle works to keep the window closed and locked.

Continue reading “Building A Bioactive Vivarium From An IKEA Shelf”

Tracing A Scene An Old-Fashioned Way

Taking a picture is as simple as tapping a screen. Drawing a memorable scene, even when it’s directly in front of you, is a different skill entirely. So trace it! Well, that’s kind of hard to do without appropriate preparation.

[bobsteaman]’s method is to first whip up a pantograph — it tested well with a felt marker on the end. Next, he built a camera obscura into a small wood box with a matte plexiglass top, which didn’t work quite so well. A magnifying glass above the camera’s pinhole aperture helped, but arduous testing was needed to ensure it was set at perfect position for a clear image. The matte plexiglass was also thrown out and, after some experimentation, replaced with a sheet of semi-transparent baking paper sandwiched between two pieces of clear plexiglass. The result is hard to argue with.

Continue reading “Tracing A Scene An Old-Fashioned Way”

Laser Cut Enclosures From Eagle Files

Once a project is finished, it might still need a decent enclosure. While it’s possible to throw a freshly soldered PCB in a standard enclosure, or piece of Tupperware, or cardboard box, these options don’t have the fit and finish of something custom-made. If you have a laser cutter sitting around, it’s a simple matter to cut your own enclosure, but now that process is much easier thanks to [Ray]’s latest project.

Since [Ray] was already using Eagle to design his PCBs, it seemed like a short step to using the Eagle files to design the enclosure as well. The script runs from those files and creates everything necessary to send to the laser cutter for manufacturing. Right now, [Ray] points out that the assembly time for each enclosure can be high, and this method might not be suited for large numbers of enclosures. Additionally, some of the calculations still need to be done by hand, but there are plans to automate everything in the future.

For single projects, though, this script could cut a lot of time off of designing an enclosure and building it from scratch, and could also help improve aesthetics over other options like 3D printed enclosures. Of course, if you have a quality 3D printer around but no laser cutter, there are options for custom enclosures as well.