A Solar-Powered Point-and-Shoot, Circa 1961

Try to put yourself in the place of an engineer tasked with building a camera in 1961. Your specs include making it easy to operate, giving it automatic exposure control, and, oh yeah — you can’t use batteries. How on Earth do you accomplish that? With a very clever mechanism powered by light, as it turns out.

This one comes to us from [Alec Watson] over at Technology Connections on YouTube, which is a channel you really need to check out if you enjoy diving into the minutiae of the mundane. The camera in question is an Olympus Pen EES-2, which was the Japanese company’s attempt at making a mass-market 35-mm camera. To say that the camera is “solar-powered” is a bit of a stretch, as [Alec] admits — the film advance and shutter mechanism are strictly mechanical, relying on springs and things to power them. It’s all pretty standard camera stuff.

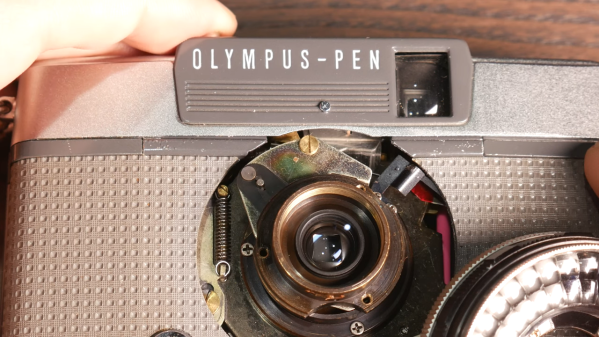
But the exposure controls are where this camera gets interesting. The lens is surrounded by a ring-shaped selenium photocell, the voltage output of which depends on the amount of light in the scene you’re photographing. That voltage drives a moving-coil meter, which waggles a needle back and forth. A series of levers and cams reads the position of the needle, which determines how far the lens aperture is allowed to open. A clever two-step cam allows the camera to use two different shutter speeds, and there’s even a mechanism to prevent exposure if there’s just not enough light. And what about that cool split-frame exposure system?

For a camera with no electronics per se, it does an impressive job of automating nearly everything. And [Alec] does a great job of making it interesting, too, as he has in the past with a deep-dive into toasters, copy protection circa 1980, and his take on jukebox heroics.

Continue reading “A Solar-Powered Point-and-Shoot, Circa 1961”

Hackaday Links: January 19, 2014

hackaday-links-chain

[Nick] wrote in to tell us about his first blog post. He’s showing off a PWM LED driver he build around a 555 timer. This project uses a lot of basics; some 555 experience, PCB etching, and surface mount soldering. We’d like to know more about the blue substrate on his circuit board!

After seeing the BOM spreadsheet with KiCAD integration a couple of weeks back, [Vassilis] sent in a link to his own Excel-based Bill of Materials helper. We’re wondering if anyone has a similar tool that will work with Open Office?

While we’re on the topic of downloadable documents, here’s a reference PDF for all types of DC measurements. The collection is a free offering from Keithley. [Thanks Buddy]

Since you’re brushing up on your knowledge you may also be interested in a free online microcontroller course offered by UT Austin. They’re targeting the Tiva C Launchpad as the dev board for the class.

This website seems to be a little creepy, but the teardrop shaped 3D printed music box which is being shown off is actually rather neat.

Hackaday Alum [Phil Burgess] threw together a point and shoot camera for Adafruit. It’s a Raspberry Pi, camera board, touchscreen display, and USB battery all rubber banded together. The processing power of the RPi is used to add image processing effects which are shown off in the demo video.

We don’t own a DeLorean. If we did, we’d probably follow the lead of Queen’s University Belfast and turn it into and electric vehicle. [Thanks Jake]

The 3D photocopiers are coming. Here’s a hacked together proof-of-concept from [Marcelo Ruiz]. After laser scanning the part is milled from floral foam.


Replacing A Point And Shoot Lens

cockeyed

Cockeyed.com is a peculiar site. It is spattered with links in an almost unintelligible manner, but if you dig hard enough, or just click randomly, you can find some pretty fun stuff. One nice writeup they’ve done is how to replace the lens in their point and shoot camera. This one happens to be a Canon Powershot sd750, but it will give you an idea about how difficult it can be for any point and shoot. The lens assembly couldn’t be replaced until almost every single piece had been disassembled. There are tons of pictures showing the process and the final result. Though the install was a success, his replacement lens was already beat up pretty bad. Looks like he’ll have to go through it all again.

[via The Old New Thing]