KVM Uses Many Arduinos

The Arduino platform is one of the most versatile microcontroller boards available, coming in a wide variety of shapes and sizes perfect for everything from blinking a few LEDs to robotics to entire home automation systems. One of its more subtle features is the ability to use its serial libraries to handle keyboard and mouse duties. While this can be used for basic HID implementations, [Nathalis] takes it a step further by using a series of Arduinos as a KVM switch; although admittedly without the video and mouse functionality yet.

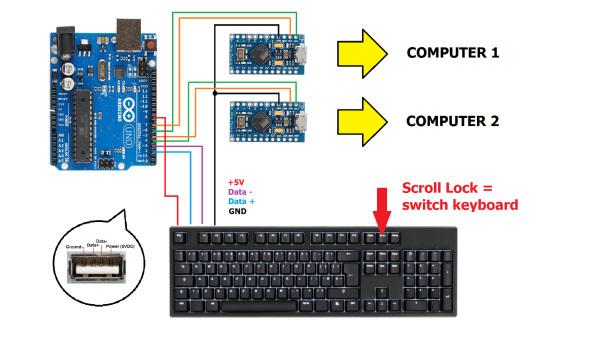
To start, an Arduino Uno accepts inputs from a keyboard which handles the incoming serial signals from the keyboard. From there, two Arduino Pro Micros are attached in parallel and receive signals from the Uno to send to their respective computers. The scroll lock key, which doesn’t do much of anything in modern times except upset Excel spreadsheeting, is the toggle switch between the two outputs. Everything is standard USB HID, so it should be compatible with pretty much everything out there. All of the source code and schematics are available in the project’s repository for anyone who wants to play along at home.

Using an Arduino to emulate a USB input device doesn’t have to be all work and no play, the same basic concept can also be used to build custom gaming controllers.

Keeping Time With Blinkenlights

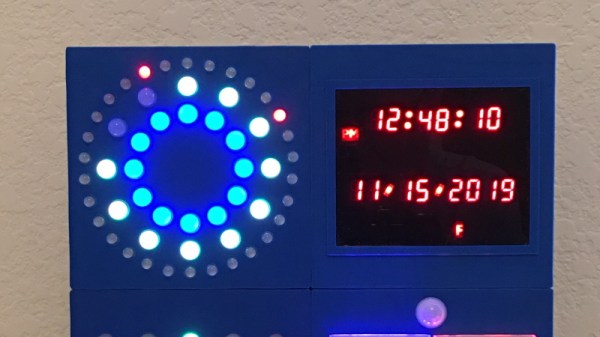
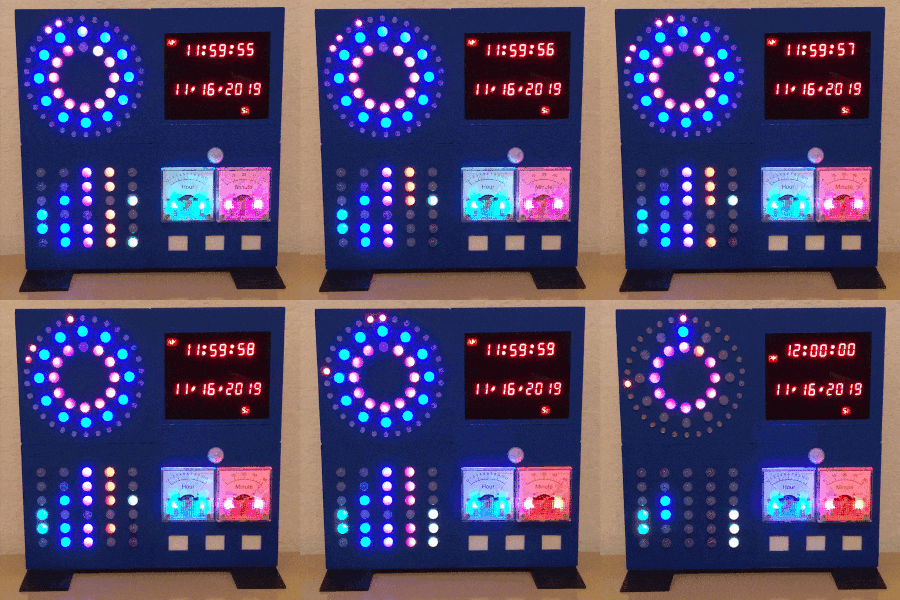
If we’ve learned anything over the years, it’s that hackers like weird clocks, and they love packing as many multicolored LEDs into a device as is humanly possible. Combine both of those concepts into one project, and you’ve got a perfect storm. So as far as unnecessarily complex timepieces go, we’d say the “Crazy Clock 4” built by [Fearless Night] ranks up there among the all-time greats.

This Arduino Pro Mini powered clock syncs the current time via GPS, with a temperature compensated DS3231 RTC to keep it on the straight and narrow between satellite downlinks. Once the clock has the correct time, how do you read it? Well, at the top you’ve got a basic numerical readout for the normies, and next to that there’s a circular LED display that looks like it could double as a sci-fi movie prop. On the lower level there’s a binary clock for the real show-offs, and as if that wasn’t enough, there’s even dual color-coded analog meters to show the hours and minutes.

[Fearless Night] has provided everything you need to follow along at home, from the Arduino source code to the 3D models of the case and Gerber files for the custom PCB. Personally we think just the top half of the clock would be more than sufficient for our timekeeping needs. If nothing else it should help save some energy, as the clock currently pulls an incredible 20 watts with all those LEDs firing off.

Should you decide to take a walk down memory lane and check out some of the other interesting LED clocks we’ve featured in the past, you’d be busy for quite awhile. But for our money, it’s still hard to beat the impossibly obtuse single-LED clock.

Sim Panel Proves You Can Always Use More Buttons

Many people enjoy playing flight simulators or making the occasional orbit in Kerbal Space Program, but most are stuck controlling the onscreen action with nothing more exotic than a keyboard and mouse. A nice compromise for those that don’t have the space (or NASA-sized budget) to build a full simulator cockpit is a USB “button box” that you can plug in whenever you need a couple dozen extra knobs, switches, and lights.

If you’ve been considering building one for yourself, this incredible build by [nexprime] should prove quite inspirational. Now at this point, a box of buttons hooked up to a microcontroller isn’t exactly newsworthy. But there are a few features that [nexprime] packed in which we think make this particular build worth taking a closer look at.

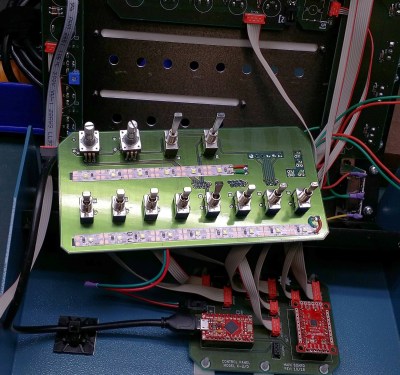
For one, the powder coated 8.5” x 10” enclosure is absolutely gorgeous. The console itself was purchased from a company called Hammond Manufacturing, but of course it still took some work to turn it into the object you’re currently drooling over. A CNC machine was used to accurately cut out all the necessary openings, and the labels were laser etched into the powder coat.

But not all the labels. One of the things we like best about this build is that [nexprime] thought ahead and didn’t just design it for one game. Many of the labels are printed on strips of paper which slide into translucent plastic channels built into the front of the box. Not only does this allow you to change out the overlays for different games, but the paper labels look fantastic when lit with the LED strips placed behind the channels.

Internally, [nexprime] used a SparkFun Pro Micro paired with a SX1509 I/O expander. The electronics are all housed on professionally manufactured PCBs, which gives the final build an incredibly neat look despite packing in 68 separate inputs for your gaming pleasure. On the software side this box appears as a normal USB game controller, albeit one with a crazy number of buttons.

If this build doesn’t have enough switches and buttons for you, don’t worry. This Kerbal Space Program cockpit has banks of switches below and above the player, so one can more realistically scramble for the correct onet to flip when things start going sideways. On the other hand, we’ve seen slightly less intense builds if you’re not quite ready to take out a loan just to get into orbit.

Updating A 1999 Saab With An Arduino

Unless your car is fresh off the lot, you’ve probably had the experience of riding in a newer car and seeing some feature or function that triggered a little pang of jealousy. It probably wasn’t enough for you to run out and sign yourself up for a new car loan (which is what the manufacturer was hoping for), but it was definitely something you wished your older model vehicle had. But why get jealous when you can get even?

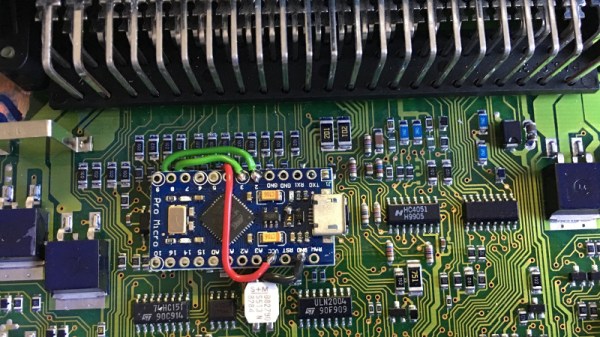
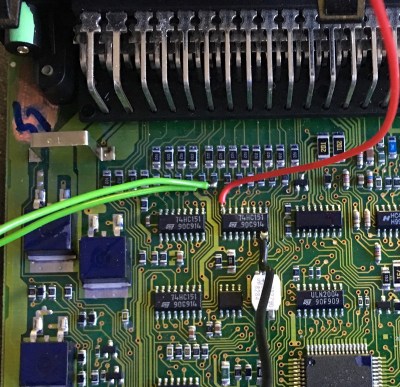
[Saabman] wished his 1999 Saab 9-5 had the feature where a quick tap of the turn signal lever would trigger three blinks of the indicator. Realizing this was an electronic issue, he came up with a way to retrofit this function into his Saab by adding an Arduino Pro Micro to the vehicle’s DICE module.

The DICE (which stands for Dashboard Integrated Central Electronics) module controls many of the accessories in the vehicle, such as the lighting and wipers. In the case of the blinkers, it reads the state of the signal lever switches and turns the blinkers on and off as necessary. After poking around the DICE board, [Saabman] found that the 74HC151 multiplexer chip he was after: the state of the blinker switches could be read from pins 1 and 2, and he’d even be able to pull 5 V for the Arduino off of pin 16.

After prototyping the circuit on a breadboard, [Saabman] attached the Pro Micro to the top of the 74HC151 with some double sided tape and got to work on refining the software side of the project. The Arduino reads the state of the turn signal switches, and if they flick on momentarily it changes the pin from an input to an output and brings it high for three seconds. This makes the DICE module believe the driver is holding the turn lever, and will keep the blinkers going. A very elegant and unobtrusive way of solving the problem.

Hackers aren’t complete strangers to the garage; from printing hard to find parts to grafting in their favorite features from other car manufacturers, this slick Saab modification is in good company.

Continue reading “Updating A 1999 Saab With An Arduino”

Cheap DIY MIDI To USB Adapter

[Joonas] became frustrated with cheap but crappy MIDI to USB converters, and the better commercial ones were beyond his budget. He used a Teensy LC to build one for himself and it did the job quite well. But he needed several converters, and using the Teensy LC was going to cost him a lot more than he was willing to spend. With some tinkering, he was able to build one using an Adafruit Pro Trinket which has onboard hardware UART (but no USB). This lack of USB support was a deal killer for him, so after hunting some more he settled on a clone of the Sparkfun Pro Micro. Based on the ATmega32U4, these clones were just right for his application, and the cheapest to boot. He reckons it cost him about $5 to build each of his cheap USB MIDI adapters which receive notes and pedal data from the keyboard’s MIDI OUT and transmit them to a computer

Besides the Pro Micro clone, the only other parts he used are a generic opto-coupler, a couple of resistors and a MIDI connector. After testing his simple circuit on a bread board, he managed to squeeze it all inside an old USB dongle housing, stuffing it in dead-bug style.

The heavy lifting is all done in the firmware, for which [Joonas] used LUFA — the Lightweight USB Framework for AVR’s. He wrote his own code to handle MIDI (UART) to USB MIDI messages conversion. The interesting part is his use of a 32.15 kbps baud rate even though the MIDI specification requires 31.25 kbps. He found that a slightly higher baud rate fixes a problem in the AVR USART implementation which tends to miss consecutive bytes due to the START edge not being detected. Besides this, his code is limited in functionality to only handle a few messages, mainly for playing a piano, and does not have full-fledged MIDI capabilities.

We’ve featured several of [Joonas]’s hacks here over the years, the most recent being the Beaglebone Pin-Toggling Torture Test and from earlier, How to Turn A PC On With a Knock And An ATTiny.

Hackaday Prize Entry: Safety Glasses Are Also Hands-Free Multimeter

It seems like the multimeter is never easy to see during a project. Whether it’s troubleshooting a vehicle’s electrical system and awkwardly balancing the meter on some vacuum lines and the intake manifold, or installing a new solar panel and hoping the meter doesn’t fall on the ground while the leads are in both hands, it seems like there’s never a good way to see the meter while actually using it. Some meters have a small magnet and strap that can be used to hang them temporarily, but this will only get you so far.

[Alain Mauer]’s entry into the Hackaday Prize looks to solve this glaring problem. Using a heads-up Bluetooth display mounted to a pair of safety glasses, a multimeter can be connected to the device in order to display its information directly to its user. Based on his original idea which used a normal pair of prescription glasses as its foundation, [Alain]’s goal is to reduce safety hazards that might arise when using a multimeter in an awkward or dangerous manner that might not otherwise be possible.

The device uses an Arduino Pro Micro to connect to the multimeter and drive the display. [Alain] notes that the real challenge is with the optical system, however. Either way though, this would be a welcome addition to any lab, workspace, or electrician’s toolbox. Be sure to check out the video of it in action after the break.

Continue reading “Hackaday Prize Entry: Safety Glasses Are Also Hands-Free Multimeter”