Finding Fractals In The 1930’s

The mesmerizing properties of fractals are surprising as their visual complexity often arises from simple equations. [CodeParade] set out to show how simple a fractal is by creating them using technology from the 1930s. The basic idea is based on projectors and cameras, which were both readily available and widely used in television (CRT projectors were in theaters by 1938, though they weren’t in color until the 1950s).

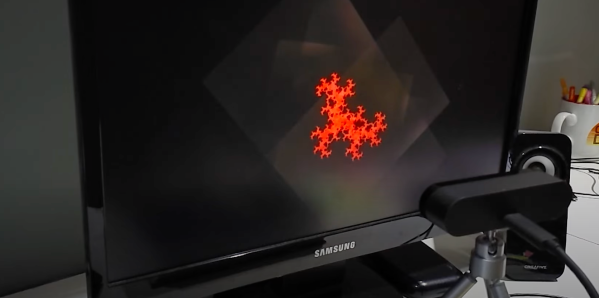
By projecting two overlapping images on the wall, pointing a camera at the resulting image, and then feeding it back into the projectors, you get some beautiful fractals. [CodeParade] doesn’t have a projector, much less two. So he did what any hacker might do and came up with a clever workaround. He made a simple app that “projects” onto his monitor and all he has to do is point an external webcam at the screen. The resulting analog fractals are quite beautiful and tactile. Rather than tweaking a variable and recompiling, you simply just add a finger or move the camera to introduce new noise that quickly becomes signal.

Better yet, there’s a web version that you can play around with right now. For more fractals implemented in hardware rather than software, there’s this FPGA with a VHDL Mandelbrot set we covered.

Continue reading “Finding Fractals In The 1930’s”

Collapsible Pattern Projector Is A Bright Idea

It’s fantastic that we’re living in the age of downloadable PDF patterns, it really is. But printing out a bunch of sheets of paper and taping them together is a tedious and tiresome process that can introduce error right from the start. This goes for any type of pattern, from sewing to R/C planes.

[Quinn]’s quarantine project is designed to cover both of those and everything in between. It’s a pattern projector made from stuff already on hand — a couple of offset projectors to scavenge parts from, and a large, trapezoidal mylar mirror from an old rear projection TV. At maximum zoom it projects a 4′ x 3′ image onto the tabletop, which sounds perfect for a whole lot of sewing patterns. At minimum zoom, the projected image fits on a foam core board.

We love that this dreamy setup can be stowed away so easily on hooks in the ceiling. [Quinn] had to perform a few hacks to make it all work together, including fabricating a bracket and some adjustable ties to hold the mirror aloft at just the right correct angle.

Need something smaller? Check out this Pi-powered pocket projector. Want a cinema-quality setup? You just have to find the right auctions.

Projecting Halloween Peril

Every holiday has a few, dedicated individuals committed to “going all out.” Whether they’re trying to show up the neighbors, love the look, or just want to put a smile on the faces of those passing by; the results are often spectacular. A recent trend in decorations has been away from analog lights and ornaments and towards digital light shows via a projector. [Georgia Clegg] and [Luma Bakery] have written up a fantastic guide detailing the involved process of house projection for those feeling the holiday spirit.

There is more to the effect than simply pointing a projector at a home and running a video clip. The good displays make use of the geometry of the home and the various depths of the walls don’t distort the picture. The house itself is mapped into the image being displayed.

There are generally two approaches to mapping: point of view mapping and neutral/orthographic mapping. The first is just setting the projector in a fixed position and designing the graphics in such a way that they will look correct. The downside is that if there are multiple projectors, each projector will need to be separately designed for and they cannot be moved or adjusted. The second maps the house in an actual 3d sense and figures out how to display the content according to the viewpoint that the projector is currently at. This means you can create one source content and simply export it for the various projectors.

As you can imagine, the second is much more involved and this is where [Georgia Clegg] has stepped in. There’s a whole series that covers creating your house in MeshRoom, cleaning it up in Blender, creating the videos in After Effects, and setting up your projector to keep it running through the season.

We’ve seen other amazing projector mapping displays with lasers here at Hackaday. Now you can make one yourself. Just don’t get bogged down refurbishing your vector projector along the way.
Continue reading “Projecting Halloween Peril”

Be Anyone Or Anything With Facial Projection Mask

In the market for a low-poly change to your look? Hate the idea of showing up for a costume party only to find out someone is wearing the same mask as you? Then this face changing front-projection mask may be just the thing for you.

To be honest, we’re not sure just how much [Sean Hodgins]’ latest project has to do with cosplay. He seems to be making a subtle commentary about dealing with life in the surveillance state, even though this is probably not a strategy for thwarting facial-recognition cameras. [Ed Note: Or maybe it’s just Halloween?]

The build consists of a Raspberry Pi and a pico projector of the kind we’ve seen before. These are mated together via a custom PCB and live inside a small enclosure that’s attached to the end of a longish boom. The boom attaches to the chin of 3D-printed mask, which in turn is connected to the suspension system of a welding helmet. Powered by a battery pack and controlled by a smartphone app, the projector throws whatever you want onto the mask – videos, effects, even images of other people. Even with some Photoshop tweaks to account for keystone distortion from the low angle of projection, there’s enough distortion that the effect is more artistic than masquerade. But honestly, having your face suddenly burst into flames is pretty cool. We just wonder what visibility is like for the wearer with a bright LED blasting into your eyes.

As a bonus, [Sean] has worked this build into a virtual treasure hunt. Check out 13thkey.com and see what you can make from the minimal clues there.

Continue reading “Be Anyone Or Anything With Facial Projection Mask”

[Ben Krasnow] Looks Inside Film Camera Date Stamping

Honestly, we never wondered how those old film cameras used to put the date stamp in the lower right-hand corner of the frame. Luckily, [Ben Krasnow] does not suffer from this deplorable lack of curiosity, and his video teardown of a date-stamping film camera back (embedded below) not only answers the question, but provides a useful lesson in value engineering.

For the likely fair fraction of the audience who has never taken a photo on film before, cheap 35-mm cameras were once a big thing. They were really all one had for family snapshots and the like unless you wanted to invest in single-lens reflex cameras and all the lenses and accessories. They were miles better than earlier cartridge cameras like the 110 or – shudder – Disc film, and the cameras started getting some neat electronic features too. One was the little red-orange date stamp, which from the color we – and [Ben] assumed was some sort of LED pressed up against the film, but it ends up being much cooler than that.

Digging into the back of an old camera, [Ben] found that there’s actually a tiny projector that uses a mirror to fold the optical path between the film and a grain-of-wheat incandescent bulb. An LCD filter sits in the optical path, but because it’s not exactly on the plane of the film, it actually has to project the image onto the film. The incandescent bulb acts as a point source and the mirror makes the optical path long enough that the date stamp image appears sharp on the film. It’s cheap, readily adapted to other cameras, and reliable.

Teardowns like this aren’t fodder for [Ben]’s usual video fare, which tends more toward homemade CT scanners and Apollo-grade electroluminescent displays, but this was informative and interesting, too.

Continue reading “[Ben Krasnow] Looks Inside Film Camera Date Stamping”

Ask Hackaday: How Would You Build This Flight Tracker For Kids?

You’ve got to hand it to marketers – they really know how to make you want something. All it takes is a little parental guilt, a bit of technical magic, and bam, you’re locked into a product you never knew you needed.

This prototype flight tracking nightlight for kids is a great example. Currently under development by Canadian airline WestJet, the idea is to provide a way for traveling parents to let kids know how long it is until Mommy or Daddy gets home from their trip. The prototype shows a stylized jet airliner with Neopixel lighting in the base. A pair of projectors in the wings shine an animated flight path on the child’s darkened bedroom ceiling, showing them when the wayward parent will return. Get past the schmaltz in the video below, and perhaps get over your jealousy of parents with kids who still eagerly await their return, and it’s actually a pretty good idea.

Now for the ask: how would you go about building something like this? And more importantly, how would you make it work for any plane, train, or automobile trip, and not just a WestJet flight? A look at the “How it will work” section of the page shows several photos of the prototype, which suggests the hardware end is dead easy. A Raspberry Pi Zero W features prominently, and the projectors appear to be TI’s DLP2000EVM, which we’ve featured before, mounted to a riser card. The Neopixels, a 3D-printed case, and the superfluous flashlight fuselage would be pretty easy, too.

On the software side, a generic version that tracks flight from any airline would need an interface for the traveler to define a flight, and something to check an API like FlightAware’s, or similar ones for whatever mode of transportation you’re using.

Seems like a pretty straightforward project. WestJet claims they’ll have their Flight Light ready sometime this summer; think we can beat them to it?

Continue reading “Ask Hackaday: How Would You Build This Flight Tracker For Kids?”

A Petite Pico Projector For Portable Pi

A few years ago, new, innovative pico projectors, influenced by one of the TI development kits, started appearing in Kickstarter projects and other various DIY endeavours. Those projects fizzled out, most likely due to the cost of the projectors, but we got a few laughs out of it: that wearable smartphone that projected a screen onto your wrist used the same technology.

But there’s a need for a small projector, a pico projector, or in this case a femto projector. It’s the Nebra Anybeam, and it’s a small projector that uses lasers, and it comes in the form of a Raspberry Pi hat. We would like to congratulate the team for shipping the ideal use case of their product first.

The key features of this pico projector address the shortcomings of existing projectors that can fit in your pocket. This uses a laser, and there’s no bulb, and the power consumption can be as low as 3 Watts. Power is provided over a micro USB cable. The resolution of this projector is 720p, which is sufficient for a quick setup for watching a movie, but the brightness is listed as equivalent to 150 ANSI lumens, about the same as small projectors from a few years ago.

But of course the big selling point isn’t the brightness or resolution, it’s all about the smallness of the projector itself. There is a developer’s kit, a Pi Hat, a fit-in-your-pocket version with an enclosure, and a ‘monster ball’ version of the Anybeam.