Image from the paper with items a-d. a) Schematic of the EC navigation system integrated with a smart contact lens consisting of GPS receiver module, Arduino UNO as a processor, and PB display. b) Photograph of contact lens placed on the 3D printed replica eyeball. c) Camera setup of the navigation system on the dashboard of a car. d) Driving schemes updating the direction signal: (1–4) images show the four cases of operational principles used in the navigation system. Based on 0.2 V applied to the common pin, 0 V (off-state) and 0.7 V (on-state) are applied alternately in 5 WEs, and operating voltages with relative voltages of −0.2 V and 0.5 V are obtained (From the figure reads left to right: the name of 6 pins used in the system, their on–off status, the applied voltage, and relative voltage). Scale bar is 2 mm.

Smart Contact Lenses Tell You Where To Go

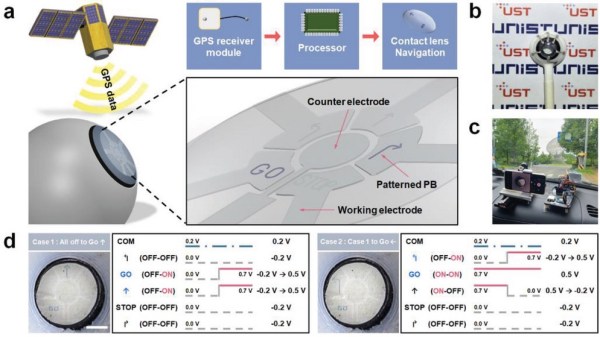
Augmented Reality (AR) promises to relieve us from from the boredom of mundane reality and can also help you navigate unfamiliar environments. Current AR tech leaves something to be desired, but researchers at the Korea Electrotechnology Research Institute have brought AR contact lenses closer to actual reality.

The researchers micro-printed FeFe(CN)6 ink onto the contact substrate and thermally reduced it at 120˚C for nine seconds to form Prussian Blue, an electrochromic pigment. By confining the material with the meniscus of the ink, resolution was better than previous techniques to display data on contact lenses. While the ability to reversibly change from clear to blue faded after 200 cycles, the researchers were targeting a disposable type of smart contact lens, so degradation of the display wasn’t considered a deal breaker.

Since voltages applied were constant, it seems this isn’t a true bi-stable display like e-ink where power is only required to change states. The on condition of a section required 0.5 V while off was -0.2 V. The researchers printed a contact with straight, left, and right arrows as well as STOP and GO commands. Connected to a GPS-equipped Arduino Uno, they used it to navigate between ten different checkpoints as a demonstration. Only a 3D printed eyeball was brave enough (or had IRB approval) to wear the contact lens, so watching the state change through a macro lens attached to a smartphone camera had to do.

With more AR devices on the way, maybe it’s time to start embedding household objects with invisible QR codes or cleaning your workshop to get ready for your AR workbench.

Cocktail Of Chemicals Makes This Blueprint Camera Unique

When you’re looking at blueprints today, chances are pretty good that what you’re seeing is anything but blue. Most building plans, diagrams of civil engineering projects, and even design documents for consumer products never even make it to paper, let alone get rendered in old-fashioned blue-and-white like large-format prints used to produced. And we think that’s a bit of a shame.

Luckily, [Brian Haidet] longs for those days as well, so much so that he built this large-format cyanotype camera to create photographs the old-fashioned way. Naturally, this is one of those projects where expectations must be properly scaled before starting; after all, there’s a reason we don’t go around taking pictures with paper soaked in a brew of toxic chemicals. Undaunted by the chemistry, [Brian] began his journey with simple contact prints, with Sharpie-marked transparency film masking the photosensitive paper, made from potassium ferricyanide, ammonium dichromate, and ammonium iron (III) oxalate, from the UV rays of the sun. The reaction creates the deep, rich pigment Prussian Blue, contrasting nicely with the white paper once the unexposed solution is washed away.

[Brian] wanted to go beyond simple contact prints, though, and the ridiculously large camera seen in the video below is the result. It’s just a more-or-less-lightproof box with a lens on one end and a sheet of sensitized paper at the other. The effective ISO of the “film” is incredibly slow, leading to problematically long exposure times. Coupled with the distortion caused by the lens, the images are — well, let’s just say unique. They’ve got a ghostly quality for sure, and there’s a lot to be said for that Prussian Blue color.

We’ve seen cyanotype chemistry used with UV lasers before, and large-format cameras using the collodion process. And we wonder if [Brian]’s long-exposure process might be better suited to solargraphy.

Continue reading “Cocktail Of Chemicals Makes This Blueprint Camera Unique”

Authentic Blue Blueprints

blue

At one point in history, blueprints were actually blue. Now, if you even see a dead tree version of plans or assemblages, they’re probably printed off with a plotter or large format printer. You can, however, make your own blueprints at home, as [Tyler] shows us in his Hackaday Project.

Back in the olden days, master drawings were traced onto large sheets of transparent film. These master prints were then laid over paper prepared with Potassium Ferricyanide and Ferric Ammonium Citrate to create an insoluble Prussian Blue background for the prints. Developing is easy – just expose the transparent positive and undeveloped paper to UV light, in the form of fluorescent bulbs or the sun.

[Tyler] began his blueprint creation process by getting a few design sketches of the RSI Aurora and Nautilus, editing them on a computer, and printing them out on transparency sheets. A solution of equal parts Potassium Ferricyanide and Ferric Ammonium Citrate were painted onto a piece of paper and allowed to dry. Exposing was a simple matter of laying the transparency over the undeveloped paper and setting it out in the sun for 20 minutes or so. After that, it’s a simple matter of washing off the unexposed chemicals and letting the newly created blueprint dry.

It’s a simple technique, but also very, very cool. Not exactly practical, given a plotter can spit out an architectural or assembly drawing of any building, vehicle, or device in a few minutes, but just the ticket for art pieces or extremely odd engineers.

Thanks [Sarah] for sending this in.