Adding Wireless Charging To The Switch Lite

The Nintendo Switch is a monstrously popular machine, and it’s had no difficulty raking in the bucks for the Japanese gaming giant, but there’s no denying that it’s technologically a bit behind the curve. Until the long-rumored “Pro” version of the Switch materializes, industrious gamers like [Robotanv] will simply have to make up for Nintendo’s Luddite ways by hacking in their own upgraded hardware.

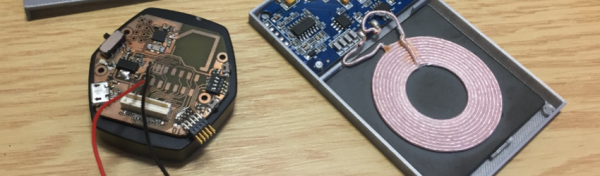
In this case, [Robotanv] wanted to add Qi wireless charging to his Switch Lite. He figured that if all of his other mobile devices supported the convenient charging standard, why not his portable gaming system? Luckily, the system already supports the increasingly ubiquitous USB-C, so finding an aftermarket Qi receiver that would connect to it was no problem. He just needed to install it into the handheld’s case.

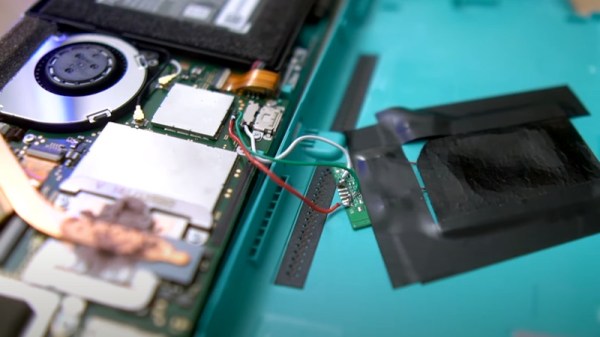
After liberating the Qi receiver from its protective pouch enclosure to get it a bit thinner, [Robotanv] taped it to the inside of the system’s case and ran thin wires to the rear of the USB-C port. As luck would have it, Nintendo was kind enough to put some test pads for the power pins right behind the port, which made for an ideal spot to connect the charger.

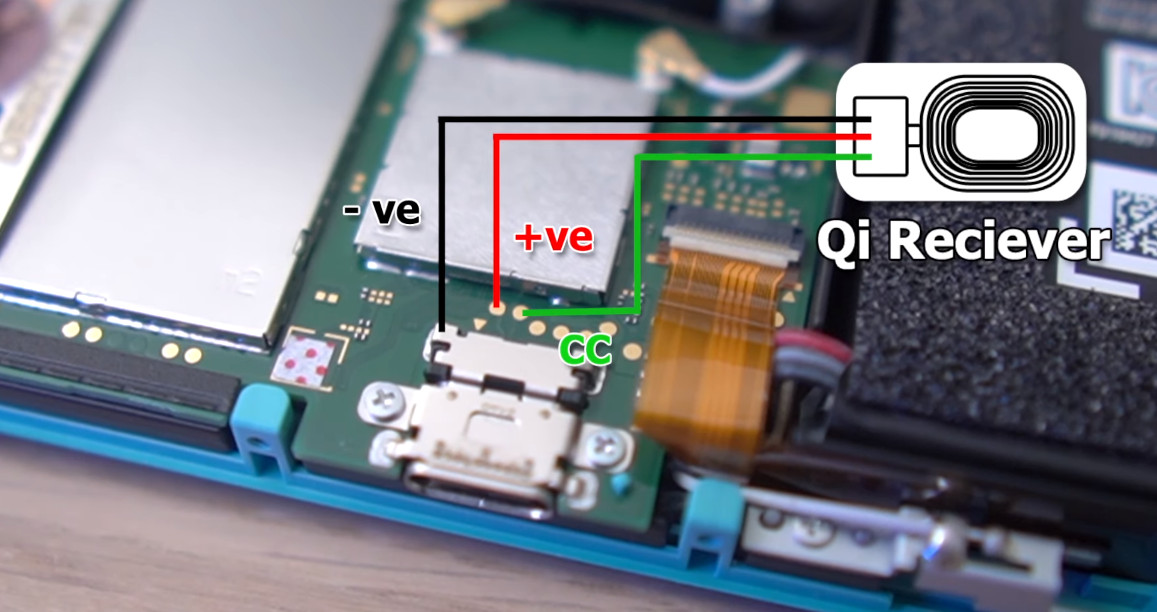
At first he only connected the positive and negative lines from the charger, but quickly realized he also had to connect the CC pin to get the juice flowing. After that, it was just a matter of buttoning the system back up. All told, it looks like a pretty simple modification for anyone who’s not bashful about taking a soldering iron to their $199 console.

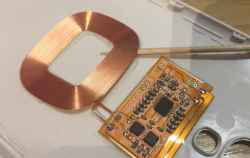
We’ve seen these Qi receivers retrofitted into devices before, and it remains an excellent way to add the feature not only to commercial products, but to your own projects.

Continue reading “Adding Wireless Charging To The Switch Lite”

Charging Pad Flips For Solar Power

Charging pads are now a common, popular way to charge small devices. They have the benefit of reducing wear on connectors and being easier to use. [bcschmi6] decided to build a solar powered charging pad, which should come in handy when out and about.

The build uses a 3 W square solar panel, hooked up to an Adafruit solar charging board. This charges a pair of 18650 lithium batteries. The batteries only put out a maximum of 4.2 V, so they’re hooked up to a boost converter to get the output a little higher, up to 5.2 V. The output of the boost converter is then hooked up to a charging pad harvested from an Anker charger, and it’s all wrapped up in a tidy 3D printed frame.

We imagine the device would be great for camping. It could be left charging in the sun during the day, before being flipped over and used as a charging pad at night. It would be easy to build a bigger version for charging several phones at once, too. If you want to build your own charging coils, that’s a thing, too. And if you’ve got your own solar project cooking up as we head into summer, be sure to let us know!

Tiny LED Cube Packs Six Meters Of Madness

When [Freddie] was faced with the challenge of building a sendoff gift for an an LED-loving coworker he hatched a plan. Instead of making a display from existing video wall LED panels he would make a cube. But not just any cube, a miniature desk sized one that wasn’t short of features or performance. We’d be over the moon if someone gifted us with this itty-bitty Qi coil-powered masterpiece of an RGB cube.

Recently we’ve been blessed with a bevy of beautiful, animated RGB cubes but none hit quite this intersection of size and function. The key ingredient here is tiny but affordable RGB LEDs which measure 1 mm on a side. But LEDs this small are dwarfed by the otherwise minuscule “2020” package WS2812’s and APA102s of the world. Pushing his layout capabilities to the max [Freddie] squeezed each package together into a grid with elements separated by less than 1 mm, resulting in a 64 LED panel that is only 16 mm x 16 mm panel (with test points and controller mounted to the back). Each of these four-layer PCBs that makes up the completed cube contains an astonishing 950 mm of tracking, meaning the entire cube has nearly six meters of traces!

How do you power such a small device with no obvious places to locate a connector? By running magnet wire through a corner and down to a Qi coil of course. Not to let the cube itself outshine the power supply [Freddie] managed to deadbug a suitably impressive supply on the back of the coil itself. Notice the grain of rice in the photo to the left! The only downside here is that the processor – which hangs diagonally in the cube on a tiny motherboard – cannot be reprogrammed. Hopefully future versions will run programming lines out as well.

Check out the video of the cube in action after the break, and the linked photo album for much higher resolution macro photos of the build. While you’re there take a moment to admire the layout sample from one of the panels! If this sets the tone, we’re hoping to see more of [Freddie]’s going-away hacks in the future!

Continue reading “Tiny LED Cube Packs Six Meters Of Madness”

Animated Bluetooth Bike Turn Signals

Tired of risking his life every time he had to signal a turn using his hands while riding his bicycle in rainy Vancouver, [Simon Wong] decided he needed something a bit higher tech. But rather than buy something off the shelf, he decided to make it into his first serious Arduino project. Given the final results and the laundry list of features, we’d say he really knocked this one out of the park. If this is him getting started, we’re very keen to see where he goes from here.

So what makes these turn signals so special? Well for one, he wanted to make it so nobody would try to steal his setup. He wanted the main signal to be easily removable so he could take it inside, and the controls to be so well-integrated into the bike that they wouldn’t be obvious. In the end he managed to stuff a battery pack, Arduino Nano, and an HC-05 module inside the handlebars; with just a switch protruding from the very end to hint that everything wasn’t stock.

On the other side, a ATMEGA328P microcontroller along with another HC-05 drives two 8×8 LED matrices with MAX7219 controllers. Everything is powered by a 18650 lithium-ion battery with a 134N3P module to bring it up to 5 VDC. To make the device easily removable, as well as keep the elements out, all the hardware is enclosed in a commercial waterproof case. As a final touch, [Simon] added a Qi wireless charging receiver to the mix so he could just pull the signal off and drop it on a charging pad without needing to open it up.

It’s been some time since we’ve seen a bike turn signal build, so it’s nice to see one done with a bit more modern hardware. But the real question: will he be donning a lighted helmet for added safety?

Continue reading “Animated Bluetooth Bike Turn Signals”

Dig Into The Apple Device Design Guide

Millions of people worldwide have just added new Apple gadgets to their lives thanks to the annual end of December consumerism event. Those who are also Hackaday readers are likely devising cool projects incorporating their new toys. This is a good time to remind everybody that Apple publishes information useful for such endeavors: the Accessory Design Guidelines for Apple Devices (PDF).

This comes to our attention because [Pablo] referenced it to modify an air vent magnet mount. The metal parts of a magnetic mount interferes with wireless charging. [Pablo] looked in Apple’s design guide and found exactly where he needed to cut the metal plate in order to avoid blocking the wireless charging coil of his iPhone 8 Plus. What could have been a tedious reverse-engineering project was greatly simplified by Reading The… Fine… Manual.

Apple has earned its reputation for hacker unfriendliness with nonstandard fasteners and liberal use of glue. And that’s even before we start talking about their digital barriers. But if your project doesn’t involve voiding the warranty, their design guide eliminates tedious dimension measuring so you can focus on the fun parts.

Dimensioned drawing of Apple iPad Pro

This guide is packed full of dimensioned drawings. A cursory review shows that they look pretty good and aren’t terrible at all. Button, connector, camera, and other external locations make this an indispensable tool for anyone planning to mill or print an interface for any of Apple’s hardware.

So let’s see those projects! Maybe a better M&M sorter. Perhaps a time-lapse machine. Or cure your car’s Tesla envy and put a well-integrated iPad into the dashboard.

Adding An IKEA Wireless Charger To A Project

IKEA sometimes seems like a DIY store disguised as a furniture store. We may go there looking for a new sofa or kitchen table, but, to the DIY enthusiast, it’s a shop full of possibilities. While wandering through the local IKEA, [Erich Styger] noticed they had some Qi wireless chargers and receivers for a very reasonable price, so he bought a few and added wireless charging to his Mikroelektronika Hexiwear.

toothpicking-the-coil
Removing the wireless charger

[Erich Styger] didn’t like the clumsiness of the Hexiwear’s USB charging options and, at the price he got the IKEA Vitahult Qi phone case wireless receivers at, he couldn’t resist buying a few for his projects. After carefully separating the circuitry from the phone cases they came in he opening up the Hexiwear. He removed the battery connector and soldered the charger to battery charging circuit. [Erich Styger] then 3D printed a new back to the Hexiwear’s case to fit the new circuitry. A quick test with the IKEA charging pad proved the hack had worked.

IKEA has become something of a DIY enthusiasts go-to shop, with everything from weather stations to a camera slider at a decent price. Walking through the maze inside the store, the DIYer doesn’t see lamps and boxes and shelves, they see light projectors and enclosures and, well, everyone needs shelves.

Wireless SNES Controller

SNES Controller Modified To Be Completely Wireless

[Pat] was looking for a way to wirelessly control his Fire TV unit. He could have just went with one of many possible consumer products, but he decided to take it a step further. He modified a unit to fit inside of an original SNES controller. All of the buttons are functional, and the controller even features a wireless charger.

[Pat] started out with a Bluetooth video game controller marketed more playing video games on tablets. The original controller looked sort of like an XBox controller in shape. [Pat] tore this controller open and managed to stuff the guts into an original SNES controller. He didn’t even have to remove the original SNES PCB. [Pat] mentions that it was rather tedious to rewire all of the buttons from the original controller, but in the end it wasn’t too difficult. The only externally visible modification to the original controller is a small hole that was made for a power button.

In order to make this unit completely wireless, [Pat] also installed a Qi wireless charging module. Now, placing the controller on a charging pad will charge up the small LiPo battery in just about 45 minutes. This controller would be the perfect addition to a RetroPi or other similar project. If you’re not into Bluetooth, you can try using a Logitech receiver instead. Continue reading “SNES Controller Modified To Be Completely Wireless”