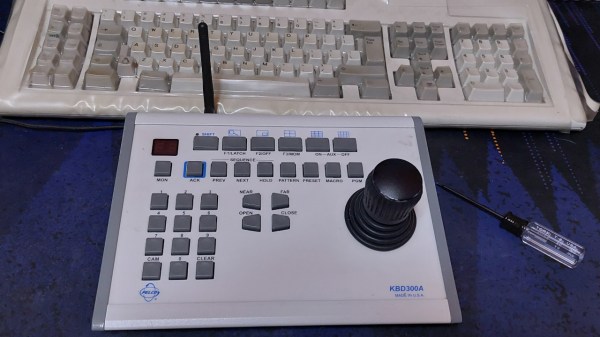
The controller after the rebuild, looking just like the stock controller but with an external antenna attached

An Extensive Walkthrough On Building Your Own KSP Controller

Having a game-tailored controller is a level-up in more ways than one, letting you perform in-game actions quickly and intuitively, instead of trying to map your actions to a clunky combination of keyboard and mouse movements. [abzman] took the Pelco KBD300A, a DVR-intended camera controller panel with a joystick, reverse-engineered it, and then rebuilt it into a Kerbal Space Program controller. What’s more, he documented every detail along the way!

The write-up is so extensive, it’s four separate posts — all of them worth reading without a doubt. In the first post, he describes the original hardware, the process of reverse-engineering it, and a few tips for your own RE journeys. Next, he covers about making his own board, showing all the small decisions he’s had to make, with plenty of KiCad screenshots. If you are on the lookout for designing such a board, there’s plenty to learn!

The original hardware didn’t go down without a fight — the third post talks about taming the seven-segment displays, the onboard joystick, and fighting with the key matrix wired in exactly the way you wouldn’t want. In the end, he shows us how you could tie a controller easily into Kerbal Space Program.

One more piece of hardware liberated, one more win for the hacker world. Whether it’s a Macintosh SE, a classic ThinkPad, or even a generic rotary tool, these upgrades are always a joy to see. If you wanted to learn to do such an upgrade yourself, here’s us showing how you can pull this off with a classic Sony Vaio!

Don’t Miss Your Last Chance To Enter The Hack It Back Challenge

While the 2022 Hackaday Prize as a whole winds its way through a good chunk of the year, each individual challenge that makes up the competition only sticks around for a limited time. As hard as it might be to believe, our time with theHack it Back challenge is nearly at a close, with just a few days left to enter your project before the July 24th deadline.

Each challenge in this year’s Hackaday Prize has been designed around the core themes of sustainability, resiliency, and circularity — and for the Hack it Back phase of the competition we asked hackers to essentially keep as much hardware out of the landfill as possible. That could mean making a simple fix that puts a piece of equipment back into service, or it might be a be complete rebuild of an older device to bring it up to modern standards. These are the kind of projects Hackaday was built on, so turning it into an official challenge this year made perfect sense. Continue reading “Don’t Miss Your Last Chance To Enter The Hack It Back Challenge”

Recycled Speed Boat Beats The Barnacles Out Of Your Average Rebuild

There’s an old saying that says “Anything is possible with enough Time, Money, or Brains. Pick two.” For [Mr HỒ Thánh Chế], the choice was obvious: Time, and Brains. This is evident by the impressive DIY boat build shown in the video below the break.

[Mr HỒ] starts with an Isuzu marine diesel engine that was apparently found on the beach, covered in barnacles and keel worms (and who knows what else). A complete teardown reveals that the crankcase was miraculously spared the ravages of the sea, and somehow even the turbo survived. After a good cleaning and reassembly, the engine rumbles to life. What’s notable is that the entire engine project was done with only basic tools, save for a lathe. Even generally disposable parts such as the head gasket are re-used.

Moving onto the hull, half of an old damaged boat is used and a new top is built. Car seats out of a Toyota sit behind a steering column also from a car, while the deck is built from scratch out of square tubing, foam board, and fiberglass.

What we liked about the project isn’t so much the end result, it has some build quality issues and it looks like the steering is far too slow, but what project of our own hasn’t been knocked together for fun with some obvious flaws? In fact, that’s very often the epitome of the Hacker spirit- doing it quick, dirty, having fun, and iterating as we go. For that, our hat is off to [Mr HỒ].

If boat recycling puts the wind in your sails, check out this boat-turned-sauna project.

Continue reading “Recycled Speed Boat Beats The Barnacles Out Of Your Average Rebuild”

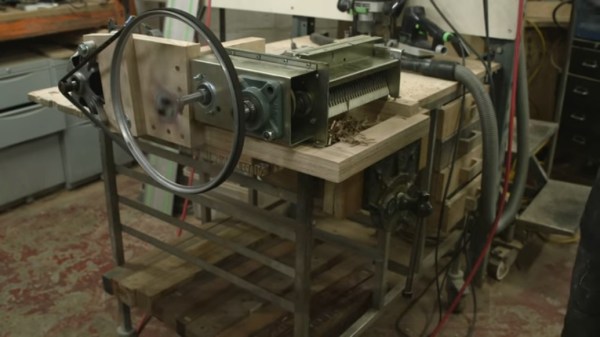
The shredder after being rebuilt, on the bench top, with the washing machine pulley driving it spinning. It has not yet been fed, but that's about to happen.

Shredder Rebuilt From The Ashes, Aims To Produce More Ashes

What do you do when you buy a broken shredder and, upon disassembly, find its gears in pieces? You might reach towards your 3D printer – this one’s not that kind of shredder, however. [New Yorkshire Workshop] gives us a master class on reviving equipment and putting it to good use – this one’s assigned to help turn their cardboard stores into briquettes for their wood burner.

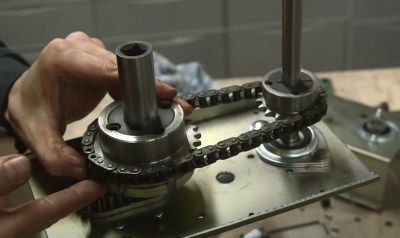
But first, of course, it had to be fixed – and fixed it was, the crucial parts re-designed and re-built around a sturdy wooden frame. It was made into a machine built to last; an effort not unlikely to have been fueled with frustration after seeing just how easily the stock gears disintegrated. The stock gear-based transmission was replaced with a sprocket and chain mechanism, the motor was wired through a speed controller, and a washing machine pulley was used to transfer power from the motor to the freshly cleaned and re-oiled shredder mechanism itself. This shredder lost its shell along the way, just like a crab does as it expands – and this machine grew in size enough to become a sizeable benchtop appliance.

After cutting loads of cardboard into shredder-fitting pieces, they show us the end result – unparalleled cardboard shredding power, producing bags upon bags of thinly sliced cardboard ready to be turned into fuel, making the workshop a bit warmer to work in. The video flows well and is a sight to see – it’s a pleasure to observe someone who knows their way around the shop like folks over at [New Yorkshire Workshop] do, and you get a lot of insights into the process and all the little tricks that they have up their sleeves.

The endgoal is not reached – yet. The shredder’s output is not quite suitable for their briquette press, a whole project by itself, and we are sure to see the continuation of this story in their next videos – a hydraulic briquette press was suggested as one of the possible ways to move from here, and their last video works on exactly that. Nevertheless, this one’s a beast of a shredder. After seeing this one, if you suddenly have a hunger for powerful shredders, check this 3D printed one out.

Continue reading “Shredder Rebuilt From The Ashes, Aims To Produce More Ashes”

RAMPS Rebuild Keeps Robox 3D Printer Out Of Junk Bin

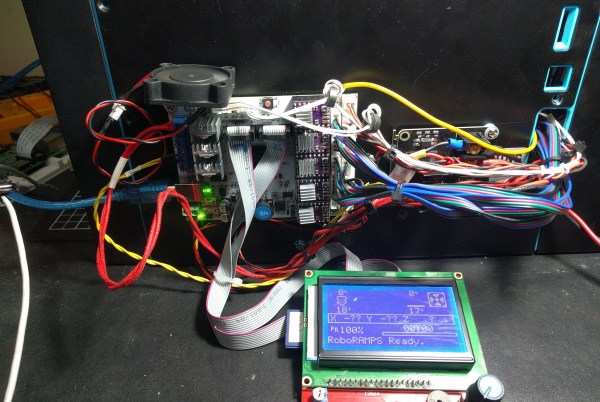
A 3D printer is a wonderful invention, but it needs maintenance like every machine that runs for long hours. [Rob Ward] had a well-used Robox 3D printer that was in need of some repairs, but getting the necessary replacement parts shipped to Australia was cost-prohibitive. Rather than see a beloved printer be scrapped as e-waste, he decided to rebuild it using components that he could more easily source. Unfortunately the proprietary software and design of the Robox made this a bit difficult, so it was decided a brain transplant was the best path forward.

Step one was to deduce how the motors worked. A spare RAMPS 1.4 board and Arduino Mega2560 made short work of the limit switches and XYZ motors. This was largely accomplished by splicing into the PCBs themselves. The Bowden filament driver motor had a filament detector and an optical travel sensor that required a bit of extra tuning, but now the challenging task was next: extruding.

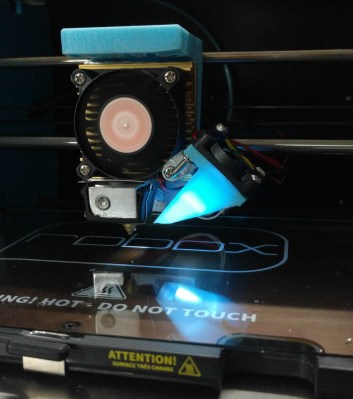
The printer’s new custom hotend.

With a cheap CR10 hot end from an online auction house, [Rob] began modifying the filament feed to feed in a different direction than the Robox was designed for (the filament comes in at a 90-degree angle on the stock Robox). A fan was needed to cool the filament feed line. Initial results were mixed with lots of blockages and clogs in the filament. A better hot end and a machined aluminum bracket for a smoother path made more reliable prints.

The original bed heater was an excellent heater but it was a 240 VAC heater. Reluctant to having high voltages running through his hacked system, he switched them out for 12 VDC adhesive pads. A MOSFET and MOSFET buffer allowed the bed to reach a temperature workable for PLA. [Rob] upgraded to a GT2560 running Marlin 2.x.x.

With a reliable machine, [Rob] stepped back to admire his work. However, the conversion to the feed being perpendicular to the bed surface had reduced his overall build height. With some modeling in OpenSCAD and some clever use of a standard silicone sock, he had a solution that fed the wire into the back of the hot end, allowing to reclaim some of the build height.

It was a long twelves months of work but the write-up is a joy to read. He’s included STL and SCAD files for the replacement parts on the printer. If you’re interested in seeing more machines rebuilt, why not take a look at this knitting machine gifted with a new brain.

Casio Computer Rebuild Puts New Wine In An Old Bottle

With a glut of vintage consumer electronics available from eBay it should be easy to relive your glory days, right? Unfortunately the march of time means that finding gear is easy but finding gear that works is not. So was the case when [Amen] acquired not one, but two used calculator/computer units hoping to end up with one working device. Instead, he went down the rabbit hole of redesigning his own electronics to drive the Casio QT-1 seen here.

Especially interesting is the prototyping process for the replacement board. [Amen] used a “BluePill” STM32 microcontroller board at its heart, and used point-to-point soldering for the rest of the circuitry on a rectangle of protoyping board. That circuit is non-trivial, needing a 23 V source to drive the original VFD from the computer, a battery-backed real-time-clock (MCP7940), and a GPIO expander to scan the keys on the keypad.

It worked great, but couldn’t be cut down to fit in the case. The solution was a PCB designed to fit the footprint of the original. The modern guts still need more firmware work and a couple of tweaks like nudging that 23 V rail a bit higher to 26 V for better brightness, but the work already warrants a maniacal cry of “It’s Alive!”.

This isn’t [Amen’s] first rodeo. Back in March we looked in on another vintage Casio refurb that sniffed out the display protocol.

Measure 1024 Times, Cut Once

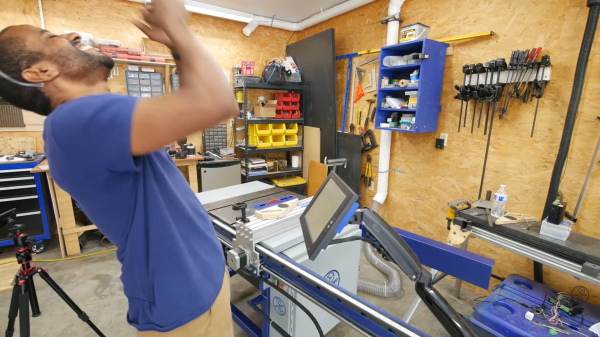
Typically, someone’s first venture into coding doesn’t get a lot of attention. Then again, most people don’t program a CNC table saw right out of the gate. [Jeremy Fielding] wasn’t enticed with “Blink” or “Hello, world,” and took the path less traveled. He tackled I/O, UX, and motion in a single project, which we would equate to climbing K2 as a way to get into hiking. The Python code was over 500 lines, so we feel comfortable calling him an over-achiever.

The project started after he replaced the fence on his saw and wondered if he could automate it, and that was his jumping-on point, but he didn’t stop there. He automated the blade height and angle with stepper motors, so the only feedback is limit switches to keep it from running into itself. The brains are a Raspberry Pi that uses the GPIO for everything. There is a manual mode so he can use the hand cranks to make adjustments like an ordinary saw, but he loses tracking there. His engineering background shines through in his spartan touchscreen application and robust 3D model. The built-in calculator is a nice touch, and pulling the calculations directly to a motion axis field is clever.

We’ve covered [Jeremy]’s DIY dynamometer and look forward to whatever he builds next. Until then, check out a light-duty approach to CNC that cuts foam in two-and-a-half dimensions.

Continue reading “Measure 1024 Times, Cut Once”