Reflowduino: Put That Toaster Oven To Good Use

There are few scenes in life more moving than the moment the solder paste melts as the component slides smoothly into place. We’re willing to bet the only reason you don’t have a reflow oven is the cost. Why wouldn’t you want one? Fortunately, the vastly cheaper DIY route has become a whole lot easier since the birth of the Reflowduino – an open source controller for reflow ovens.

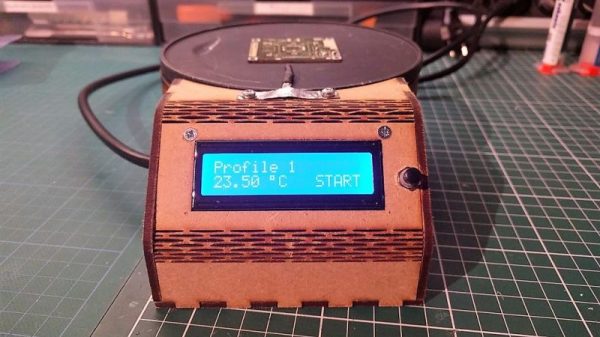
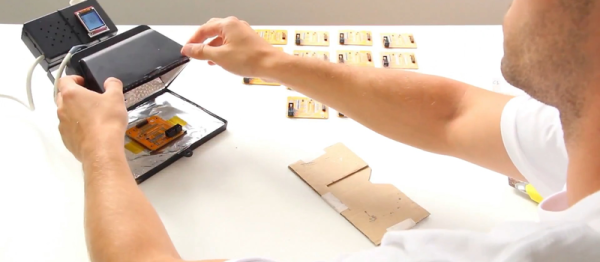
This Hackaday Prize entry by [Timothy Woo] provides a super quick way to create your own reflow setup, using any cheap means of heating you have lying around. [Tim] uses a toaster oven he paid $21 for, but anything with a suitable thermal mass will do. The hardware of the Reflowduino is all open source and has been very well documented – both on the main hackaday.io page and over on the project’s GitHub.

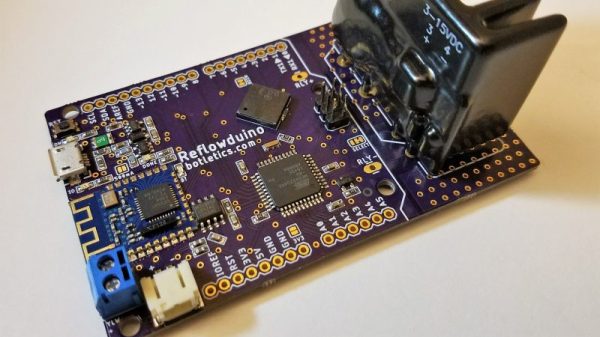
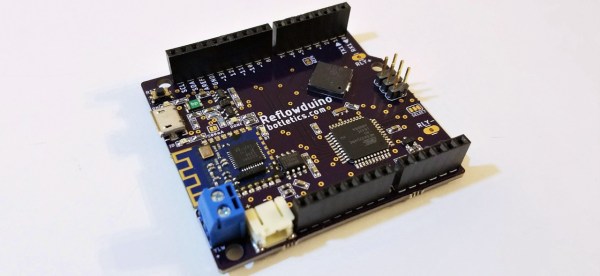
The board itself is built around the ATMega32u4 and sports an integrated MAX31855 thermocouple interface (for the all-important PID control), LiPo battery charging, a buzzer for alerting you when input is needed, and Bluetooth. Why Bluetooth? An Android app has been developed for easy control of the Reflowduino, and will even graph the temperature profile.

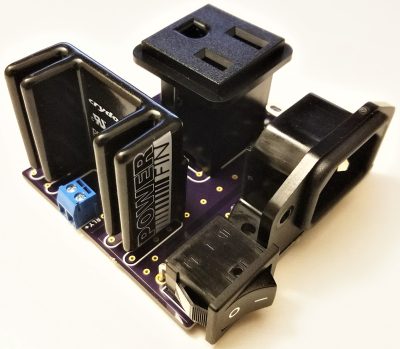
When it comes to controlling the toaster oven/miscellaneous heat source, a “sidekick” board is available, with a solid state relay hooked up to a mains plug. This makes it a breeze to setup any mains appliance for Arduino control.

We actually covered the Reflowduino last year, but since then [Tim] has also created the Reflowduino32 – a backpack for the DOIT ESP32 dev board. There’s also an Indiegogo campaign now, and some new software as well.

If a toaster oven still doesn’t feel hacky enough for you, we’ve got reflowing with hair straighteners, and even car headlights.

Reflow Rig Makes SMD Soldering A Wok In The Park

For a DIY reflow setup, most people seem to rely on the trusty thrift store toaster oven as a platform to hack. But there’s something to be said for heating the PCB directly rather than heating the surrounding air, and for that one can cruise the yard sales looking for a hot plate to convert. But an electric wok as a reflow hotplate? Sure, why not?

At the end of the day [ThomasVDD]’s reflow wok is the same as any other reflow build. It has a heat source that can be controlled easily, temperature sensors, and a microcontroller that can run the proportional-integral-derivative (PID) control algorithm needed for precise temperature control. That the heating element he used came from an electric wok was just a happy accident. A laser-cut MDF case complete with kerf-bent joints holds the heating element, the solid-state relay, and the Arduino Nano that runs the show. A MAX6675 thermocouple amp senses the temperature and allows the Nano to cycle the temperature through different profiles for different solders. It’s compact, simple, and [ThomasVDD] now has a spare wok to use on the stove top. What’s not to like?

Reflow doesn’t just mean oven or hotplate, of course. Why not give reflow headlights, a reflow blowtorch, or even a reflow work light a try?

Car Lights For Reflow Heat Source

If you only have a car and you need to unsolder some tricky surface mount components: what would you do? If you’re Kasyan TV, you’d remove your car’s halogen lights and get to town. That’s right: car lights for reflow.

When the friend of the host of Kasyan TV needed to remove some roasted toasted FETs from his motherboard but didn’t have anything for reflowing, she took some headlights and used them as an infrared source to desolder the FETs. Powered by a lab supply (although car batteries work too), the process works with 60 and 100-watt bulbs.

Now, reflowing with halogen bulbs isn’t new, and we’ve seen it done with the run of the mill 100-watt bulbs and a halogen floodlight. However, what we really like about using car lights is that they’re available everywhere and we already own some that we could (temporarily) repurpose. Now, don’t get us wrong – if you’re going to be reflowing more than just a little, there are plenty of alternative methods that don’t involve staring at “rather bright lights” for extended periods of time.

People ’round these parts can’t seem to get enough of reflow: from open source reflow oven controllers to reflowing with a hair straightener we’ve seen quite a bit. If you’re new to the reflow arena, we’ve got zero to hero: reflow style just for you. And if DIY at home reflow isn’t intense enough for you, we’ve got next level reflowing as well.

The full video is after the break, complete with Kasyan TV’s sponsored segment in the middle..

Continue reading “Car Lights For Reflow Heat Source”

An Awesome Open Mechanical Keyboard

Who doesn’t want a little added functionality to their  lives? Feeling a few shortcut keys would make working in Eagle a bit smoother, [dekuNukem] built his own programmable mechanical keypad: kbord.

It sports vibrant RGB LED backlight effects with different animations, 15 keys that execute scripts — anything from ctrl+c to backdoors — or simple keystrokes, up to 32 profiles, and a small OLED screen to keep track of which key does what!

kbord is using a STM32F072C8T6 microcontroller for its cost, speed, pins, and peripherals, Gateron RGB mechanical keys — but any clear key and keycaps with an opening for the kbord’s LEDs will do — on a light-diffusing switch plate, and SK6812 LEDs for a slick aesthetic.

Check out the timelapse video tour of his build process after the break! (Slightly NSFW, adolescent humor for a few seconds of the otherwise very cool video. Such is life.)

Continue reading “An Awesome Open Mechanical Keyboard”

Hackaday Prize Entry: Reflowduino, The Open Source Reflow Oven Controller

Face it — you want a reflow oven. Even the steadiest hands and best eyes only yield “meh” results with a manual iron on SMD boards, and forget about being able to scale up to production. But what controller should you use when you build your oven, and what features should it support? Don’t worry — you can have all the features with this open source reflow oven controller.

Dubbed the Reflowduino for obvious reasons, [Timothy Woo]’s Hackaday Prize entry has everything you need in a reflow oven controller, and a few things you never knew you needed. Based on an ATMega32, the Reflowduino takes care of the usual tasks of a reflow controller, namely running the PID loop needed to accurately control the oven’s temperature and control the heating profile. We thought the inclusion of a Bluetooth module was a bit strange at first, but [Timothy] explains that it’s a whole lot easier to implement the controller’s UI in software than in hardware, and it saves a bunch of IO on the microcontroller. The support for a LiPo battery is somewhat baffling, as the cases where this would be useful seem limited since the toaster oven or hot plate would still need a mains supply. But the sounder that plays Star Wars tunes when a cycle is over? That’s just for fun.

Hats off to [Timothy] for a first-rate build and excellent documentation, which delves into PID theory as well as giving detailed instructions for every step of the build. Want to try lower-end reflow? Pull out a halogen work light, or perhaps fire up that propane torch.

A Bright Idea For Reflow Soldering

There are almost as many ways to reflow a surface-mount circuit board as there are hackers. Today, we add another method to the list. [Dasaki] converted a halogen floodlight into an SMT oven, and did so with all the bells and whistles. Check the video below the break.

We’ve actually seen the low-tech version of this hack before, but it’s nothing we would want to use on a daily basis. [Dasaki] needed to get 100 boards done, so it was worth the effort to get it right.

Continue reading “A Bright Idea For Reflow Soldering”

An Hour To Surface Mount

Most of us have made the transition from through hole parts to surface mount. There are lots of scattered tutorials, but if you want to learn some techniques or compare your technique to someone else’s, you might enjoy [Moto Geek’s] hour-long video on how he does surface mount with reflow soldering. You can see the video below.

What makes the video interesting is that it is an hour long and covers the gamut from where to get cheap PCBs, to a homebrew pick and place pencil. [Moto Geek] uses a stencil with solder paste, and he provides links to the materials he uses. Continue reading “An Hour To Surface Mount”