About a year ago, [Nick Johnson] over at Arachnid Labs sent a tip in about Re:load Pro, his digital constant current load design. [Nick] was running a crowdfunding campaign, which always makes me think twice about posting. However in this case, I had no qualms writing a feature here on the blog (and backing the campaign with my own cash). Re:load Pro is actually [Nick’s] third generation current load. Having purchased and used the original Re:load, I knew [Nick] was capable of fulfilling all the promises in the campaign. Turns out I was right – [Nick] and the Arachnid Labs team had a very successful crowdfunding campaign. All the kickstarter backers have been enjoying their units for months now. When it came time to stock up the Hackaday Store, the Re:load Pro was a no-brainer.
What does one need a digital constant current load for? Plenty of jobs could benefit from it! From testing batteries to verifying power supplies, to tests of many driver circuits, a digital load is a great tool to have in your arsenal.
Like many electronic devices, our first step with the Re:load Pro was to upgrade the firmware. Since the Re:load Pro is operated by a Cypress Semiconductor PSOC 4, firmware updates are handled by the cyflash python package. For now this means heading to the command line and installing pip and cyflash. Those who aren’t familiar with a command line prompt will find a step by step guide on the firmware update page.
I should note that the Re:load Pro is powered by the USB input. I connected it up to my lab PC, which had no problem supplying the necessary power.
Calibration
The next step is calibrating the Re:load Pro. This requires an adjustable power supply capable of supplying at least 10 volts at 2amps, a decent multimeter, and of course some test leads. If you don’t have a reliable adjustable supply ask around; it should be easy to find someone who does.
The calibration is performed in three steps – first with nothing connected to the Re:load Pro. Then a power supply set to approximately 9.99 volts is connected. The voltage displayed on the Re:load Pro is tweaked with the rotary encoder to display the same value as that of the power supply. My power supply has a rather cheap internal voltmeter, so I used a multimeter in parallel with the setup. With voltage done, the Re:load Pro will draw 2 amps from the power supply. You need to adjust the current displayed on the Re:load Pro such that it matches the voltage displayed on your power supply current meter. Again, since my supply doesn’t have the most accurate meter, I used a multimeter – this time in series with the Re:load and the power supply.
Taking Measurements
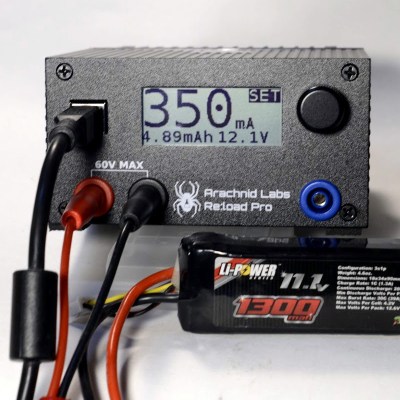
 With all the preliminary work done, it’s time to make some measurements! Re:load pro has a simple user interface. everything is accessed with the rotary encoder on the front panel. Turn the dial to your desired value, and press to select. In my case, I wanted to check the voltage drop of a LiPo battery under various loads. I simply hooked up the battery and dialed 350ma on the encoder. The Re:load Pro showed me that the battery was holding at 12.1 volts, and a display on the lower left side showed me how many milli amp hours I had pulled from the battery.
The Re:load Pro’s USB connector isn’t just for power. It will show up on your PC as a serial device. Just open your favorite terminal emulator, set the port to 115200 baud 8/N/1, and you’re good to go. The Re:load Pro uses a simple text based command/response protocol, all the commands are outlined on the Arachnid labs page.
Conclusion:
Re:load Pro is one of the first of new breed of open source tools. Like the closed source Rigol Oscilloscope, it replaces tools which cost several times more. [Nick] and Arachnid Labs aren’t just resting on their success though – they’ve just finished up a kickstarter for their latest open source tool. Tsunami is an open source signal generator based upon the Arduino platform. Tools enable projects, and open source tools are the best way to push the entire ecosystem forward.
Editor’s Note: We are reviving the concept of “Reviews” on Hackaday. These were pioneered long long ago by Hackaday Alum [Ian Lesnet] with his post on smart tweezers but little has been done since. We see a lot of tools, parts, raw materials, and equipment flow through our inbox. We plan to post reviews as a new Hackaday Column. These reviews are not paid placement, they are chosen by editors and writers based on our own interest. This particular example is available in the Hackaday Store and we started with it because we already have the hardware in-hand. However, we will be reviewing items we do not sell and have already put out requests for review units. If you know of something you think worthy of a review, please let us know by submitting it to the tips line. Thanks!
-Mike Szczys, Managing Editor


 With all the preliminary work done, it’s time to make some measurements! Re:load pro has a simple user interface. everything is accessed with the rotary encoder on the front panel. Turn the dial to your desired value, and press to select. In my case, I wanted to check the voltage drop of a LiPo battery under various loads. I simply hooked up the battery and dialed 350ma on the encoder. The Re:load Pro showed me that the battery was holding at 12.1 volts, and a display on the lower left side showed me how many milli amp hours I had pulled from the battery.


