Laser Cutting A 3D Printer

The concept of self-replicating 3D printers is a really powerful one. But in practice, there are issues with the availability and quality of the 3D-printed parts. [Noyan] is taking a different approach by boostrapping a 3D printer with laser-cut parts. There are zero 3D-printed parts in this project. [Noyan] is using acrylic for the frame and the connecting mechanisms that go into the machine.

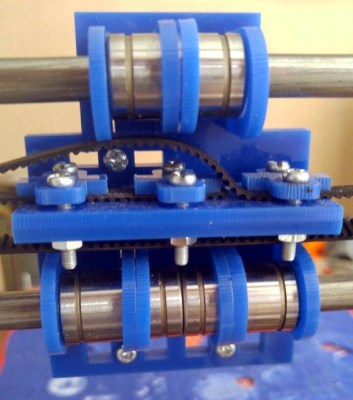
The printer design chosen for the project is the Prusa i3. We have certainly seen custom builds of this popular design before using laser-cut plywood for the frame. Still, these builds use 3D-printed parts for some of the more complicated parts like the extruder carriage and motor brackets. To the right is the X-carriage mechanism. It is complicated but requires no more than 6 mm and 3 mm acrylic stock and the type of hardware traditionally associated with printer builds.

With the proof of concept done, a few upgrades were designed and printed to take the place of the X-axis parts and the belt tensioner. But hey, who doesn’t get their hands on a 3D printer and immediately look for printable solutions for better performance?

We first saw a laser-cut RepRap almost nine years ago! That kit was going to run you an estimated $380. [Noyan] prices this one out at under $200 (if you know someone with a laser cutter), and of course you can get a consumer 3D printer at that price point now. Time has been good to this tool.

Hackaday Links Column Banner

Hackaday Links: January 4, 2015

Chips as furniture is now a thing. It started off with a 555 footstool from Evil Mad Scientist and moved on to an EPROM coffee table. Now [msvm] over on the War Thunder forums has constructed a Nixie tube driver table. It’s based on the K155, and as a neat little addition, he’s included a real vintage chip under glass in the table.

Have some tongs, an anvil, and a blowtorch? Make some bottle openers out of framing nails. There’s a lot of variety here in the shapes of the bottle openers.

[Stephen] used a solid state relay he found on eBay to drive some Christmas lights. The SSR failed. That meant it was time to see inside of this relay looked like. The short answer is, ‘a lot of goop and epoxy’, but the traces look big enough to support the current it’s rated for.

Imagine a part of your 3D printer breaks. That’s alright, just print another…. oh, yeah. Well, I guess it’s time to make a bearing bracket out of wood.

The Electronica MK-54 and MK-61 (actually the Электроника МК-54) were incredibly popular Soviet programmable calculators. Now there’s an emulator for them.

[Rue Mohr] found a very cheap TFT display on an Arduino shield. The chip for the display was an SPF5408, a chip that isn’t supported by the most common libraries. He eventually got it to work after emailing the seller, getting some libraries, and renaming and moving a bunch of stuff. If you have one of these displays, [Rue] just saved you a bunch of time.

CNC Router Converted to 3D Printer

CNC Router Converted To 3D Printer

3D Printers have come down significantly in price over the past few years. Nowadays it is even possible to get a 3D printer kit for between $200-300. It’s arguable how well these inexpensive printers perform. [Jon] wanted a printer capable of quality prints without breaking the bank. After researching the different RepRap types that are available he concluded he really wasn’t up for a full machine build. He had previously built a CNC Router and decided it was best to add a hot end and extruder to the already built 3 axis frame.

The CNC Router frame is made from aluminum, is very rigid and has a 2′ by 2′ cutting area. All axes glide smoothly on THK linear bearings and are powered by NEMA 23 motors driven by Gecko 540 stepper drivers. The router was removed from the machine but the mounting bracket was left on. The bracket was then modified to hold the extruder and hot end. With 3D Printers there is typically a control board specifically designed for the task with dedicated outputs to control the temperature of the hot end. Since [Jon] already had the electronics set up for the router, he didn’t need a specialized 3D Printer control board. What he does need is a way to control the temperature of the hot end and he did that by using a stand-alone PID. The PID is set manually and provides no feedback to the computer or control board.

Huge Whistle
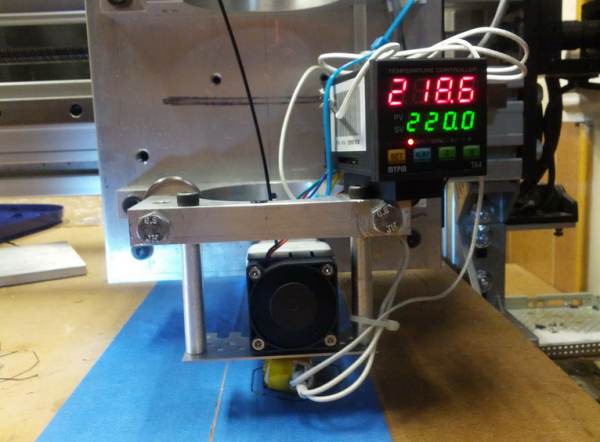
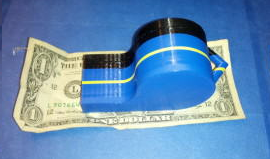
[Jon] used liked Mach3 for controlling his CNC Router so he stuck with it for printing. He’s tried a few slicers but it seems Slic3r works the best for his setup. Once the g-code is generated it is run though Mach3 to control the machine. [Jon] admits that he has a way to go with tweaking the settings and that the print speed is slower than most print-only machines due to the mass of the frame’s gantry and carriage. Even so, his huge whistle print looks pretty darn good. Check it out in the video after the break…

Continue reading “CNC Router Converted To 3D Printer”

Scratch-built 3D Printer Shows Rock-solid Performance

scratch-built-3d-printer

These days it’s super-easy (not super-cheap) to go out and buy a 3D printer. But if you’ve got the mad skills like [Mario Lukas] maybe you can build a 3D print using a bunch of scavenged parts (translated). He’s published six posts on the build, and put together an overview video which you can watch after the break.

A pile of salvaged parts were found in a scanner and four different printers. He’s also powering the thing with an old PC PSU. The hot bed and extruder are brand new, which is a wise investment. We’re not sure about the threaded rod and bearings but we’d bet those are new as well. When it came time to work on the electronics he chose an Arduino board as the go-between for the printer and computer. It uses four stepper motor driver boards to drive the axes. Connections can be a bit complicated and he actually ‘smoked’ one of the boards during the development phase.

One of the mechanical build posts shows a belt routed in a T-shape. We wonder if it’s function is similar to what this H-bot style printer uses?

Continue reading “Scratch-built 3D Printer Shows Rock-solid Performance”

From RepStrap To RepRap; A 3D Printer Is Born

[Gavilan Steinman] just printed and assembled his own RepRap machine and filmed the process. This isn’t news but we found it very interesting to watch. He started with a RepStrap, a rapid-prototyping 3D printer that as built by hand instead of printed by a similar machine. This is the seminal step in the self-replicating process.

From there he prints an extruder head which improves the quality of the parts the RepStrap can produce. We then see time-lapse footage of the printing process for a Mendel unit, the second generation of RepRap machines. We’ve embedded the video after the break. It’s a great way to spend ten minutes on a Sunday afternoon.

Continue reading “From RepStrap To RepRap; A 3D Printer Is Born”

Print Your Own Pizza

[youtube=http://www.youtube.com/watch?v=XJ7gD0nH-xA]

If you think there’s never enough computerized numerical control in your life perhaps the pizza plotter should be your next project. This is a large 2-axis machine that shoots pressurized sauce onto a pizza crust. It’s a food-grade RepStrap and appears to use a garden sprayer as a reservoir. They learned their lesson when a loose hose clamp sprayed sauce around the room. We’re thinking this is a bit of reinventing the wheel as pizza-making factories but it’s fun nonetheless.

Hackaday Links: Sunday, November 29

Sometimes we wonder if we’re making good choices with PCB layout when using EagleCAD. Watch how the pros do it with a video of an hour-long Adafruit PCB layout session compressed into seven minutes.

[Elijah] documented his RepStrap build. This is a chicken-or-egg project in that RepStrap machines are built without the assistance of an already existing RepRap.

Here’s an ASUS concept from CeBIT this year for a laptop that has two touch screens and no physical keyboard. Isn’t this just the DS project we saw this week but in a nice case?

[James] conjured up a physical realization of the Spinning Wheel of Death for an art exhibit. We can’t stop smiling when looking at this artful hack.

I’m sure nobody will raise an eyebrow when you pop out that roll of duct-tape and affix your phone to the airplane window. That’s what [floe] did to make this airline flight time-lapse video with an Android phone. Aren’t you supposed to turn off all electronics for takeoff?