Reverse Engineering A PokeWalker

The PokeWalker is part of Nintendo’s long quest to get children (and likely some adults) walking and exercising. There’s the PokeWalker, Pokemon Pikachu, PokeBall Plus, Pokemon Pikachu 2, Pokemon mini, and of course Pokemon Go. Despite being out a decade, there wasn’t a ROM dump for the device and there was minimal documentation on the communication protocol. [Dmitry Grinberg] took it upon himself to change all that and crack the PokeWalker open.

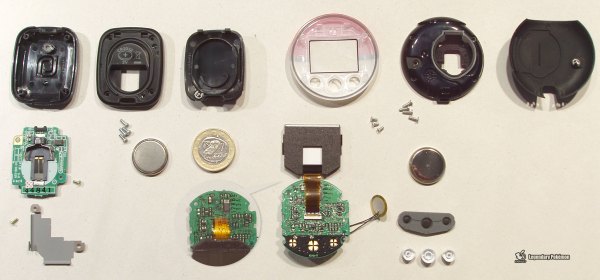
At its heart, the PokeWalker is just a pedometer with an IR port and a 96×64 grayscale screen. It came out in 2009 to accompany the new Pokemon release for the Nintendo DS. Cracking open the device revealed a 64KB EEPROM, a Renesas H8/38606R CPU, a Bosch BMA150 accelerometer, and a generic IR transceiver. The CPU is particularly interesting as in addition to being quite rare, it has a mix of 8, 16, and 32 bits with 24-bit pointers. This gives it a 64K address space. While the CPU is programmable, any attempt to do so erases the onboard flash. The communication protocol packets have an 8-bit header that precedes each packet. The header has a checksum, a command byte, and four bytes of session id, and an unused byte. Curiously enough, every byte is XOR’d with 0xAA before being broadcast.

One command is an EEPROM write, which uses back-referencing compression. Each chunk of data to be written is packaged into 128-byte chunks, though 128 bytes likely won’t be sent thanks to the compression. The command can theoretically reference 4k bytes back, but in practice, it can only reference 256 bytes back. It was this command that laid the foundation for the exploit. By carefully crafting the command to send, the command can overflow the decompression buffer and into executable code. Only a few bytes can be overflowed so the payload needs to be carefully crafted. This allowed for an exploit that reads the system ROM and broadcasts it out the IR port. Only 22k bytes can be dumped before the watchdog reboots the device. By changing the starting address, it was easy to do multiple passes.

After the ROM was stitched together from the different passes, the different IR commands were analyzed. In particular, a command was found that allows direct writes into RAM. This makes for a much easier exploit as you can write your exploit, then override a pointer in the event table, then have the exploit revert the event table once the system naturally jumps to your exploit.

[Dmitry] finishes off this amazing exploit by writing a PalmOS app to dump the ROM from a PokeWalker as well as modify the system state. PalmOS was chosen as it is an easy and cheap way to have a programmable IR transciever. All in all, a gorgeous hack with a meticulous writeup. This isn’t the first video game accessory that’s been reverse engineered with a scrupulous writeup, and we’re sure it won’t be the last.

Continue reading “Reverse Engineering A PokeWalker”

Industrial Robot Given New Life And Controller

We all think we could use a third arm from time to time, but when we actually play this thought experiment out in our heads we’ll eventually come to the same hurdle [caltadaniel] found, which is a lack of a controller. His third arm isn’t just an idea, though. It’s a Yaskawa industrial robot that he was able to source for pretty cheap, but it was missing a few parts that he’s been slowly replacing.

The robot arm came without a controller or software, but also without any schematics of any kind, so the first step was reverse engineering the wiring diagram to get an idea of what was going on inside the arm. From there some drivers were built for the servos, but the key to all of it is the homemade controller. The inverse kinematics math was done in Python and runs on an industrial PC. Once it was finally all put together [caltadaniel] had a functioning robotic arm for any task he could think of.

Interestingly enough, while he shows the robot brushing his teeth for him, he also set it up to flip the switch of a useless machine that exists only to turn itself off. There’s something surreal about a massive industrial-sized robotic arm being used to turn on a $20 device which will switch itself back off instantly, but the absurdity is worth a watch.

Continue reading “Industrial Robot Given New Life And Controller”

Reverse Engineering A Ceiling Fan Remote

In the quest to automate everything in your home, you no doubt have things that aren’t made with home automation in mind. Perhaps your window AC unit, or the dimmer in your dining room. [Seb] has several ceiling fans that are controlled by remotes and wanted to connect them to his home automation system. In doing so, [Seb] gives a good overview of how to tackle this problem and how to design a PCB so he doesn’t have a breadboard lying around connected to the guts of his remote control.

There are several things [Seb] needs to figure out in order to connect his fans to Home Assistant, the home automation system he uses: He needs to determine if the circuit in the remote can be powered by 5 or 3.3 V, he needs to connect the circuit to an ESP32 board, and he needs to figure out if he can create a custom PCB that combines the circuit and the ESP32 into one. The video goes through each of these steps and shows the development of each along the way.

There’s a lot of info in the video, so it might need to be slowed down a bit to see all the details. There are some other reverse engineering of home automation gear on the site, here, or, you might want to build your own remote to control your automated devices.

Continue reading “Reverse Engineering A Ceiling Fan Remote”

Dumping A Zelda SNES ROM, And Learning A Few Things Along The Way

For many of us, being given a big old DIP ROM from nearly thirty years ago and being told to retrieve its contents would be a straightforward enough task. We’d simply do what we would have done in the 1980s, and hook up its address lines to a set of ports, pull its chip select line high, and harvest what came out of the data lines for each address.

But imagine for a minute that an old-fashioned parallel ROM is a component you aren’t familiar with, as [Brad Dettmer] did with the ROM from a SNES Zelda cartridge. We’ve seen plenty of reverse engineering stories with ancient computing gear as their subject, but perhaps it’s time to accept that some of the formerly ubiquitous devices are edging towards that sort of status.

So [Brad] takes us through the process of using the Saleae logic analyser to interrogate the chip while an Arduino stepped through its address lines, and the lesson is probably that while it seems like a sledgehammer to crack a nut it is important to factor in that unfamilarity. If you’d never worked with a 1980s ROM, it would make sense to use the tool you are familiar with, wouldn’t it?

Anyway, all’s well that ends well. While we’re on the subject of Nintendo ROMs, have a read about extracting the boot ROM from a cloned Game Boy.

Cracking A Bluetooth Credit Card

You might be surprised to find out that it’s actually not a good idea to put all of your credit card information on a little Bluetooth enabled device in your pocket. Oh, what’s that? You knew already? Well in that case you won’t find the following information terribly shocking, but it’s still a fascinating look at how security researchers systematically break down a device in an effort to find the chinks in its armor.

[Mike Ryan] of ICE9 Consulting has recently published an article detailing the work done to examine and ultimately defeat the security on the FUZE Card. From using an x-ray machine to do non-destructive reconnaissance on the device’s internals to methodically discovering all the commands it responds to over Bluetooth, it’s safe to say the FUZE Card is cracked wide open at this point.

To be clear, the attacker must still pair with FUZE, so physical access is required. But as pointed out by [Mike] in the blog post, handing your card over to a merchant is standard operating procedure in many cases. It isn’t as if it would be hard to get a hold of one of these FUZE cards for a minute or two without the owner becoming suspicious. Pairing FUZE to the Linux device to continue to the next step of the attack only takes a few seconds, as demonstrated in the video after the break.

Once paired, the attacker can simply send a BLE command to FUZE which disables the lock screen. It’s really that simple. The attacker can also send commands to dump credit card info over Bluetooth, meaning they could download your information even when the card is “safely” back in your pocket. The inherent failure in the FUZE design is that you don’t need to provide any sort of authentication to pair it to a new Bluetooth device. It makes the (very dangerous) assumption that the person holding it is entitled to do so.

Even if you know better than to ever buy a device like this, the post [Mike] has written up is really a must-read for anyone who’s ever looked at a device and tried to figure out what was going on in its little silicon brain. We especially liked his assertion that reverse engineering a device essentially boils down to: “staring, thinking, a little experimentation, but mostly staring and thinking.” We’re having an internal debate here at Hackaday HQ about making that the site’s tagline.

Incidentally, this is very similar to the Bluetooth gun “safe” that was cracked not so long ago. At this point, it might be wise to just stay away from anything with that little blue logo on it if you intend to trust it with your identity and/or deadly weapon.

Continue reading “Cracking A Bluetooth Credit Card”

Mike Harrison’s Reverse Engineering Workshop

Hardware teardowns are awesome when guided by experts. One of our favorites over the years has been [Mike Harrison], who has conquered teardowns of some incredibly rare and exquisitely engineered gear, sharing the adventure on his YouTube channel: mikeselectricstuff. Now he’s putting on a workshop to walk through some of the techniques he uses when looking at equipment for the first time.

[Mike] will be in Pasadena a few days early for the Hackaday Superconference and floated the idea of hosting a workshop. We ordered up some interesting gear which he hasn’t had a chance to look at yet. A dozen lucky workshop attendees will walk through the process [Mike] uses to explore the manufacturing and design choices — skills that will translate to examining any piece of unknown gear. He may even delve into the functionality of the equipment if time allows. Get your ticket right now!

To keep things interesting we’re not going to reveal the equipment until after the fact. But follow the event page where we’ll publish the details of his reverse engineering work after the workshop.

[Mike] is the badge designer for this year’s Hackaday Superconference badge. Unfortunately Supercon is completely sold out (we tried to warn you) but you can check out the badge details he already published. And we will be live streaming the Supercon this year — more details on that next week!

Dummies Guide To Reverse Engineering

[Juan Carlos Jiménez] has reverse engineered a router — specifically, a Huawei HG533. While that in itself may not sound substantial, what he has done is write a series of blog posts which can act as a great tutorial for anyone wanting to get started with sniffing hardware. Over the five part series, he walks through the details of identifying the hardware serial ports which open up the doors to the firmware and looking at what’s going on under the hood.

The first part deals with finding the one or several debug ports on the hardware and identifying the three important pins – Rx, Tx and GND. That’s when he shows novices his first trick – shining a flashlight from under the PCB to find the pins that have trace connections (most likely Rx and Tx), those that don’t have any connections (most likely CTS and DTR) and those that have connections to the copper pour planes (most likely VCC and GND). The Tx signal will be pulled up and transmitting data when the device is powered up, while the Rx signal will be floating, making it easy to identify them. Finding the Baud rate, though, will require either a logic analyser, or you’ll have to play a bit of a guessing game.

Once you have access to the serial port and know its baud rate, it’s time to hook it up to your computer and use any one of the several ways of looking at what’s coming out of there — minicom, PuTTY or TeraTerm, for example. With access to the devices CLI, and some luck with finding credentials to log in if required, things start getting interesting.

Over the next part, he discusses how to follow the data paths, in this case, looking at the SPI signals between the main processor and the flash memory, and explaining how to use the logic analyser effectively and decode the information it captures. Moving further, he shows how you can hook up a USB to SPI bridge, connect it to the flash memory, take a memory dump of the firmware and read the extracted data. He wraps it up by digging in to the firmware and trying to glean some useful information.

It’s a great series and the detailed analysis he does of this particular piece of hardware, along with providing a lot of general tips, makes it a perfect starting point for those who need some help when getting started on debugging hardware.

Thanks, [gnif] for posting this tip.

Continue reading “Dummies Guide To Reverse Engineering”