an RGB LED display showing expected arrival times of trams and buses sitting on a table

A Private View Of A Public Transport Sign

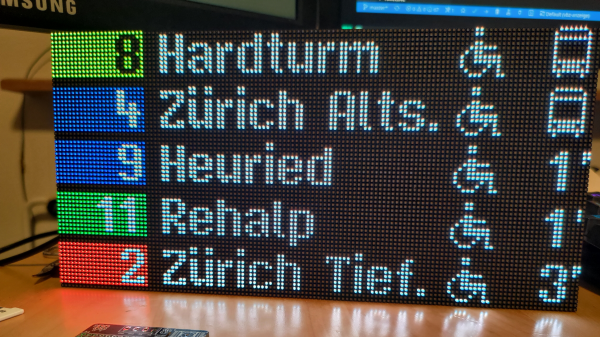
[Stefan Schüller] was a fan of the LED signs that display arrival information for the trams and buses in their city of Zürich. [Stefan] was having trouble finding a source to purchase the signs so, instead, decided to build one himself.

[Stefan] decided to recreate the 56×208 single color 2mm dot pitch display with an 128 x 64 P2 RGB LED screen respecting the same 2 mm pitch. The display is driven by an ESP32 DMA RGB LED matrix shield utilizing a HUB75 RGB LED matrix library, all being powered from a 5 V 4 A power supply.

In addition to driving the LED matrix display, the ESP32 polls Zürich’s public transportation API and then parses the XML for the relevant information. Since [Stefan] wanted to match the fonts as closely as possible,
he created a new font from scratch, including the bus and accessibility icons. The new font was encoded into a glyph bitmap distribution format (BDF) that was then converted to work with Adafruit’s GFX library, with [Stefan] creating a custom conversion tool, called bdf2adafruit, to do the last leg of the conversion.

Since the LED matrix had full color capability, [Stefan] decided to add a little extra flourish and color code the transportation lines with the official tram colors. All source code is available on his GitHub repository for the project, for those looking for more detail.

We’ve featured DIY builds of public transportation feeds before. With the ubiquity of low cost RGB LED displays and public APIs, hopefully we’ll see many more!

Share Screen To RGB Panel With Pi Pico W

RGB LEDs are great for adding a bit of color to your life, and it’s even more satisfying to use a matrix of them as a graphic display. [bitluni] built an RGB LED display with Pi Pico to which you can share a pixelated version of your PC’s screen.

[bitluni] wanted to gain some experience with MicroPython on the Raspbery Pi Pico W, and had previously used WebSockets to transmit display data over WiFi. Unfortunately, the available MicroPython WebSockets implementation didn’t leave enough RAM for the rest of the code. Instead, he set up a simple HTTP server on the Pico that receives the pixel data as a POST request. This makes for a slow refresh rate but still looks great, especially with the 3D printed rear-projection frame.

To send display data from the computer, [bitluni] uses a simple locally hosted HTML page that takes the Pico’s IP address, and prompts you to select the display or window you want to share. It uses JavaScript to grab the display data, generate the required low-res pixel values, and send the POST request.

This looks like a fun weekend project to add to your lab or home and only costs about $20 in parts. It’s basically a scaled-down version of his giant ping pong ball wall display.

Continue reading “Share Screen To RGB Panel With Pi Pico W”

FFT display on 16x16 RGB LED grid

Art Project Fast And Fouriously Transforms Audio Into Eye Candy

Fast Fourier Transforms. Spectrum Analyzers. Waterfall displays. Not long ago, such terms were reserved for high end test gear. But oh, how things have changed! It’s no surprise to many Hackaday readers that modern microcontrollers have transformed the scene as they become more powerful and as a result are endowed with more and more powerful software libraries. [mircemk] has used such a library along with other open source software combined with mostly off the shelf hardware to create what he calls the DIY FFT Spectrum Analyzer. Rather than being a piece of test gear, this artful project aims to please the eye.

The overall build is relatively simple. Audio is acquired via a line-in jack or a microphone, and then piped into an ESP32. The ESP32 runs the audio through the FFT routine, sampling, slicing, and dicing the audio into 16 individual bands. The visual output is displayed on a 16 x 16 WS2812 Led Matrix. [mircemk] wrote several routines for displaying the incoming audio, with a waterfall, a graph, and other visualizations that are quit aesthetically pleasing. Some of them are downright mesmerizing! You can see the results in the video below the break.

Of course the build doesn’t stop with slapping some hardware and a few passive components together. To really be finished, it needs to be encased in something worth displaying. [mircemk] does not disappoint, as a beautiful 3D-printed enclosure wraps it all up nicely.

We think that the final product is great, and it reminds us of some of the very things that inspired us early on in our hacking careers. We would love to see this project integrated with an Interactive Musical Art Installation of any kind, the more esoteric the better. Perhaps a 555 timer synth could fit the bill? Be sure to share your own hacks with us via the Tip Line!

Continue reading “Art Project Fast And Fouriously Transforms Audio Into Eye Candy”

LED Matrix Takes You Down To Nixieland

It’s said that imitation is the sincerest form of flattery. Sure, there are some who might simply sugarcoat blatant plagiarism with fancy quotes, but there are still cases that come from well-intended, genuine admiration. The Nixie tube with its ember-like glow is a component that definitely gets a lot of such admiration, and being a fond LED enthusiast, [tuenhidiy] saw a perfect opportunity to imitate them with a RGB LED Matrix and build a virtual Nixie clock from it.

What may sound like just displaying images of Nixie tubes on a LED matrix, is actually exactly that. Using the UTFT library and converter, [tuenhidiy] turned pictures of individually lit-up Nixie tube digits into arrays of 16bit RGB values, and shows the current time on an ESP32-controlled 64×64 matrix with them. Providing two different image sizes, you can either place two tubes next to each other, or in a 3×2 arrangement, and of course have plenty of flexibility for future extensions. In the demo video after the break, you can see the two options in action while displaying both the full time, and only the seconds.

Unfortunately, it’s always difficult to judge an LED project through the lens of a camera, especially when looking for the characteristic color of a Nixie tube, but we take [tuenhidiy]’s word that it resembles it a lot better in reality. On the other hand, the pixelated look certainly adds its own charm, so you might as well go completely overboard with the colors — something we’ve seen with a different LED-themed Nixie alternative a little while back.

Continue reading “LED Matrix Takes You Down To Nixieland”

Lots Of Blinky! ESP32 Drives 20,000 WS2812 LEDs

20,000 LEDs sounds like an amazing amount of blink. When we start to consider the process of putting together 20,000 of anything, and then controlling them all with a small piece of electronics the size of a postage stamp, we get a little bit dizzy. Continue reading “Lots Of Blinky! ESP32 Drives 20,000 WS2812 LEDs”

Morphing Digital Clock Will Show You A Good Time

A few weeks ago, [HariFun] set out to emulate a 7-segment display with an LED matrix. Seems easy enough, right? Right. He also wanted to come up with a new way to transition between digits, which is a much harder task. But he did it, and it’s really cool. At a viewer’s suggestion, [Hari] used the transition as the basis for a mesmerizing clock that brings the smooth sweep of an analog second-hand into the digital age.

This is the coolest way to watch the time pass since the hourglass. You can almost hear the light move as one digit slides into the next. Each transition is totally unique, so depending on the digit this involves one or more vertical segments sliding from right to left, or multiple segments moving in a counter-clockwise circle.

You too can watch time glide by with little more than a 64×32 RGB LED matrix, a NodeMCU, and [Hari]’s digit transition code. It only costs about $25 to build, and you really can’t beat the quality of instruction he’s put together. Take a second or two and check it out after the break.

If you prefer OLEDs and vertical transitions, there’s a clock for that, too.

Continue reading “Morphing Digital Clock Will Show You A Good Time”

After The Sun Set On San Mateo, LED Takes Over Hackaday’s BAMF Meetup

After this Spring’s Bay Area Maker Faire closed down for Saturday night and kicked everybody out, the fun moved on to O’Neill’s Irish Pub where Hackaday and Tindie held our fifth annual meetup for fellow Maker Faire attendees. How do we find like-minded hackers in a crowded bar? It’s easy: look for tables lit by LEDs and say hello. It was impossible to see everything people had brought, but here are a few interesting samples.

Continue reading “After The Sun Set On San Mateo, LED Takes Over Hackaday’s BAMF Meetup”