Sierpinski PCB Christmas Tree

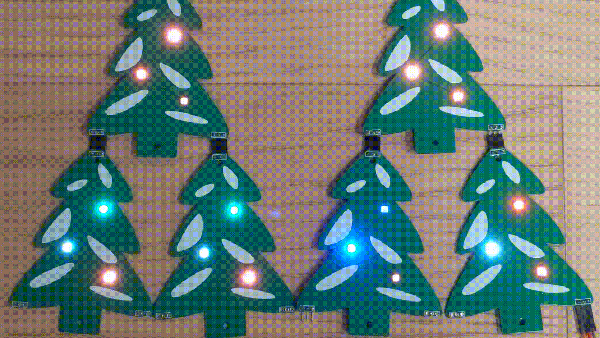
It’s holiday time again! And that means it’s time to break out the soldering iron and the RGB LEDs! If you’re going to make a custom PCB to put those LEDs on, you’ll notice that you get few copies of your PCB in your order, so, might as well design it such that you can combine them all together into a single Sierpinski Christmas Tree, just like [Landon Carter] did.

Each PCB “tree” has three connections which can be used as either inputs or outputs by soldering one of two bridge connections on the PCB. The power and signal goes up and down through the tree, rather than across, so the connections go one on the top of the tree and two on the bottom. This way, each tree in the triangle can easily be connected, and each triangle can be easily connected to another. Each individual tree has three WS2812b-mini addressable RGB LEDs and the tree is controlled by an external Arduino.

The first order of 10 PCBs came in, which makes a 9 member tree – next up is a 27 member tree. After that, you’re going to need some pretty high vaulted ceilings in order to put these on the wall. On the upside, though, once the holidays are over, everything can be easily disconnected and packed away with the rest of the decorations. If you, too, are interested in RGB LED decorations, there are a few on the site for your perusal.

RGB Party Bike Flashes With The Beat

One of the biggest dangers to a cyclist is not being seen at night. To counteract this, all manner of lighting and reflective gear is available to help ensure bicycles are seen on the streets. Of course, you don’t have to stop at the purely practical. [TechnoChic] decided to have some fun with her ride, festooning her party bike with many, many LEDs.

As you’d expect, the RGB illuminations are thanks to WS2812B LED strips. Running the show is  a trio of Arduino Nano 33 IoTs – one for the LEDs on the bike’s frame, the other two mounted on the front and back wheels respectively. This allowed for the easy control of LEDs on the spokes without having to pass data and power lines to the rotating wheels. The LEDs on the frame are even music-reactive, with the Arduino sampling music input via one of its analog-to-digital converters.

Paired with a boombox on the bike, the build makes for a great way to hype up group rides through the city at night. We can imagine such a bike being an absolute hit at Critical Mass, though you’ve probably gotta add a laser or glitter cannon if you’re going to draw attention at Burning Man. If you’re tired of pedaling, you might consider an electric conversion, too. Video after the break.

Continue reading “RGB Party Bike Flashes With The Beat”

3D Print Your Way To A Modular MIDI Playset

Have you ever wanted to experiment with MIDI, but didn’t know where to start? Or perhaps you didn’t think you could afford to properly outfit your digital beat laboratory, especially given the average hacker’s penchant for blinkenlights? Well worry no more, as [Johan von Konow] has unveiled a collection of DIY MIDI devices that anyone with a 3D printer can build on the cheap.

The LEET modular synthesizer is made up of a keyboard, drum pad, chord keyboard, arpeggiator and a step sequencer that plug into your computer and interface with industry standard digital audio workstation (DAW) programs. The down side is that they don’t do anything on their own, but this simplification allowed [Johan] to really streamline the design and bring the cost of the build down to the bare minimum.

Integrated wire channels mean no PCB is required.

You don’t need to build all the components either, especially if you’re just testing the waters. The keyboard is a great starting point, and even if you have to buy all the components new from eBay, [Johan] says it shouldn’t cost you more than $10 USD to build. You just need an Arduino Pro Micro, some tact switches, and a section of WS2812 RGB LED strip. There’s an excellent chance you’ve already got some of that in the parts bin, which will make it even cheaper.

There is one missing element though: the PCB. But not because you have to source it yourself. Like his clever Arduboy clone we covered earlier in the year, the 3D printed bodies for all of the LEET devices have integrated wiring channels that serve as a stand-in for a traditional circuit board. Simply place all your components, push some stiff 0.3 mm diameter wire down into the channels, and solder the ends. It’s a very neat approach, and something we could see becoming more popular as desktop 3D printers become an increasingly common sight in the home workshop.

Continue reading “3D Print Your Way To A Modular MIDI Playset”

Illuminated 3D Printed Guitar Is Ready To Rock

When we think of 3D printed parts for our projects, most of us imagine little bits like brackets and mounting plates. Perhaps the occasional printed project enclosure. But if you’ve got a big custom printer as [Joshendy] does, plus plenty of time, it opens up a whole new world of large scale projects. Take for example the gorgeous RGB LED guitar body he recently completed.

Despite the considerable 300 x 300 mm build area of his custom 3D printer, [Joshendy] still had to design the guitar body in sections that could be bolted together after being printed in ABS. It took around 60 hours to run off all the parts, with the large central section taking the longest to print at 28 hours. With the generous application of heat-set inserts, the assembled guitar should be plenty strong.

The white ABS of the guitar body helps diffuse the LEDs.

While the skeletal plastic body of the guitar is certainly visually interesting in itself, it only makes up for half of the final look. Inside the central cavity, [Joshendy] has embedded two strips of RGB LEDs, a 128×64 OLED screen, and a custom PCB that plays host to a STM32L4 microcontroller the appropriate voltage regulators necessary to run it all on a battery pack.

The board taps into the audio being produced by the guitar and uses a fast Fourier transform (FFT) to get the LEDs reacting to the beat. As demonstrated in the video after the break, you can use the screen to navigate through the different lighting modes in real-time right on the instrument itself.

We covered the equally impressive large-format 3D printer that [Joshendy] used to produce this guitar earlier in the month, and it’s quite exciting to see the sort of things he’s printing on it already. This project has already set the bar very high, and we can’t wait to see what he comes up with next.

Continue reading “Illuminated 3D Printed Guitar Is Ready To Rock”

Voice Controlled RGB LEDs Go Big

When we see RGB LEDs used in a project, they’re often used more for aesthetic purposes than as a practical source of light. It’s an easy way to throw some color around, but certainly not the sort of thing you’d try to light up anything larger than a desk with. Apparently nobody explained the rules to [Brian Harms] before he built Light[s]well.

Believe it or not, this supersized light installation doesn’t use any exotic hardware you aren’t already familiar with. Fundamentally, what we’re looking at is a WiFi enabled Arduino MKR1000 driving strips of NeoPixel LEDs. It’s just on a far larger scale than we’re used to, with a massive 4 x 8 aluminum extrusion frame suspended over the living room.

Onto that frame, [Brian] has mounted an undulating diffuser made of 74 pieces of laser-cut cardstock. Invoking ideas of waves or clouds, the light looks like its of natural or even biological origin while at the same time having a distinctively otherworldly quality to it.

The effect is even more pronounced when the RGB LEDs kick in, thanks to the smooth transitions between colors. In the video after the break, you can see Light[s]well work its way from bright white to an animated rainbow. As an added touch, he added Alexa voice control through Arduino’s IoT Cloud service.

While LED home lighting is increasingly becoming the norm, projects like Light[s]well remind us that we aren’t really embracing the possibilities offered by the technology. The industry has tried so hard to make LEDs fit into the traditional role of incandescent bulbs, but perhaps its time to rethink things.

Continue reading “Voice Controlled RGB LEDs Go Big”

Circuit Board Origami Puts You Face-to-Face With Low-Poly Electronics

Paper craft has been around almost as long as paper itself. It’s fun to mimic paper craft and origami with low-poly 3D prints, and [Stephen Hawes] wondered whether it could be done with copper-clad PCBs. Two years after the question arose, we have the answer in the form of a fantastical mask with light-up eyes. Check it out in the video below.

[Stephen] started with a model (Update: [kongorilla]’s 2012 low poly mask model from back in 2012 was the starting point for this hack) from the papercraft program Pepakura Designer, then milled out dozens of boards. Only a few of them support circuitry, but it was still quite the time-consuming process. The ATmega32U4 on the forehead along with the fold-traversing circuitry serve to light up the WS2812B eyes. Power runs up the copper tube, which doubles as a handy mounting rod to connect to the 3D printed base.

Continue reading “Circuit Board Origami Puts You Face-to-Face With Low-Poly Electronics”

Falcon 9 Lamp Is Touching Down In The Living Room

Many of us have been inspired by the videos of the Falcon 9 booster, tall as an office building, riding a pillar of flame down to a pinpoint landing at Kennedy Space Center or on one of SpaceX’s floating landing pads in the ocean. It’s not often that we get to see science fiction fantasy become reality on such a short timescale, and while they might not be sold on the practicality of reusable rockets, even the most skeptical of observers have to admit it’s an incredible feat of engineering.

Though it can’t quite compare to the real thing, this 1:60 scale Falcon 9 lamp by [Sir Michael II] promises to bring a little of that excitement home every time you flick on the light. Combining a scratch built model of the reusable booster with some RGB LEDs, the hovering tableau recreates the tense final seconds before the towering rocket comes to a rest on its deployable landing legs. We imagine those last moments must seem like an eternity for the SpaceX engineers watching from home as well.

The LED “exhaust” without the fluff.

[Michael] walks readers through assembling the Falcon 9 model, which cleverly uses a 2 inch white PVC pipe as the fuselage. After all, why waste the time and material printing a long white cylinder when you can just buy one at the hardware store for a few bucks?

Dressed up with 3D printed details from Thingiverse user [twuelfing] and splashed with a bit of paint, it makes for a very convincing model. While the diameter of the pipe isn’t quite right for the claimed 1:60 scale, unless Elon Musk is coming over your place to hang out, we don’t think anyone will notice.

The rocket is attached to the pad with a piece of threaded steel rod, around which [Michael] has wrapped one meter of RGB LEDs controlled by an Arduino Uno. With some polyester fiber filler as a diffuser and a bit of code to get the LEDs flickering, he’s able to produce a realistic “flame” that looks to be coming from the Falcon 9’s center engine. While we admit it may not make a very good lamp in the traditional sense, it certainly gets extra points for style.

We’ve actually seen a similar trick used before to light up the engines of a LEGO Saturn V and Apollo Lunar Module. It’s amazing how realistic the effect can be, and we’d love to see it used more often. We’d also like to see more model rockets that actually levitate over their pads, but one step at a time.