More Drill Press Mods: Adding A VFD Means No More Belt Changes

A decent drill press is an essential machine tool for almost any kind of shop, and marks a significant step up in precision compared to a hand drill. The ability to drill square, true holes is one thing, but the added power over what’s possible with a portable tool is the real game changer. If only you didn’t have to switch around those damn belts to change speeds, though.

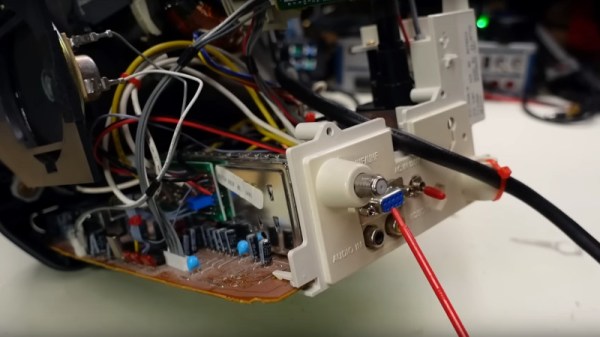
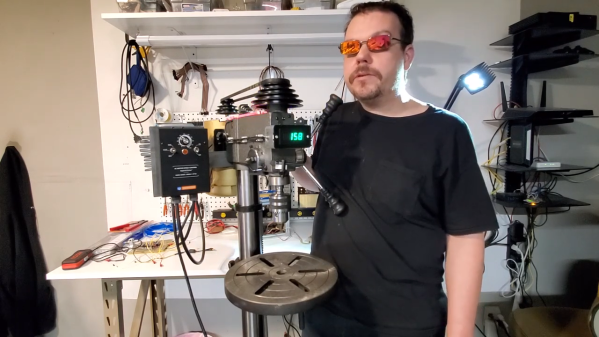
You don’t, of course, if you go through the effort to add a variable frequency drive to your drill press like [Midwest Cyberpunk] did, along with some other cool mods. The donor tool for these mods came from — where else? — Harbor Freight. Some will quibble with that choice, but the tool was pretty cheap, and really all [Midwest] was interested in here was some decent castings and a quill with acceptable runout, since the entire power train of the tool was slated for replacement. The original motor gave way to a beefy Baldor 3-phase/240-volt motor controlled by a VFD mounted on a bracket to the left of the drill press head, allowing the stock belt and step pulley transmission to be greatly simplified. Continue reading “More Drill Press Mods: Adding A VFD Means No More Belt Changes”

Old TV To RGB

As CRT televisions have faded from use, it’s become important for retro gaming enthusiasts to get their hands on one for that authentic experience. Alongside that phenomenon has been a resurgence of some of the hacks we used to do to CRT TV sets back in the day, as [Adrian’s Digital Basement] shows us when he adds an RGB interface to a mid-1990s Sony Trinitron.

Those of us lucky enough to have lived in Europe at the time were used to TVs with SCART sockets by the mid-1990s so no longer needed to plumb in RGB signals, but it appears that Americans were still firmly in the composite age. The TV might have only had a composite input, but this hack depends on many the video processor chips of the era having RGB input pins. If your set has a mains-isolated power supply then these pins can be hooked up with relative ease.

In the case of this little Sony, the RGB lines were used by the integrated on-screen display. He takes us through the process of pulling out these lines and interfacing to them, and comes up with a 9-pin D connector with the same pinout as a Commodore monitor, wired to the chip through a simple RC network and a sync level divider. There’s also a switch that selects RGB or TV mode, driving the OSD blanking pin on the video processor.

We like this hack just as much as we did when we were applying it to late-80s British TV sets, and it’s a great way to make an old TV a lot more useful. You can see it in the video below the break, so get out there and find a late-model CRT TV to try it on while stocks last!

Unsurprisingly, this mod has turned up here a few times in the past.

Continue reading “Old TV To RGB”

Mechanical Color Picker Types Hex Codes For You

Hex codes are a simple, unambiguous way to designate colors in digital media. However, going from a color in your head to a hex code can be difficult for the unpracticed. [Guy Dupont] built a little gadget by the name of the Dial Toner to do it for him (Nitter).

The Dial Toner has two dials for each color channel – Red, Green, and Blue. By turning the dials, one can choose a given color in the 8-bit RGB color space, and that color is then displayed on the device’s included RGB LED. Once selected, the button can be pressed to type the selected color’s hex code into a text box. The Dial Toner runs on a Xiao RP2040 microcontroller board, and is coded in CircuitPython.

[Guy] hopes to sell the Dial Toner on Etsy in future, and is even working on a CMYK version for print addicts. We’ve featured [Guy]’s work here before, too, in the form of his extended-play HitClips cartridges. Video after the break.

Continue reading “Mechanical Color Picker Types Hex Codes For You”

GP2040: A Configurable Game Pad Firmware

[feralAI] and fellow GitHub contributors present for your viewing pleasure GP2040: an open source game pad firmware for RP2040-based hardware. The dual-core RP2040 is a good platform to use for gaming inputs, as there is plenty of CPU grunt to get sub-1 ms USB polling time, regardless of any other tasks the controller may be performing. Currently the firmware supports PC, Android, RPi, Nintendo Switch, PS3, PS4 (legacy mode), and the sweet MiSTer FPGA-based retro-gaming platform.

The firmware supports the older DirectInput API and the newer shiny (but rather restrictive) XInput API (no, it’s not the old X11 input extension with the same name) — as well as the usual controller features like SOCD cleaning, D-pad mapping, and RGB support for additional distractions. There is even support for those tiny OLED displays (SSD1306 and friends), although we can’t think of a use case for that at the moment. Configuration is particularly interesting, however, as it is based upon an embedded web application. This is where the pin mappings to your actual hardware are defined, as well as all that RGB bling, if you so desire.

Continue reading “GP2040: A Configurable Game Pad Firmware”

Electronic Catan Game Board Is Modular

Plenty of gamers around these parts require an expensive PC to play games, often spending thousands of dollars for a gaming machine. Believe it or not, though, there are entire classes of games that don’t require any electronics at all, but that doesn’t mean that they don’t benefit from the addition of some neat gadgets. This Settlers of Catan game uses custom LCD tiles with a built-in custom mesh network.

The tiles for the game board themselves are hexagonal and snap together using magnetic pogo pins in order to form a board of any size or shape. The pogo pins also allow communication for a pseudo-mesh network to operate with each tile’s built-in PCB to allow the game board to know exactly which tiles are placed where and to display the correct image on each one. Each tile contains it own RP2040 microcontroller, keeping the overall cost of each tile to a minimum.

For those regularly hosting game night, a project like this could really change the traditionally analog game’s dynamic for the better. It was mostly a project that [Colin Iuliano] built just for fun, and if he ever builds a second one he does plan on some improvements, but we’d say that it looks like a success already. For other Catan-based electronic design inspiration, take a look at this complete and non-modular electronic game board.

The LED tree itself , filmed in the dark - a myriad of small orbs glowing mictures of green, blue and warm white

Kaleidoscope – Feelings Turned Into LED Tree

In 2020, [Eddie] found himself with a few hundred RGB LEDs left after a pandemic-interrupted project, and a slew of emotions he wanted to express – so he turned to the language of hardware, and started sculpting his feelings into an art project. He set out to build an LED tree around a piece of wood he picked for its cool shape, and trying out a long-shelved idea of his, while at it – using different resistors to mix colors of the RGB LEDs. The end result, pictured above, has earned “The Most Important Device” spot in our recent Sci-Fi contest, fair and square.

Initially, he wanted to use ATTiny microcontrollers and PWM all the lights in parallel. Having built an intermediate prototype, a small LED flower, he scrapped the idea due to technical problems, and then simplified it by hard-wiring RGB LEDs with randomly selected colors instead. As for the glowing orbs themselves, he made these just by pouring hot glue into silicon orb molds, a simple technique any of us could repeat. After 90 hours of work between him and an assistant he hired, the LEDs were wired up, each with random resistors connected to green and blue LED colors, and some warm white LEDs added into the mix.

He wanted to mostly use blue and green colors, as symbols of a world revived and revitalized – something we can’t help but keep our fingers crossed for. Before putting it all together, they wouldn’t know which colors each of the LEDs would power up in – part of the charm for this art piece, and no doubt a pleasant surprise. In the end, it turned out to be a futuristic decoration that we’re glad a camera could capture properly! If you like what you see, the build logs linked above have a bit more insights into how it all came together.

LED-adorned plants are fun projects that bring joy for a long time after you’ve finished them. You can easily make a LED tree out of what you have on hand, and if you get real fancy, you can create an intricate bonsai, too. And, if you’re ever interested to experiment with castellations, you can design yourself some PCB cube flowers!

This project was an entry into the 2022 Sci-Fi Contest. Check out all of the winning entries here.

Giant PC fan

3D-Printed Parts Let You Assemble Your Own Biggest Fan

It’s getting close to the time of year when we need to start carefully vetting projects here at Hackaday. After all, nobody likes to get punked by an early April Fool’s joke. But as silly as this outsized PC fan looks, it sure seems like a legit build, if a bit on the pointless side.

Then again, perhaps pointless is too harsh a word to use. This 500-mm fan is by [Angus] over at Maker’s Muse, and it represents a lot of design work to make it buildable, as well as workable and (mostly) safe. Using both CNC-cut MDF and printed parts, the fan is an embiggened replica of a normal-sized case fan. The fan’s frame had to be printed in four parts, which lock together with clever interlocking joints. Each of the nine blades locks into a central hub with sturdy-looking dovetails.

And sturdy is important, as the fan is powered by a 1,500 Watt brushless DC motor. With a 4:1 reduction thanks to a printed gear train, the fan spins at around 3,300 RPM, which makes a terrifying noise. There’s a little bit of “speed-wobble” evident, but [Angus] managed to survive testing. The fan, however, did not — the 3D-printed gears self-destructed after a full-speed test, but not before the fan did its best wind tunnel imitation. And the RGB LEDs looked great.

This one reminds up of something we might see [Ivan Miranda] come up with. In fact, his super-sized 3D printer might have been just the thing to shorten [Angus]’ print times.

Continue reading “3D-Printed Parts Let You Assemble Your Own Biggest Fan”