A purple PCB with a Raspberry Pi Pico and an MK3870 mask ROM microcontroller

A 1970s Mask ROM MCU Spills Its Secrets

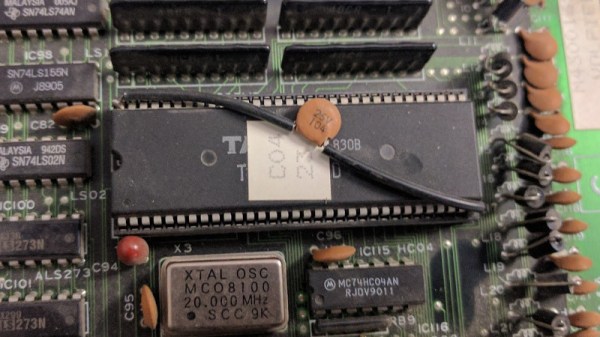
If you buy any kind of electronic gadget today, chances are it’s powered by a microcontroller with a program stored in its internal flash ROM. That program’s code is often jealously guarded by the manufacturer, who will try their best to make sure you can’t just read back the chip’s contents by using lock bits or some sort of encryption. Things were more laid back in the 1970s and ’80s, when code was stored unencrypted in standard EPROM chips, or, for high-volume applications, in mask ROMs integrated in microcontrollers. Reading back the code of such micros was still very difficult because chips simply didn’t have a way of dumping their contents. [Andrew Menadue] ran into this issue when trying to repair an old HP calculator printer, and had to apply a clever hack to dump the contents of its Mostek MK3870 chip.

The main trick [Andrew] used was one discovered by [Sean Riddle] and explained on his website. It makes use of the fact that the MK3870 has a TEST pin that can be used to disable the mask ROM and load alternative program code directly into the micro’s processing core. By setting up a LOAD instruction pointing at a ROM location and briefly disabling test mode while that instruction is executed, the ROM’s contents can be read out by the externally loaded program.

Simple as this hack may seem, actually implementing it was tricky enough because of the strict timing requirements between signals on the clock pins, the data bus, and the TEST pin. [Andrew] got it to work on his Raspberry Pi Pico setup most of the time, but somehow the micro still returned a plainly wrong value every few hundred bytes. Not willing to spend too much time debugging this issue, [Andrew] applied a rather crude hack to his code: instead of reading each byte once, it runs the read cycle 200 times, and only returns a result when all 200 runs return the same value. Dumping the entire 4 kB of ROM now takes several minutes, but this isn’t much of an issue since [Andrew] only has one chip to read out.

If you do have a bucketload of MK3870 chips that you need to dump, you might want to try and optimize the code on [Andrew]’s GitHub page. It’s a lucky coincidence that the ‘3870 has the exploitable TEST feature; often, the only way to get inside mask ROM code is by decapping the chip and optically reading the bits one by one. Mask ROMs are great for very long term data storage, however.

Continue reading “A 1970s Mask ROM MCU Spills Its Secrets”

Picture of the dumper board, with a ROM chip and a Pi Pico inserted

A Disposable Dumper For ROM Chips With A Pi Pico

ROM dumping is vital for preserving old hardware, and we’ve seen many hacks dedicated to letting someone dump a ROM and send its contents to some hacker stuck with a piece of technology that lost its firmware. However, that requires ROM dumping tools of some kind, and it’s often that the lucky ROM-equipped hacker doesn’t own such tools. Now, you could mail the chip to someone else, but postal services in many countries are known to be UDP-like — lossy and without delivery guarantees. The risk of leaving both hackers without a ROM chip is quite real, so, instead of mailing ROM chips or expensive devices around, [Amen] proposes a cheap and disposable flash dumping tool that you could mail instead.

The ROMs in question are 24-pin 2332 and 2364 chips, which run at 5 V and can easily be read with any microcontroller. Thus, his concept is a very simple board, with a Pi Pico and flash chip socket on it, as well as some resistors. Those are used to provide rudimentary GPIO over-voltage protection, since the RP2040 runs its GPIOs at 3.3 V. All the magic is in the software – the tool can both write the chip contents in the RP2040’s internal memory, as well as dump it over USB to the computer. Everything is open-source – if you ever need to dump a rare chip on the other side of the world, modify the design to your liking, order a few copies and then mail them to the hacker involved – losing such a package is way less significant than losing a ROM chip with last-of-its-kind firmware on it.

Old ROM chips are dying out, causing whole generations of hardware, like synths, to fade away – with tools like this one, you can lend a hand in preserving the legacy of many an industry and hobby, and many hackers do. Looking to learn about the basics of parallel flash dumping? This post from 2012 will be a good start, and then check out a more recent venture to learn how things are done with more recent parts.

Dumping Game Boy Cartridges Via The Link Cable Port

When it comes to vintage consoles like the Game Boy, it’s often nice to be able to dump cartridge ROMs for posterity, for archival, and for emulation. To that end, [Francis Stokes] of [Low Byte Productions] whipped up a rather unique method of dumping Game Boy carts via the link cable port.

The method starts by running custom code on the Game Boy, delivered by flash cart. That code loads itself into RAM, and then waits for the user to swap in a cart they wish to dump and press a button. The code then reads the cartridge, byte by byte, sending it out over the link port. To capture the data, [Francis] simply uses a Saleae logic analyzer to do the job. Notably, the error rate was initially super high with this method, until [Francis] realised that cutting down the length of the link cable cut down on noise that was interfering with the signal.

The code is available on GitHub for those interested. There are other ways to dump Game Boy cartridges too, of course.

Continue reading “Dumping Game Boy Cartridges Via The Link Cable Port”

Dumping A N64 Development Cartridge Safely

Retro gaming enthusiasts have always had great interest in rarities outside the usual commercial titles. Whether they be early betas, review copies, or even near-complete versions of games that never made it to release, these finds can be inordinately valuable. [Modern Vintage Gamer] recently came across a pre-release version of Turok 3 for the Nintendo 64, and set about dumping and preserving the find. (Video, embedded below.)

With one-off cartridges like these, it’s important to take the utmost care in order to preserve the data onboard. Simply slapping it into a regular console might boot up the game, but carries with it a non-zero chance of damaging the cart. Instead, the first step taken was to dump the cart for archival purposes. When working with a prototype cart, commodity dumpers like the Retrode aren’t sufficient to do the job. [Modern Vintage Gamer] notes that a Doctor V64 or Gameshark with a parallel port could work, but elects to use a more modern solution in the form of the Ultrasave and 64drive.

With the cartridge backed up and duplicated onto the 64drive, the code can be run on a real console without risk of damage to the original. At first glance, the game appears similar to the final retail version. Analysis of the dump using a file comparison tool suggests that the only differences between the “80% Complete” ROM and the retail edition are headers, leading [Modern Vintage Gamer] to surmise that the game may have been rushed to release.

While in this case the dump didn’t net an amazing rare version of a retro game, [Modern Vintage Gamer] does a great job of explaining the how and why of the process of preserving a vintage cartridge. We look forward to the next rare drop that shakes up the retro world; we’ve seen efforts on Capcom arcade boards net great results. Video after the break.

Continue reading “Dumping A N64 Development Cartridge Safely”

Snakes And Ladders: Game Boy Emulator In Python

If a Game Boy was a part of your childhood, you were probably more than once dreaming of spending your entire school day with it. Well, they had to wait a few more years for that, but eventually in 2015, [Asger], [baekalfen], and [troelsy] made that dream reality when they created a Game Boy emulator in Python for a university project. However, it didn’t stop there, and the emulator has since grown into a full-blown open source project, PyBoy, which just reached the version 1.0 release.

Since it started out as an academic project, the three of them had to do their research accordingly, so the background and theory about the Game Boy’s internal functionality and the emulator they wrote is summarized in a report published along with the source code. There is still some work to be done, and sadly there is no sound support implemented yet, but for the most part it’s fully functional and let’s you successfully play your own extracted cartridges, or any ROM file you happen to have in your possession.

Being an emulator, you can also inspect its inner life when run in debug mode, and watch the sprites, tiles, and data as you play, plus do cool things like play the emulation in reverse as shown in the clip below. Even more so, you can just load the instance in your own Python scripts, and start writing your own bots for your games — something’s we’ve seen in action for the NES before. And if you want to dive really deep into the world of the Game Boy, you should definitely watch the 33c3 talk about it.

Continue reading “Snakes And Ladders: Game Boy Emulator In Python”

Dumping Arcade ROMs The Hard Way

Nostalgia is a funny thing. That desire we all get to relive past memories can make you do things that in any other scenario would be out of the question. The effect seems even stronger when it comes to old video games. How else can you explain buying the same games over and over every time they get “remastered” for the next generation of consoles? But what if those remasters aren’t good enough?

If you have a burning desire to play a 100% accurate version of certain old arcade games, you might have your work cut out for you. Getting precise ROMs from some of these machines is exceptionally difficult, and as explained on the [CAPS0ff] blog, sometimes requires nearly superhuman feats of engineering.

As explained in the blog post, less invasive methods of getting inside the Taito C-Chip had already been examined and come up lacking. Despite best efforts, sending the unlock command to the chip didn’t yield the desired effect. If you can’t read the ROM the usual way, you need to get a little creative.

The process starts by milling down the case of the chip until the integrated circuit is just starting to become visible. Then acid is used to fully expose the traces. The traces are then tinned, and some very fine soldering is done to get the chip wired up to the reader. All told it takes about three hours from start to finish to pull a ROM using this method. But it’s all worth it in the end when you can play that 100% accurate version of Rainbow Islands. Or so we’ve been told.

If you couldn’t tell, this isn’t the first time a chip has been flayed open like this on the [CAPS0ff] blog.

Extracting A Vector Font From A Vintage Plotter

There is a huge variety of hardware out there with a font of some form or other baked into the ROM. If it’s got a display it needs a font, and invariably that font is stored as a raster. Finding these fonts is trivial – dump the ROM, render it as a bitmap, and voilà – there’s your font. However, what if you’re trying to dump the font from a vintage Apple 410 Color Plotter? It’s stored in a vector format, and your job just got a whole lot harder.

The problem with a vector font is that the letters aren’t stored as individual images, but as a series of instructions that, when parsed correctly, draw the character. This has many benefits for generating characters in all manner of different sizes, but makes the font itself much harder to find in a ROM dump. You’re looking for both the instructions that generate the characters, as well as the code used to draw them, if you want a full representation of the font.

The project begins by looking at what’s known about the plotter. The first part of any such job is always knowing where to look, of course. It’s quickly determined that the font is definitely stored in the main ROM, and that there is no other special vector drawing chip or ROMs on board. The article then steps through the search process, beginning with plaintext searches of the binary dump, before progressing to a full disassembly of the plotter firmware. After testing out various assumptions and working methodically, the vector data is found and eventually converted into a modern TrueType font.

In the end, the project is successful, and it’s a great guide on how to approach similar projects. The key is to lay out everything you know at the start, and use that to guide your search step by step, testing and discarding assumptions until you hit paydirt. We’ve seen similar works before, like this project to dump the voice from an ancient Chrysler Electronic Voice Alert.