Dead Drop Concept Inspired By [Ender Wiggin] Family

encrypted-dead-drop-concept

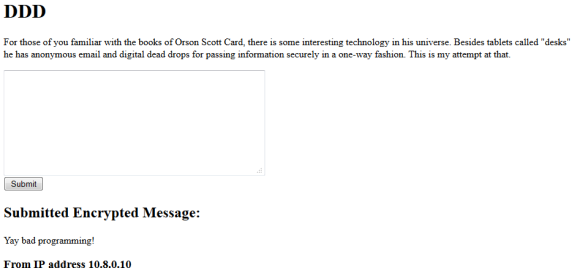
[Tyler Spilker’s] DDD project is a Digital Dead Drop system based on Python and a Raspberry Pi as a server. It’s pretty rough around the edges at this point — which he freely admits. But we like the concept and figure it might spark an interesting conversation in the comments section.

Now by far our favorite dead drop concept is this USB drive lewdly sticking out of a brick wall. But you actually need to be on-site where this drive is mortared into the wall in order to access it. [Tyler] instead developed a webpage that gives him a text box to enter his messages. These are encrypted using key pairs and pushed to his remote RPi server. This way he can write down his thoughts knowing they’re stored securely and never in danger of being accessed from a lost or stolen cellphone.

If free thought isn’t what you’re trying to transfer from one place to another you probably want something like a Pirate Box.

Xbox 360 Light Right And RF Module Connected To Raspberry Pi

rpi-connected-to-xbox-lightring

If you want to mess around with your Xbox 360 controllers on a computer Microsoft would be happy to sell you a USB dongle to do so. But [Tino] went a different route. The board that drives the Xbox 360’s status light ring also includes the RF module that wirelessly connects the controllers. He wired this up to his Raspberry Pi using the GPIO header.

The module connects via an internal cable and is treated much like a USB device by the Xbox motherboard. The problem is that it won’t actually handle the 5V rail found on a USB connector; it wants 3.3V. But this is no problem for the RPi’s pin header. Once a few connections have been made the lights are controlled via SPI I2C and [Tino] posted some example code up on Github to work with the RF module. He plans to post a follow-up that interfaces the module with a simple microcontroller rather than an RPi board. If you can’t wait for that we’re sure you can figure out the details you need by digging through his example code.

Self-contained Time-lapse Rig Braves Elements From Thirty Feet

Perspective is a bit hard to grasp in this image, but all of this hardware is mounted thirty feet above the ground. This time-lapse photography box makes use of the sun and a Raspberry Pi to document the goings on. The rig is one of three that were built by [Patty Chuck] to record progress on a seventy acre construction site over the course of eighteen months. The gallery linked above shows off the project well, but a much more in-depth text description is found in his Reddit thread.

What’s not shown in the image is a solar array which powers the box. When they were installed there were no utilities on site. To guard against power-loss there’s a hardware RTC that keeps ticking. The Raspberry Pi uses GPIO pins to switch the Nikon D7100 camera on once every five minutes during the work day. It snaps a photo before powering it down again. It also monitors a temperature sensor and actuates circulation fans if necessary.

He’s planning to post the videos once the project’s done in 18 months. If you see them and remember this post, send us the link and we’ll post the update.

Headless Tethering Between Raspberry Pi And IPhone

rpi-iphone-tethering

This hack doesn’t necessarily have a target application. But there’s a lot of potential. It’s a headless setup for tethering your Raspberry Pi to an iPhone. Building sensor arrays that upload to the Internet (live or just to dump its logs)  immediately comes to mind. But we’re sure there are a ton of other applications just waiting to be thought of.

Tethering is pretty simple with the Raspberry Pi. Just install a few packages that are available in the repositories and make a quick configuration file tweak to allow hot-plugging. But this is dependent on the iPhone being mounted and that task is normally only automatic if the GUI is running. To get by without the X desktop [Dave Controy] walks through the ifuse setup to mount the phone from command line. The result is that your RPi will establish a network connect whenever the iPhone is plugged into it, without any intervention from you.

[Thanks Michael]

Monitoring A Sick Bird Using The Raspberry Pi

sick-bird-monitoring-with-rpi

[Jorge Rancé] was nursing a sick bird back to health. He found it on the street with a broken leg, which required a mini plaster cast for it to heal correctly. But felt bad when leaving the house for long periods. He grabbed some simple hardware and put his mind at easy by building an Internet connected bird monitoring system. It’s really just an excuse to play around with his Raspberry Pi, but who can blame him?

A webcam adds video monitoring using the Linux software called “motion” to stream the video. This is the same package we use with our cats when we travel; it provides a continuous live stream but can also save recordings whenever motion is detected. He added a USB temperature sensor and attached a water level sensor to the GPIO header. These are automatically harvested — along with a still image from the webcam — and tweeted once per hour using a bash script. He just needs to work out automatic food and water dispensing and he never needs to return home! Bird seed shouldn’t be any harder to dish out than fish food, right?

Home Audio And Lighting Taken Over By The Raspberry Pi

687474703a2f2f7777772e6265616b61626c652e636f6d2f696d672f707265766965772d312e706e67

We’re beginning to see a lot of momentum building for using Raspberry Pi boards as the basis of your home automation. This latest offering from [Iain Hamilton] combines lighting and audio control through a single web interface. His frontend is run as a web page from the RPi board. It even includes separate layouts for mobile devices and computers in order to maximize use of the screen real estate.

Three buttons at the top of the interface allow him to configure the settings and switch between lighting and audio controls. This audio control screen issues commands to the Spotify client running on the Pi. The Mopidy package takes care of almost everything (as we’ve seen with other single-board computer Spotify servers). Future iterations will offer other streaming services like SoundCloud. [Iain’s] home lighting system uses X10 modules for control. He’s using a USB dongle to facilitate control of that system.

Continue reading “Home Audio And Lighting Taken Over By The Raspberry Pi”

Multiple Raspberry Pi Boards Used To Create Video Wall

Five Rasberry Pi’s are used to drive this four-display video wall. This screenshot shows the system playing back some BBC documentaries. The sync, alignment, and video quality all seem to be spot on which makes it quite easy for your eye to assemble the images into one picture.

Each screen has its own Raspberry Pi which generates the HDMI video shown on the screen. These are fed from one central RPi board which acts as the controller. Video is pushed between the boards using the Real Time Streaming Protocol (RTSP) available through the Linux GStreamer package. Synchronization between the different video boards is taken care of using network time. [Samer] mentions that this system is scalable — each additional screen simply requires one more RPi to drive it.

The team also did some experiments with live video. They added a sixth RPi board with the camera module in order to display a live feed.