Baby C-17 Sends Imaginations Soaring

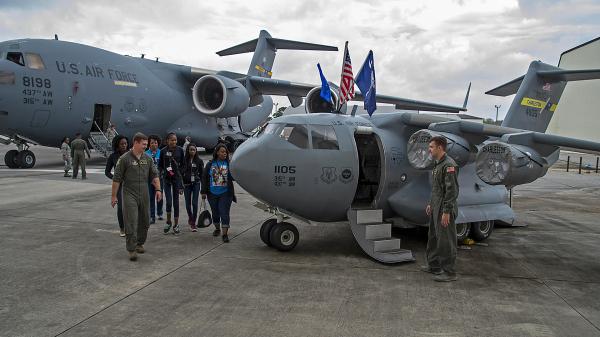
The C-17 Globemaster III is a military cargo jet that can carry what their commercial counterparts can’t, to places those other planes can’t go. The people who keep these planes flying are proud of their capable airlifter, but it’s hard to show them off. Solution: build a scaled-down version more suitable for driving off base for a parade down Main Street and other community events.

While the real thing was built under an expensive and contentious military procurement process, the miniature was built with volunteer labor using castoff materials. The volunteer force included maintenance crew whose job is to know the C-17 inside and out. Combined with fabrication skills that comes with the job, the impressive baby plane faithfully copied many curvatures and details from full-sized originals. (Albeit with some alteration for its cartoony proportions.) Underneath are mechanicals from a retired John Deere Gator utility vehicle. They usually resemble a large golf cart except with a cargo bed and more rugged suspension. Basically they are to golf carts as a C-17 is to a 767. Amusingly, the little plane has its own rear loading ramp, superficially preserving the cargo-carrying capacity of the original Gator chassis.

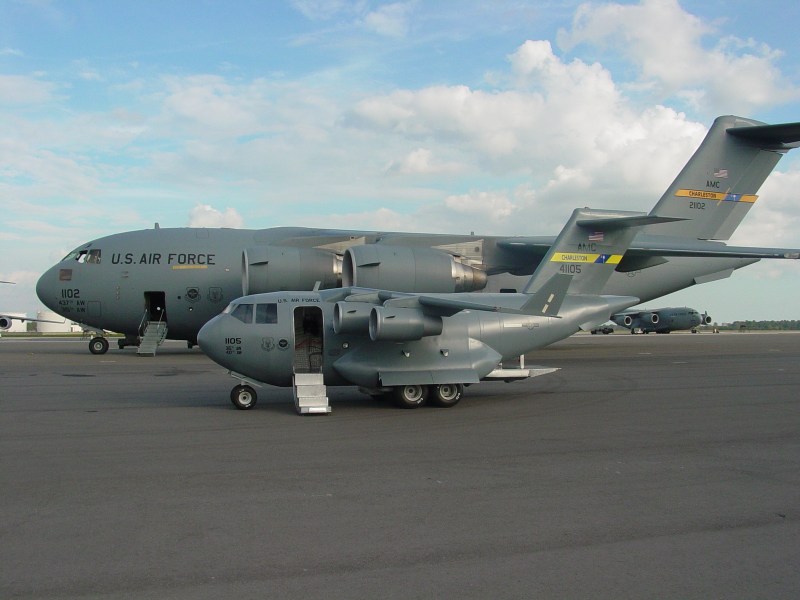
Interior features continue, though the official picture gallery doesn’t show them. There is a flight deck with control panels and various sights and sounds to keep visitors entertained. Enough details were poured into the exhibit that some people had to ask if the little plane can fly, and the answer is a very definite no. The wings, and the engine pods mounted to them, are only for show carrying The Spirit of Hope, Liberty & Freedom. It is quite a long official name for such a short stubby thing.

We always love to admire impressively put-together miniatures, and not all projects require skill of aircraft mechanics. Like this very approachable miniature forklift project. But there are plenty of other projects whose skills put us in awe, like this remote-control car powered by a miniature V-10 engine.

[via The Museum of Flight]

3D-Printed Scale Model Of Perseverance Rover Seems As Complicated As The Real One

Sometimes the best way to figure out how something works is to make a model of it. 3D-modeling software makes it possible to do the job in silico, and sometimes that’s enough. But to really get inside the designer’s head, executing a physical model, like this quarter-scale RC-controlled Perseverance rover, is a great way to go.

If you’re looking for cutting-edge tech or groundbreaking design, this build will probably not light your fire. But a closer look will show not only great details about how JPL designs robots that can operate on Mars, but some great design and 3D-printing tips too. [Dejan]’s modeling process started with the 3D renderings of Perseverance available on the NASA website, which went into SolidWorks via Blender. [Dejan] was intent on capturing all the details of the rover, even those that ended up just for looks. But there’s plenty of functionality, too — the running gear looks and functions just like the six-wheel double-bogie design used on Perseverance, as well as Curiosity before it. This revealed an interesting fact that we didn’t previously realize — that the hull is suspended from a single pivot point on each side, while a linkage across the deck both prevents the body from pivoting and provides differential control of the drive bogies on either side of the rover.

The video below shows both the impressive amount of 3D printing needed to make all the model’s parts as well as the involved assembly process. It also shows the Arduino-controlled model being piloted around via radio control. There’s a lot to learn from this model, and [Dejan]’s craftsmanship here is top-notch too. We’ve seen such builds before from him, like this 3D-printed SCARA arm, a CNC hot-wire foam cutter, and an automated wire bender.

Continue reading “3D-Printed Scale Model Of Perseverance Rover Seems As Complicated As The Real One”

Homebrew Slide Rule Gets Back To Mathematical Basics

In the grand scheme of things, it really wasn’t all that long ago that a slide rule was part of an engineer’s every day equipment. Long before electronic calculators came along, a couple of sticks of wood inscribed with accurate scales was all it took to do everything from simple multiplication to logarithms and trig functions.

While finding a slide rule these days isn’t impossible, it’s still not exactly easy, and buying one off the shelf isn’t as fun or as instructive as building one yourself. [JavierL90]’s slide rule build started, ironically enough, on the computer, with a Python program designed to graphically plot the various scales needed for the fixed sections of the slide rules (the “stators”) and the moving bit (the “slide”).  His first throught was to laser-engrave the scales, but the route of printing them onto self-adhesive vinyl stock proved to be easier.

With the scale squared away, work turned to the mechanism itself. He chose walnut for the wood, aluminum for the brackets, and a 3D-printed frame holding a thin acrylic window for the sliding cursor. The woodworking is simple but well-done, as is the metalwork. We especially like the method used to create the cursor line — a simple line scored into the acrylic with a razor, which was then filled with red inks. The assembled slide rule is a thing of beauty, looking for all the world like a commercial model, especially when decked out with its custom faux leather carry case.

We have to admit that the use of a slide rule is a life skill that passed us by, but seeing this puts us in the mood for another try. We might have to start really, really simple and work up from there.

Cheap Lab Balance Needs Upgrades, Gets Gutted Instead

What is this world coming to when you spend seven bucks on a digital scale and you have to completely rebuild it to get the functionality you need? Is nothing sacred anymore?

Such were the straits [Jana Marie] found herself in with his AliExpress special, a portable digital scale that certainly looks like it’s capable of its basic task. Sadly, though, [Jana] was looking for a few more digits of resolution and a lot more in the way of hackability. And so literally almost every original component was ripped out of the scale, replaced by a custom PCB carrying an STM32 microcontroller and OLED display. The PCB has a complicated shape that allows the original lid to attach to it, as well as the stainless steel pan and load cell. [Jana] developed new firmware that fixes some annoying traits, for example powering down after 30 seconds, and adds new functionality, such as piece-counting by weight. The video below shows some of the new features in action.

Alas, [Jana] reports that even the original load cell must go, as it lacks the accuracy her application requires. So she’ll essentially end up building the scale from scratch, which we respect, of course. At this rate, she might even try to build her own load cell from SMD resistors too.

Continue reading “Cheap Lab Balance Needs Upgrades, Gets Gutted Instead”

Automated Cat Feeder Leaves Little To Chance

We often like to say that if something is worth doing, then it’s worth overdoing. This automatic cat feeder built by [krizzli] is a perfect example of the principle. It packs in far more sensors and functions than its simple and sleek outward appearance might suggest, to the point that we think this build might just set the standard for future projects.

The defining feature of the project is a load cell located under the bowl, which allows the device to accurately measure out how much feed is being dispensed by weight. This allows the feeder to do things such as detect jams or send an alert once it runs out of food, as well as easily adjust how much is dispensed according to the animal’s dietary needs. To prevent any curious paws from getting into the machine while it’s doling out the food, the lid will automatically open and close during the filling process, complete with optical sensors to confirm that it moved as expected.

All of the major components of the feeder were printed out on a Prusa i3 MK3S, and [krizzli] says that the feed hopper can be scaled vertically if necessary. Though at the current size, it’s already packing around a week’s worth of food. Of course, this does depend on the particular feline you’re dealing with.

In terms of electronics, the feeder’s primary control comes from an ESP8266 (specifically, the Wemos D1 Mini), though [krizzli] also has a Arduino Pro Mini onboard so there’s a few more GPIO pins to play with. The food is dispensed with a NEMA 17, and a 28-BYJ48 stepper is in charge of moving the lid. A small OLED on the side of the feeder gives some basic information like the time until the next feeding and the dispensed weight, but there’s also a simple API that lets you talk to the device over the network. Being online also means the feeder can pull the time from NTP, so kitty’s mealtime will always be on the dot.

Over the years we’ve seen an incredible array of automatic cat feeders, some of which featuring the sort of in-depth metrics possible when you’ve got on onboard scale. But we can’t help but be impressed with how normal this build looks. If nothing else, of all the feeders we’ve seen, this one is probably the most likely to get cloned and sold commercially. They say it’s the most sincere form of flattery.

Auto-Trickler Gently Doles Out Powder To Assist Reloading

Do you even trickle?

[Eric] does, and like everything else about reloading, trickling is serious business. Getting an exact charge of powder to add to a cartridge is not a simple task, and very tedious when done manually. This smartphone-controlled auto-trickler is intended to make the job easier, safer, and more precise.

Reloading ammunition is a great way for shooters to save money and recycle the brass casings that pile up at the end of a long day at the range. It can be a fairly simple process of cleaning the casings, replacing the spent primers, adding the correct powder charge, and seating a new bullet. It’s all pretty straightforward, but the devil is in the details, especially with the powder charge. A little too much can be a big problem, so tricklers were invented to allow the reloader to sneak up on the proper charge. [Eric]’s auto-trickler interfaces to a digital powder scale and uses a standard cell phone vibration motor to gently coax single kernels of powder from a hopper until the proper charge has accumulated. It’s easier to understand by watching the video below.

The hardware behind the trickler is pretty standard — just a Raspberry Pi Zero to talk to the smartphone UI via Bluetooth, and to monitor and control the scale via USB. [Eric] has made all the code open source so that anyone can build their own auto-trickler, which we applaud; he did the same thing with his rifle-mounted accelerometer. This project might have applications far beyond reloading where precision dispensing is required.

Continue reading “Auto-Trickler Gently Doles Out Powder To Assist Reloading”

Let Your Pi Make A Pie Chart For Your Pie

March 14th is “Pi Day”, for reasons which should be obvious to our more mathematically inclined readers. As you are not reading this post on March 14th, that must mean we’re either fashionably late to Pi Day 2019, or exceptionally early for Pi Day 2020. But in either event, we’ve got a hack for you that celebrates the day using two things we have it on good authority most hackers overindulge in: food and needless complexity.

This project comes from [Mike MacHenry], and it’s just as straightforward as it looks. Put simply, he’s using a load cell connected to the Raspberry Pi to weigh an actual pie and monitor its change over time. As the pie is consumed by hungry hackers, a pie graph (what else?) is rendered on the attached screen to show you how much of the dessert is left.

One might say that this project takes a three dimensional pie and converts it to a two dimensional facsimile, but perhaps that’s over-analyzing it. In reality, it was a fun little hack [Mike] put together just because he thought it would be fun. Which is certainly enough of a motive for us. More practically though, if you’re looking for a good example for how to get a load cell talking to your non-edible Raspberry Pi, you could do worse than checking this out.

We’ve also got to give [Mike] extra credit for including the recipe and procedure for actually baking the apple pie used in the project. While we’re not 100% sure the MIT license [Mike] used is actually valid for foodstuffs, but believe it or not this isn’t the first time we’ve seen Git used in the production of baked goods.