Arduino MP3 Jukebox

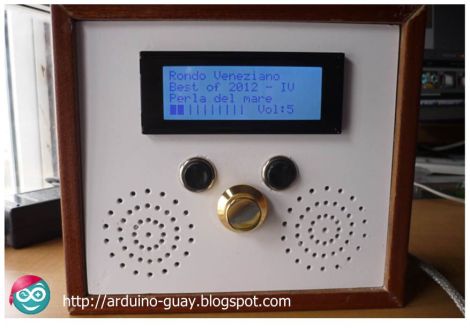
Here’s an inexpensive Arduino-based MP3 Jukebox (translated) which [Jose Daniel Herrera] put together.

He spent some time making sure that it looked great sitting on a shelf with his other audio equipment. This started with a wooden box which is some reused packaging. We’re not familiar with the ‘iNFUSiONES’ product; perhaps it’s tea or tobacco? At any rate, to this he added a custom face plate to host the character LCD, rotary encoder, two buttons, and to act as a grill for the two speakers.

The speakers and their accompanying amplifier circuitry were pulled from a portable speaker set. He combined them with a VS1002d MP3 decoder module, SD card breakout board, and the Arduino itself. In addition to the overview post linked above, there is also a collection of assembly photos, and a post discussing the way he arranged the code for the control systems (translated). See and hear the unit in action in the clip after the break.

Continue reading “Arduino MP3 Jukebox”

GD-ROM Drive Emulated To Use SD Cards Instead

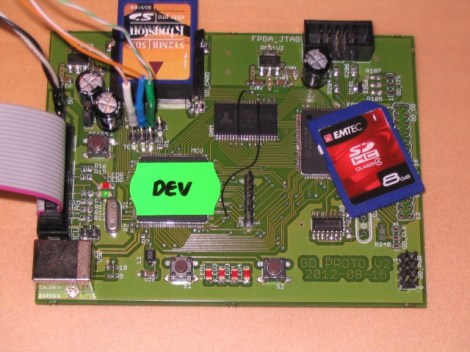
This board is the prototype which [Deunan] has been working on in order to use an SD card in place of a GD-ROM drive. The idea is to fully implement the hardware protocol used by a GD-ROM drive so that it can be completely replaced. The end goal is to do away with the optical drive on a Dreamcast game console.

As these game systems age, the optical drive is the most likely part to fail first as it involves moving parts and a lens that may degrade over time (we’re basing that assumption on our experience with DVD-ROM and RW). This may sound like a way to play pirated games, but [Deunan] makes it clear in his question and answer post that the firmware for his prototype is written to only play proper disc images and will probably not play the rips which are found in the darker recesses of the interwebs.

He’s been at this for quite a while. Here’s an earlier project he did that uses an FPGA board for the hardware.

[Thanks Walt]

Arduino BASIC Interpreter Using LCD, Keyboard, And SD

This Arduino BASIC interpreter will make a really fun one-day project if you’ve already got the parts on hand. [Usmar A. Padow] put together an Arduino Uno, SD card, four line character LCD, and PS/2 keyboard. but he’s also included alternative options to go without an LCD screen by using a computer terminal, or without the SD card by using only the Uno’s RAM. As you can see in his demo after the break, this simple input/output is all you need to experiment with some ancient computing.

It’s hard for us to watch this and not think back to an orange or green monochrome display. Just like decades past, this implementation of BASIC has you start each line of code with a line number, and doesn’t allow for character editing once the line has been input. The example programs that [Usmar] shows off are simple to understand but cover enough to get you started if you’ve never worked with BASIC before.

Last August we saw another hack which ported Tiny BASIC to the Arduino. You may want to take a gander at that one as well.

Continue reading “Arduino BASIC Interpreter Using LCD, Keyboard, And SD”

DSLR Performance Measured With Audio Editing Software

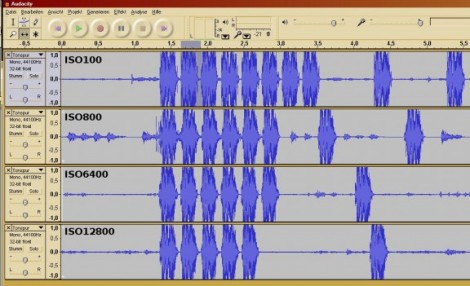
[Jaroslav’s] camera didn’t have a feature to measure the speed of its response in different modes so he figured out his own method. Using the microphone on his webcam he recorded the sound made by the mirror and shutter movements, then used Audacity to analyze the camera’s performance.

When you get right down to it, this is a fantastic idea. Audacity, the open source audio editing suite, has the ability to show each captured audio track next to each other. That makes it easy for you to precisely align the clips, and has in-build time measuring features with fantastic resolution.

He tested a whole bunch of different settings on a Canon EOS600D DSLR camera. In the image above you can see him comparing performance between different ISO settings. He also looks into different brands and sizes of SD storage cards, as well as the time difference when storing raw image data versus JPEG encoded data.

Scam-o-Matic Determines If You Bought Fake SD Cards

[Andrew] recently got scammed on an SD card purchase and put together a small tool that can help you determine if you’ve had the wool pulled over your eyes as well.

You see, he purchased a set of MicroSD cards, all of which had an advertised capacity of 4GiB. When he tried to use them, they all failed to write more than about 115MiB of data, so he knew something was up. He sat down with some tools that can be used to check the actual capacity of flash media, but he says they were unbelievably slow to scan the cards.

While he waited for one of the scans to complete, he decided to create a utility of his own that would do the same thing in a fraction of the time. His quick and dirty application, called “Scam-o-Matic”, writes random data to the card, double-checking the written region to ensure that data can be read back. If it finds errors your card is likely either a fake or damaged, but if not, it automatically prepares the media for use.

Obviously this sort of situation is relatively rare, but if you think that you have picked up some shady SD cards, be sure to check out [Andrew’s] Github repository.

Bobuino: Arduino Based On ATmega1284 + Goodies

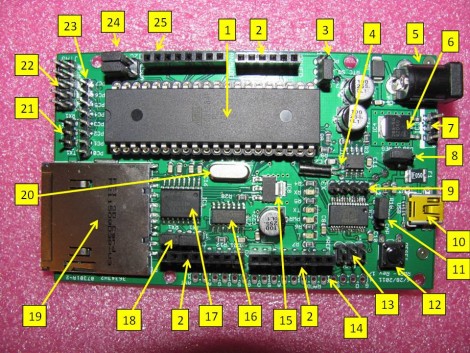
[Erik] wrote in letting us know that he just completed development of the Bobuino, a Arduino based on an ATmega1284. That chip is nice and beefy, most notably for having 16 KB of SRAM but it also boasts 4 KB of EEPROM, and 128 KB of program memory.

But the upgraded chip isn’t the only thing that it brings to the table. It’s easy to spot the on-board SD card slot in the image above. Also of note is the battery-backed DS1307 real time clock with a jumper that will route the square wave output to one of two pins on the microcontroller.

This design is compatible with standard Arduino shields thanks to the familiar pair of pin sockets, and can still be programmed via the USB socket. Since the AVR chip has more IO than normal there’s also pin headers to break out the PORTC pins, for a JTAG connector, and for an RS232 port.

Ever Wonder Where Cool Interactive Museum Exhibits Come From?

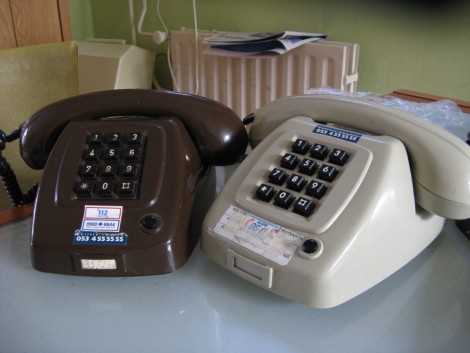
[Victor’s] girlfriend works at a museum and enlisted his expertise in designing an interactive detective game for kids visiting the museum. The vision was for the kids to discover phone numbers that they could call for clues. Originally he planned to display the clues on a character LCD, but obviously it’s much neater to hear the clues in the handset of the phone.

Quickly switching gears, [Victor] dropped the ATtiny2313 and started over with an Xmega chip — in fact, it was our recent Xmega post that inspired him to document his project. The microcontroller is responsible for a lot of goings-on. It scans the key matrix for inputs, simulates the DTMF touch tones, reads audio files from a FAT file system on an SD card, and plays them back over the hand set’s speaker. Since most of the hardware is already built into the phones, it was not hard to fit his add-ons inside the case. A simple audio amplifier circuit joins the microcontroller, which is patched into the rows and columns of the keyboard. Take a gander at the video after the break to see the device in action.

Continue reading “Ever Wonder Where Cool Interactive Museum Exhibits Come From?”