44 Mac Pros Racked Up To Replace Each Rack Of 64 Mac Minis

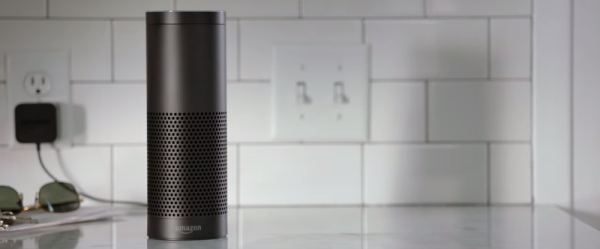
We were delighted at a seeing 96 MacBook Pros in a rack a couple of days ago which served as testing hardware. It’s pretty cool so see a similar exquisitely executed hack that is actually in use as a production server.  imgix is a startup that provides image resizing for major web platforms. This means they need some real image processing horsepower and recently finalized a design that installs 44 Mac Pro computers in each rack. This hardware was chosen because it’s more than capable of doing the heavy lifting when it comes to image processing. And it turns out to be a much better use of rack space than the 64 Mac Minis it replaces.

Racking Mac Pro for Production

single-mac-pro-rack

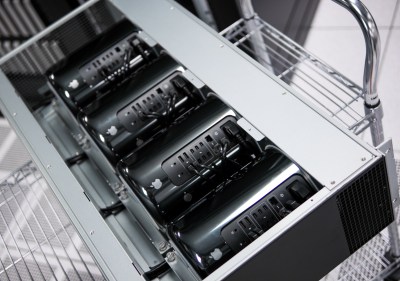
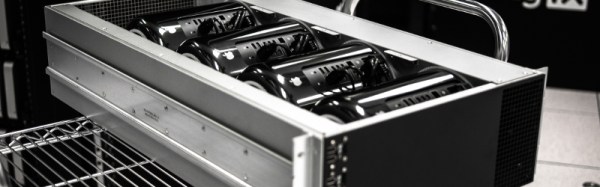
Each of the 11 R2 panels like the one shown here holds 4 Mac Pro. Cooling was the first order of business, so each panel has a grate on the right side of it for cold-air intake. This is a sealed duct through which one side of each Pro is mounted. That allows the built-in exhaust fan of the computers to cool themselves, pulling in cold air and exhausting out the opposite side.

Port access to each is provided on the front of the panel as well. Connectors are mounted on the right side of the front plate which is out of frame in this image. Power and Ethernet run out the back of the rack.

The only downside of this method is that if one computer dies you need to pull the entire rack to replace it. This represents 9% of the total rack and so imgix designed the 44-node system to deal with that kind of processing loss without taking the entire rack down for service.

Why This Bests the Mac Mini

3 racks - Linux. Mac Min, Mac Pro
3 racks – Linux. Mac Min, Mac Pro

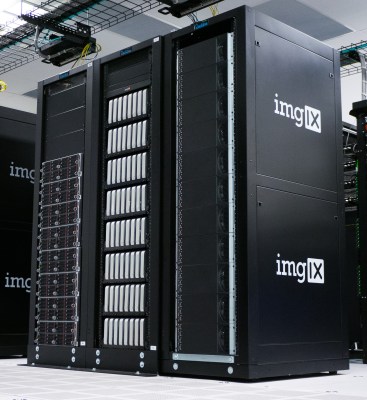
Here you can see the three different racks that the company is using. On the left is common server equipment running Linux. In the middle is the R1 design which uses 64 Mac Minis for graphic-intensive tasks. To the right is the new R2 rack which replace the R1 design.

Obviously each Mac Pro is more powerful than a Mac Mini, but I reached out to imgix to ask about what prompt them to move away from the R1 design that hosts eight rack panes each with eight Mac Minis. [Simon Kuhn], the Director of Production, makes the point that the original rack design is a good one, but in the end there’s just too little computing power in the space of one rack to make sense.

Although physically there is room for at least twice as many Mac Mini units — by mounting them two-deep in each space — this would have caused several problems. First up is heat. Keeping the second position of computers within safe operating temperatures would have been challenging, if not impossible. The second is automated power control. The R1 racks used two sets of 48 controllable outlets to power computers and cooling fans. This is important as the outlets allow them to power cycle mis-behaving units remotely. And finally, more units means more Ethernet connections to deal with.

We having a great time looking that custom server rack setups. If you have one of your own, or a favorite which someone else built, please let us know!

[Thanks to drw72 for mentioning R2 in a comment]

How To Make Amazon Echo Control Fake WeMo Devices

[Chris] has been playing with the Amazon Echo. It’s sort of like having Siri or Google Now available as part of your home, but with built-in support for certain other home automation appliances like those from Belkin WeMo and Philips. The problem was [Chris] didn’t want to be limited to only those brands. He had other home automation gear that he felt should work with Amazon Echo, but didn’t. That’s when he came up with the clever idea to just emulate one of the supported platforms.

The WeMo devices use UPnP to perform certain functions over the network. [Chris] wanted to see how these communications actually worked, so he fired up his laptop and put his WiFi adapter into monitor mode. Then he used Wireshark to start collecting packets. He found that the device detection function starts out with the Echo searching for WeMo devices using UPnP. The device then responds to the Echo with the device’s URL using HTTP over UDP. The Echo then requests the device’s description using that HTTP URL. The description is then returned as an HTTP response.

The actual “on/off” functionality of the WeMo devices is simpler since the Echo already knows about the device. The Echo simply connects to the WeMo over the HTTP interface and issues a “SetBinaryState” command. The WeMo then obliges and returns a confirmation via HTTP.

WeMo Echo
How Echo Communicates with WeMo Devices

[Steve] was able to use this information to set up his own WeMo “virtual cloud”. Each virtual device would have its own IP address. They would also need to have a listener for UDP broadcasts as well as an HTTP listener running on the WeMo port 49153. Each virtual device would also need to be able to respond to the UPnP discovery requests and the “on/off” commands.

[Chris] used a Linux server, creating a new virtual Ethernet interface for each virtual WeMo switch. A single Python script runs the WeMo emulation, listening for the UPnP broadcast and sending a different response for each virtual device. Part of the response includes the device’s “friendly name”, which is what the Echo listens for when the user says voice commands. Since the virtual WeMo devices are free, this allows [Chris] to make multiple phrases for each device. So rather than be limited to “television”, he can also make a separate device for “TV” that performs the same function. [Chris] is also no longer limited to only specific brands of home automation gear.

There’s still a long way to go in hacking this device. There’s a lot of hardware under the hood to work with. Has anyone else gotten their hands (and bench tools) on one of these?

Googly Eyes Follow You Around The Room

If you’re looking to build the next creepy Halloween decoration or simply thinking about trying out OpenCV for the first time, this next project will have you covered. [Glen] made a pair of giant googly eyes that follow you around the room using some servos and some very powerful software.

The project was documented in three parts. In Part 1, [Glen] models and builds the eyes themselves, including installing the servo motors that will eventually move them around. The second part involves an Arduino and power supply that will control the servos, and the third part goes over using OpenCV to track faces.

This part of the project is arguably the most interesting if you’re new to OpenCV; [Glen] uses this software package to recognize different faces. From there, the computer picks out the most prominent face and sends commands to the Arduino to move the eyes to the appropriate position. The project goes into great detail, from Arduino code to installing Ubuntu to running OpenCV for the first time!

We’ve featured some of [Glen]’s projects before, like his FPGA-driven LED wall, and it’s good to see he’s still making great things!

Continue reading “Googly Eyes Follow You Around The Room”

iram

PCI I-RAM Working Without A PCI Slot

[Gnif] had a recent hard drive failure in his home server. When rebuilding his RAID array, he decided to update to the ZFS file system. While researching ZFS, [Gnif] learned that the file system allows for a small USB cache disk to greatly improve his disk performance. Since USB is rather slow, [Gnif] had an idea to try to use an old i-RAM PCI card instead.

The problem was that he didn’t have any free PCI slots left in his home server. It didn’t take long for [Gnif] to realize that the PCI card was only using the PCI slot for power. All of the data transfer is actually done via a SATA cable. [Gnif] decided that he could likely get by without an actual PCI slot with just a bit of hacking.

[Gnif] desoldered a PCI socket from an old faulty motherboard, losing half of the pins in the process. Luckily, the pins he needed still remained. [Gnif] knew that DDR memory can be very power-hungry. This meant that he couldn’t only solder one wire for each of the 3v, 5v, 12v, and ground pins. He had to connect all of them in order to share the current load. All in all, this ended up being about 20 pins. He later tested the current draw and found it reached as high as 1.2 amps, confirming his earlier decision. Finally, the reset pin needed to be pulled to 3.3V in order to make the disk accessible.

All of the wires from his adapter were run to Molex connectors. This allows [Gnif] to power the device from a computer power supply. All of the connections were covered in hot glue to prevent them from wriggling lose.

Hackaday Links Column Banner

Hackaday Links: November 2, 2014

Russians blowing up capacitors! As we all know, electronics only work because of blue smoke. [kreosan] is releasing this blue smoke from a few hundred caps. Fun times, even if they are a large number of inert tube shields in their collection of caps.

[mayhugh1] over on the home model engine machinist forum has built an 18 cylinder radial engine. It’s based on the Hodgson 9-cylinder radial engine that has been around for a while. The crank case is machined from a 5″ diameter rod of aluminum. There’s a Picassa album of the engine being constructed as well.

[Richard] wanted a Minecraft server, but not just any Minecraft server; this one demanded a custom case. A grass block was the inspiration, acrylic the medium, and a quad-core Mini-ITX the guts of the project.

Halloween was last Friday, and as always the tip line filled up with costume builds. [Leif] built a Ghostbusters costume complete with Muon trap, [Jeff] printed out some steampunk post-apocolyptic goggles, and [Green Gentleman] made a death-a-corn, although we’re struggling to figure out why the last one isn’t called an acorn-‘o-lantern.

[Matthias Wandel], a.k.a. the woodgears.ca dude,  is well-known in certain circles for being a wizard of wood. One of the first projects that put him on the map was a pantorouter – a router to cut mortises and tenons. He’s going back to his roots and building a bigger version. This version uses models of routers that are available outside North America, and in the latest video [Matthias] has it dialed in very well.

The Open Source Remote Control was an entry for The Hackaday Prize that didn’t make the final cut. It’s now an indiegogo project, and has some really cool tech we can’t wait to see in mainstream RC transmitters.

The Economics Of Fuzz Testing With The Intel Edison

The Intel Edison is an incredibly small and cheap x86 computing platform, and with that comes the obvious applications for robotics and wearable computing. [mz] had another idea: what if the Edison could do work that is usually done by workstations? Would it make economic sense to buy a handful of Edisons over a single quad-core Xeon system?

[mz] thought the Edison would be an ideal platform for fuzz testing, or sending random, automated data at a program or system to figure out if they’ll misbehave in interesting ways. After figuring out where to solder power and ground wires to boot an Edison without a breakout board, [mz] got to work benchmarking his fuzz testing setup.

Comparing the benchmarks of a fuzzing job running on the Edison and a few servers and workstations, calculations of cost-efficiency worked out well for this tiny x86 system on module. For parallelizable tasks, the Edison is about 8x less powerful than a reasonably modern server, but it’s also about 5-8x cheaper than a comparable desktop machine. Although renting a server is by far the more economic solution for getting a lot of computing power easily, there are a few use cases where a cluster of Edisons in your pocket would make sense.

Hackaday Links: July 13, 2014

hackaday-links-chain

Don’t like sunglasses? Deal with it. They’re the pixeley, retro sunglasses from your favorite animated .GIFs, made real in laser cut acrylic. Points of interest include heat-bent frames made out of a single piece of acrylic.

Remember this really small FPGA board? The kickstarter is ending really soon and they’re upgrading it (for an additional $30) with a much better FPGA.

Sparkfun is now hosting the Internet of Things. They’re giving people a tiny bit of space to push data to, and you can also deploy your own server. That’s interesting, and you can expect us doing a full post on this soon.

Need waveforms? [Datanoise] is building a wavetable synthesizer, and he’s put all his waveforms online. Now if we could just get a look at the synth…

If you only have $20 to spend on a board, you’ll want to pick up at Teensy 3.1. [Karl] wrote some bare metal libraries for this awesome board, and while it’s not as extensive as the standard Arduino libs, it’s more than enough to get most projects off the ground. Included are UARTs, string manipulation tools, support for the periodic interval timers on the chip, and FAT and SD card support.