How To Keep Your Head Warm With A Skirt

We’re not sure what we like better about this upcycled trapper hat — that [ellygibson] made it as a tribute to Holden Caulfield, the anti-hero of the classic teen angst novel The Catcher in the Rye, or the fact that she made it out of a skirt that cost a dollar from the thrift store. Oddly enough, one dollar is exactly what Holden paid for his hat in the book.

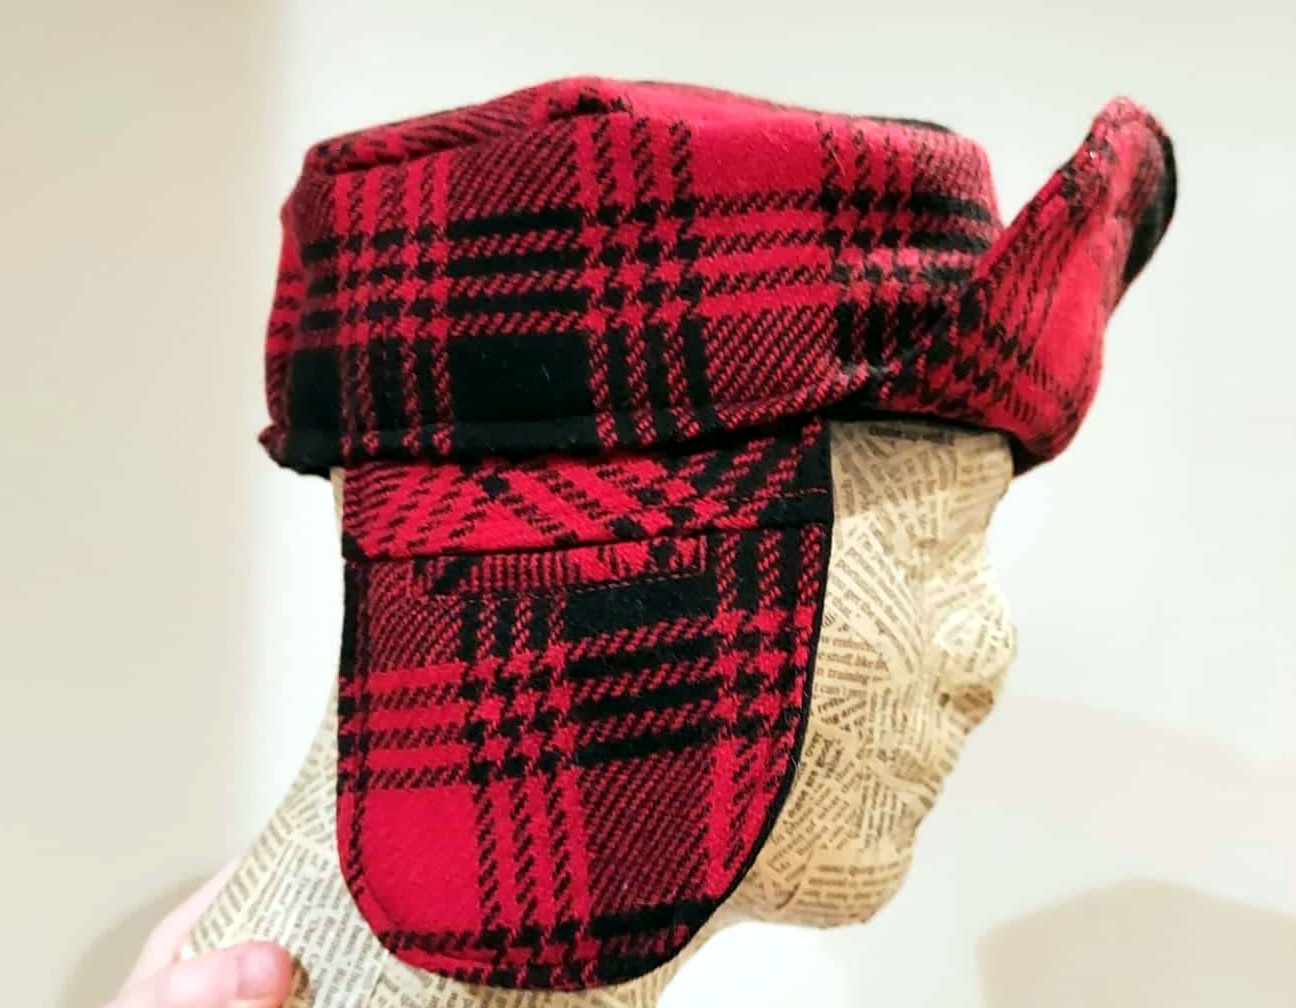
To make this hat, [elly] started by measuring the circumference of her head, then used math to figure out the radius of the circle for the top part. She made a prototype first to get the fit right, then cut the pieces from the skirt and the lining pieces from black flannel. We love that [elly] used the tiny pocket from the skirt in one of the ear flaps, because it will surely come in handy one day.

[elly] doesn’t provide pattern pieces, but that’s okay — between the explanation of how she arrived at the hat band circumference and the step-by-step instructions, it should be easy to make one of these for yourself from whatever fabric you’ve got.

Before you go cutting up an old coat, consider whether it could be fixed. Remember when [Ted Yapo] fixed the zipper box on his son’s winter coat by printing a replacement? Or how about the time [Gerrit Coetzee] cast his own pea coat buttons?

Arduino Bobbin Winding Machine Is Freaky Fast

One of the worst things about sewing is finding out that your bobbin — that’s the smaller spool that works together with the needle and the larger spool to make a complete stitch — ran out of thread several stitches ago. If you’re lucky, the machine has a viewing window on the bobbin so you can easily tell when it’s getting dangerously close to running out, but many machines (ours included) must be taken halfway apart and the bobbin removed before it can be checked.

Having spare bobbins ready to go is definitely the answer. We would venture to guess that most (if not all) machines have a built-in bobbin winder, but using them involves de-threading the machine and setting it up to wind bobbins instead of sew. If you have a whole lot of sewing to do and can afford it, an automatic bobbin winder is a godsend. If you’re [Mr. Innovative], you build one yourself out of acrylic, aluminium, and Arduinos.

Here’s how it works: load up the clever little acrylic slide with up to twelve empty bobbins, then dial in the speed percentage and press the start button. The bobbins load one at a time onto a drill chuck that’s on the output shaft of a beefy 775 DC motor. The motor spins ridiculously fast, loading up the bobbin in a few seconds. Then the bobbin falls down a ramp and into a rack, and the thread is severed by a piece of nichrome wire.

An important part of winding bobbins is making sure the thread stays in place at the start of the wind. We love the way [Mr. Innovative] handled this part of the problem — a little foam doughnut around a bearing holds the thread in place just long enough to get the winding started. The schematic, BOM, and CAD files are available if you’d like to make one of these amazing machines for yourself. In the meantime, check out the demo/build video after the break.

Still not convinced that sewing is cool enough to learn? Our own [Jenny List] may be able to convert you. If that doesn’t get you, you might like to know that some sewing machines are hackable — this old girl has a second life as a computerized embroidery machine. If those don’t do it, consider that sewing machines can give you a second life, too.

Continue reading “Arduino Bobbin Winding Machine Is Freaky Fast”

Dyeing Fabric To Create Sensors

Fabrics with electrical functionality have been around for several years, but are very rarely used in mainstream clothing. The fabrics are very expensive and the supply can be unreliable. Frustrated by this, [Counter Chemists] developed PolySense, simple open-source technology to make any fibrous material into a conductive material that can be used to sense pressure, stretch, capacitive touch, humidity, or temperature.

PolySense uses a process called in-situ polymerization, effectively dying a fabric to become piezoelectric. This is done by first soaking the fabric in a mixture of water and the organic compound pyrrole, and then adding iron chloride to trigger a reaction. The polymerization process that takes place wraps the individual fibers of the fabric in conductive polymer chains.

Instead of just uniformly coating a fabric, various masking techniques can be used to dye patterns onto the fabric for various use cases. The video after the break shows a range of these applications, including using polymerized gloves and leggings for motion capture, a zipper that acts like a linear potentiometer, and touch-sensitive fabric. The project page lists sources for the required chemicals in both Europe and the US, and we look forward to seeing what other applications the community can come up with.

The project is very well documented, with a number of scientific papers covering all the details. [Counter Chemists] will also be presenting PolySense at the 2020 Virtual Maker Faire.

This technology can also be used to make a fabric piano with a lot less effort. On the more mechanical side of things, you can also 3D print on pre-stretched fabric to make it pop into 3D shapes.

Continue reading “Dyeing Fabric To Create Sensors”

There Really Was A Sewing Machine Controlled By A Game Boy

These days, high-quality displays and powerful microcontrollers are cheap and plentiful. That wasn’t the case a couple of decades ago, and so engineers sometimes had to get creative. The result of this is products like the Jaguar nu.yell sewing machine, as covered by [Kelsey Lewin].

The later nuotto model was capable of more advanced embroidery patterns. A Mario character cartridge was sold, while a later Kirby edition was scrapped before release.

The Japanese market product eschewed the typical mechanical controls of the era, to instead interface with a Nintendo Game Boy. The sewing machine would hook up to the handheld console via the Link Port, while the user ran a special cartridge containing the control software. This would allow the user to select different stitch types, or embroider letters. Very much a product of its time, the nu yell mimics the then-cutting edge industrial design of the first-generation Apple iMac. The technology was later licensed to Singer, who brought it to the US under the name IZEK. Sales were poor, and the later Jaguar nuotto didn’t get a similar rebranding stateside.

Back in the late 90s, the Game Boy was likely an attractive package to engineers. Packing a Z80 processor, buttons, and a screen, it could act as a simple human interface in lieu of designing one from the ground up.  Aprilia even used them to diagnose motorbike ECUs, and we’ve seen Game Boy parts used in medical hardware from the era, too. Video after the break.

Continue reading “There Really Was A Sewing Machine Controlled By A Game Boy”

Fabric(ated) Drum Machine

Some folks bring out an heirloom table runner when they have company, but what if you sewed your own and made it musical? We’d never put it away! [kAi CHENG] has an Instructable about how to recreate his melodic material, and there is a link to his website, which describes his design process, not just the finished product. We have a video below showing a jam session where he exercises a basic function set.

GarageBand is his DAW of choice, which receives translated MIDI from a Lilypad. If you don’t have a Lilypad, any Arduino based on the ATmega328P chip should work seamlessly. Testing shows that conductive threads in the soft circuit results in an occasional short circuit, but copper tape makes a good conductor  at the intersections. Wide metallic strips make for tolerant landing pads beneath modular potentiometers fitted with inviting foam knobs. Each twist controls a loop in GarageBand, and there is a pressure-sensitive pad to change the soundset. Of course, since this is all over MIDI, you can customize to your heart’s content.

MIDI drums come in all shapes and sizes, from a familiar game controller to hand rakes.

Continue reading “Fabric(ated) Drum Machine”

Say What You Will, A Fursuit Is A Lot Of Work.

One thing [Dr. Cockroach]’s build log shows is that a fursuit isn’t an easy thing to make.

Furries came out of early American comics and grew into the subculture the internet just can’t leave alone today. Many people take on an avatar of their furry self when participating in this subculture, and one of the prize achievements is to design, commission, or build a fur suit. What [Dr. Cockroach]’s build shows is why some of these suits can easily fetch 10,000USD. It really is a labor of love. It’s also brings up one of his goals in this project, to discover cheaper ways to construct these suits, so other people who share his hobby have a more financially accessible process to join in.

We were fascinated at the construction process. A base was built out of soft foam around a mock head. On this base more foam was layered and carved before the shape of his avatar, Marcus, started to take form. His wife found the testing process particularly humorous, but when he was happy with the arrangement and the movable jaw he began working on the pattern.

The pattern making process is very clever. He layers the foam base with masking tape and then peels it off. It’s easy to then cut the tape strategically until it lays flat. We can definitely see ourselves using this trick to do anything from sheet metal to duplicating plastic forms.

Then comes quite a lot of difficult stitching. We’d never thought about it before, but if you’re trying to simulate fur a lot of attention has to be paid tot he direction the fur lays; further increasing the difficulty.

Wherever your opinion lies, no hacker can turn down a detailed build log, and there are tricks to be learned anywhere if enough attention is paid.

Tool Rolls, The Fabric Design Challenge That Can Tidy Up Any Workshop

You’ve designed PCBs. You’ve cut, drilled, Dremeled, and blow-torched various objects into project enclosurehood. You’ve dreamed up some object in three dimensions and marveled as the machine stacked up strings of hot plastic, making that object come to life one line of g-code at a time. But have you ever felt the near-limitless freedom of designing in fabric?

I don’t have to tell you how satisfying it is to make something with your hands, especially something that will get a lot of use. When it comes to that sweet cross between satisfaction and utility, fabric is as rewarding as any other medium. You might think that designing in fabric is difficult, but let’s just say that it is not intuitive. Fabric is just like anything else — mysterious until you start learning about it. The ability to design and implement in fabric won’t solve all your problems, but it sure is a useful tool for the box.

WoF? Fat quarter? How much is a yard of fabric, anyway?

To prove it, I’m going to take you through the process of designing something in fabric. More specifically, a tool roll. These two words may conjure images of worn, oily leather or canvas, rolled out under the open hood of a car. But the tool roll is a broad, useful concept that easily and efficiently bundles up anything from socket wrenches to BBQ utensils and from soldering irons to knitting needles. Tool rolls are the best in flexible, space-saving storage — especially when custom-designed for your need.

In this case, the tools will be pens, notebooks, and index cards. You know, writer stuff. But the same can just as easily organize your oscilloscope probes. It’s usefully and a great first foray into building things with fabric if this is your first time.

Continue reading “Tool Rolls, The Fabric Design Challenge That Can Tidy Up Any Workshop”