Failed Tool Turned Exploded Wall Art

Few things hit a hacker or maker harder than when a beloved tool goes to that Big Toolbox In The Sky. It can be hard to trash something that’s been with you through countless repairs and teardowns, made all the worse by the fact most employers don’t recognize “Tool Bereavement” as a valid reason to request time off. Maybe next time one of your trusty pieces of gear gives up the ghost, you can follow the example set by [usuallyplesent] and turn it into a piece of art to hang up on the shop wall.

The shop had gotten years of daily service out of this air powered angle die grinder (not bad for a $14 Harbor Freight tool), and he thought they should immortalize it in their waiting room by turning it into an interesting piece of art. After all, it’s not everyday that some folks see the insides of the sort of tools the more mechanically inclined of us may take for granted.

After taking the grinder apart and cleaning everything up, [usuallyplesent] decided to simplify things a bit by tossing out the assorted tiny components like seals and washers. By just focusing on the larger core components, the exploded view is cleaner and reminds us of a light saber cutaway.

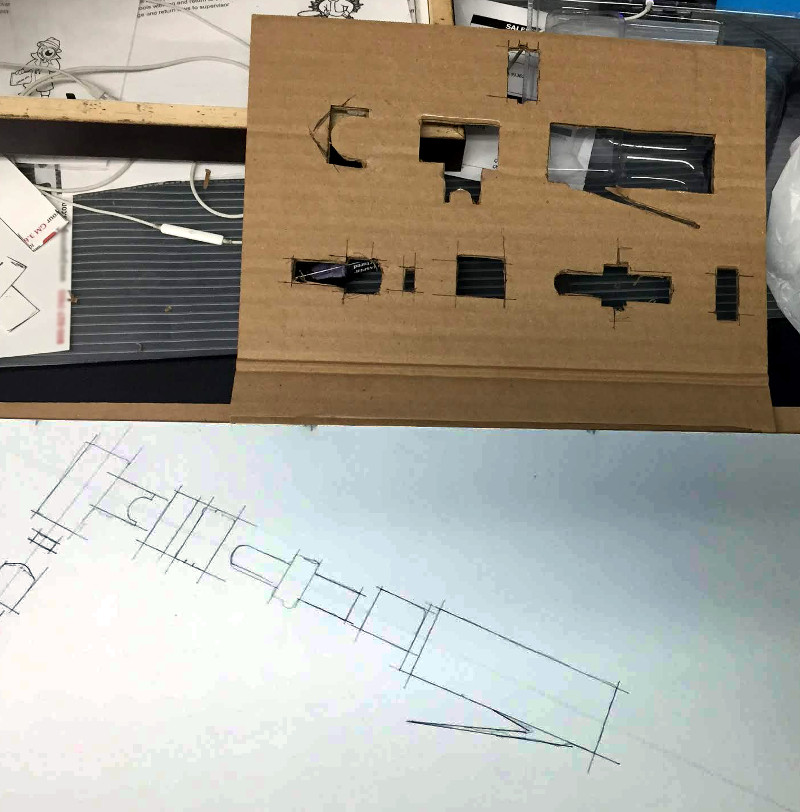
Using a piece of scrap cardboard, [usuallyplesent] made templates for all of the major pieces of the grinder and used that to sketch out the placement and spacing on the white background. He then cut out each shape so the parts would be partially recessed into the board. This gives the effect that each piece was cut down the middle lengthwise but without all the hassle of actually cutting everything down the middle lengthwise.

We’ve previously seen similar displays made out of dissected consumer electronics, but there’s something rather personal about doing the same thing for a well-used tool. If any of our beloved readers feel inspired to enshrine a dead multimeter into a shadow box over the bench, be sure to let us know.

[via /r/justrolledintotheshop]

Forgot About Valentine’s Day? A Quick IoT Valentine

Did you forget about Valentine’s Day? Do you need a quick project to get ready for Valentine’s Day? [Becky Stern] has you covered. She’s whipped up a neat Internet-enabled Valentine project which should be pretty quick to put together.

At its heart (pun intended) is an ESP8266 microcontroller, in this case an Adafruit Feather Huzzah. Several layers of tissue paper heart are stitched together and cut out into a heart shape and then attached to a spring. A vibrating pager motor is used to shake the it when a signal comes in. Two buttons are used to send the message and a red LED is used to light the heart up. The whole thing is enclosed in a shadow box. [Becky] also put together another controller with a similar setup in a plastic enclosure. When the buttons are pressed on either controller, the other gets a signal and the heart shakes and lights up.

These projects send and receive Valentines, but they could be programmed to send whatever information you’d like. If you’re looking for a quick Valentine’s Day project, this is a great one, and you might have all you need already in your component drawer. Break out the soldering iron and send your Valentine a message! If you’re still looking for a quick Valentine’s Day project, check out this animated heart or this PCB Valentine.

Continue reading “Forgot About Valentine’s Day? A Quick IoT Valentine”

Aurora Painting

“Arduino Borealis” Combines LEDs And Paint

[Stef Cohen] decided to combine three different artistic mediums for her latest project. Those are painting, electronics, and software. The end goal was to recreate the aurora borealis, also known as the northern lights, in a painting.

The first step was to make the painting. [Stef] began with a shadow box. A shadow box is sort of like a picture frame that is extra deep. A snowy scene was painted directly onto the front side of the glass plate of the shadow box using acrylic paint. [Stef] painted the white, snowy ground along with some pine trees. The sky was left unpainted, in order to allow light to shine through from inside of the shadow box. A sheet of vellum paper was fixed to the inside of the glass pane. This serves to diffuse the light from the LEDs that would eventually be placed inside the box.

Next it was time to install the electronics. [Stef] used an off-the-shelf RGB LED matrix from Adafruit. The matrix is configured with 16 rows of 32 LEDs each. This was controlled with an Arduino Uno. The LED matrix was mounted inside the shadow box, behind the vellum paper. The Arduino code was easily written using Adafruit’s RGB Matrix Panel library.

To get the aurora effect just right, [Stef] used a clever trick. She took real world photographs of the aurora and pixelated them using Photoshop. She could then sample the color of each pixel to ensure that each LED was the appropriate color. Various functions from the Adafruit library were used to digitally paint the aurora into the LED matrix. Some subtle animations were also included to give it an extra kick.