A VFD Wall Thermometer

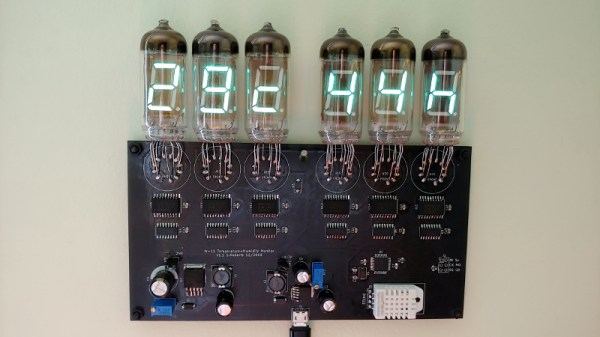
Want to build something using VFD tubes, but don’t need yet another clock project? In that case, this wall mounted temperature and humidity display created by [commanderkull] might be exactly what you’re looking for. With six IV-11 tubes, this display is a practical way to add some of that gorgeous blue-green glow to your home or office.

The USB powered display uses a XL6009 and an XL7015 to provide the 24 V and 1.8 V needed by the IV-11 tubes, respectively. Both of which can be disconnected with jumpers to shut down the tubes without powering off the entire device, a useful feature when programming and debugging the display’s ATmega328P microcontroller. Each tube is connected to the ATmega with an 74HC595 shift register and a UDN2981 driver. Temperature and humidity data is provided, perhaps unsurprisingly, by the exceptionally common DHT22 sensor.

If you are looking to build another clock with these style tubes, there’s certainly enough prior art out there to get you started. We’ve also seen faux VFDs that you could use for either project, just in case you aren’t looking to deal with the voltage requirements and relative rarity of the real thing.

Programmable Wrist Synth Pushes The Envelope

Synths are a ton of fun no matter how good or bad they sound. Really, there are no bad-sounding ones, it’s just that some are more annoying to listen than others to if you’re not the one making the beep boops. [Clem] had built a tiny LDR-based synth into a watch case a few years back and took it to many a Maker Faire, where it delighted and annoyed until it ultimately broke.

Naturally, it was time to make a new version that’s more capable. Whereas the first one was Atari-punk-console-meets-light-Theremin, this one has a bunch of inputs and can be programmed on the fly to record and play back bendable tones. It’s driven by an Arduino MKR, and the inputs are managed by an impressively squash bug-wired shift register. [Clem] used beefy switches this time in the hopes that this one will last longer. We think the slide pots are a great touch, as are the candy-colored knobs printed in PMMA.

Our favorite part is that [Clem] took advantage of the random states the microcontroller pins are in when it’s first powered on. If you don’t want to program any notes, you can use the ones generated at boot and just play around with those. Be sure to check out the build video after the break.

We’ve seen our share of synths, but few as delicious-looking as KELPIE from this year’s Hackaday Prize.

Continue reading “Programmable Wrist Synth Pushes The Envelope”

Chaining Together A 16×2 Bubble LED Display

We’ve recently noticed an uptick of interest in so-called “bubble displays”: vintage alphanumeric LEDs which are probably best remembered as being used in watches and calculators before the LCD took over. Today they’re available as surplus or even salvage for literally pennies, but unfortunately they only provide four or five characters to work with. Or rather they did, until [sjm4306] built a board that chains them into a 16×2 array.

For the princely sum of 71 cents each, [sjm4306] picked up ten HPDL-1414 displays, each capable of showing four characters. He then designed a PCB that would accept eight of the displays at once, and even thought ahead to use headers so they could be pulled out and swapped as needed. Of course mounting them is only half the battle, you still need to drive the things.

Each display has its own dedicated driver chip on board, but trying to address each one individually would take far too many pins. So [sjm4306] opted to use a trio of 74HC595 shift registers, allowing him to toggle the three dozen pins necessary over SPI from a microcontroller. He’s even written up a little library and some example code that you can grab on the project’s Hackaday.io page.

Unfortunately, after all his hard work, tragedy struck. As these displays were a couple decades old given their date code, [sjm4306] thought he would clean them up with a bit of alcohol before their big video debut. But whatever plastic the clear panels are made of didn’t take kindly to the IPA, and they all shattered. They still work, but it’s definitely a quirk to keep in mind if you pick up some of these vintage displays to play with yourself.

In the past we’ve seen a much smaller PCB that allowed similar displays to more easily be interfaced with modern microcontrollers; perfect if you just want to bang out a few retro LED characters with a minimum of fuss.

Continue reading “Chaining Together A 16×2 Bubble LED Display”

[Ben Krasnow] Makes A DSKY

There are hundreds if not thousands of artifacts from the Apollo program scattered around the globe, some twisted wrecks at the bottom of the ocean, others lovingly preserved and sitting in museums or in the hands of private collectors. All of what’s left is pretty much pure unobtainium, so if you want something Apollo-like, you’re probably going to have to make it yourself.

[Ben Krasnow] took up the challenge to make an electroluminescent Apollo-era DSKY display from scratch, with outstanding results. The DSKY, or “display and keyboard”, was the user interface for the Apollo Guidance Computer, the purpose-built digital navigation system that got a total of 24 men there and back again. [Ben] says it took a long time to recreate the display, and we can see why. He needed to master quite a few skills, including screen printing to get the glass-panel display working. The panel is a sandwich of phosphorescent paint, a dielectric, and conductive ink. The ink is silkscreened on the back to form the characters, all applied to indium tin oxide (ITO) conductive glass. A PCB with the same pattern of character segments lays behind that, driving each segment with 300 volts or so through a trio of HV507 high-voltage shift registers. It’s an impressive bit of engineering and gives off a decidedly not-homebrew vibe.

In the video below, [Ben] goes into detail about the trials he experienced on the way to this amazing endpoint, not least of which was frying chip after chip due to ineffective protection diodes in the shift registers. That’s an epic debugging story that’s worth the price of admission all by itself. It’s not the only DSKY in town, of course – [Fran Blanche] has been working on one for a while too – but there’s just something about that blue glow that we really like.

Continue reading “[Ben Krasnow] Makes A DSKY”

The Clickiest Game Of Tetris You’ll Ever Play, On A Flip-Dot

Like many other classics it’s easy to come up with ways to ruin Tetris, but hard to think of anything that will make it better. Adding more clickiness is definitely one way to improve the game, and playing Tetris on a flip-dot display certainly manages to achieve that.

The surplus flip-dot display [sinowin] used for this version of Tetris is a bit of an odd bird that needed some reverse engineering to be put to work. The display is a 7 x 30 matrix with small dots, plus a tiny green LED for each dot. Those LEDs turned out to be quite useful for replicating the flashing effect used in the original game when a row of blocks was completed, and the sound of the dots being flipped provides audio feedback. The game runs on a Teensy through a custom driver board and uses a Playstation joystick for control. The video below, in perfectly acceptable vertical format, shows the game in action and really makes us want to build our own, perhaps with a larger and even clickier flip-dot display.

The best thing about Tetris is its simplicity: simple graphics, simple controls, and simple gameplay. It’s so simple it can be played anywhere, from a smartwatch to a business card and even on a transistor tester.

Continue reading “The Clickiest Game Of Tetris You’ll Ever Play, On A Flip-Dot”

Old Nixie Display Rides Again As 3D-Printer Filament Meter

We’re not sure about the name of this Nixie tube filament meter that [Scott M. Baker] built. He calls it a “filadometer”, perhaps a portmanteau of “filament” and “odometer”, in which case it makes sense. It may not flow trippingly from the tongue and we can’t come up with anything better, but whatever moniker you use it’s actually a pretty cool build.

The filadometer started life as something completely different and utterly typical for Nixie tube projects – a temperature and humidity gauge. [Scott] decided to recycle the eight-tube display to keep track of his Prusa, and in doing so he reveals a pretty remarkable degree of forethought in his design process. The original Nixie display has all the usual trappings – the driver chips, the shift registers, and the high voltage power supply. What stands out is the modularity of his design: the tube sockets and drivers live on a backplane PCB, with a Raspberry Pi and a separate HV supply board plugging into it. The original display had a Model B Pi, so there was plenty of room for a new Zero W. A new printed case and a little programming to capture the filament use from Octoprint is all it took to put this nifty little build back in action. The video below shows the details.

We’re always excited to see new videos from [Scott] because we learn so much from looking over his virtual shoulder. If you haven’t checked out his stuff, take a look at his homage to the 8″ floppy or his dual-port memory hack for retro gaming.

Continue reading “Old Nixie Display Rides Again As 3D-Printer Filament Meter”

CPU Made From 74HC Chips Is A Glorious Mess

Did you ever start a project that you felt gained a life of its own? This project by [Paulo Constantino] is an entire CPU named dreamcatcher on breadboards, and is a beautiful jungle of digital. On top of that, it works to connect to an analog VGA display. How cool is that!

Designing an ALU and then a CPU is a typical exercise for students of digital design and is done using VerilogHDL or VHDL. It involves creating an ALU that can add, subtract etc while a control unit manages data moves and the like. There is also a memory fetch and instruction decode made up of de-mulitiplexers and a bunch of flip-flops that make up registers and flags. They are as complex as they sound if not more.

[Paulo Constantino] went ahead and designed the whole thing in Eagle as a schematic using 74HC logic chips. To build it though instead of a PCB he used breadboards. Everything from bus decoders to controlling an external VGA display is done using jumper wires. We did cover a video on the project a while back, but this update adds a video card interface to the build.

The CPU updates the display buffer on the VGA card, and in the video below shows the slow and steady update. The fact that the jungle of wires can drive a display is awesome. He has since started working on a 16-bit version of the processor and we’d love to see someone take it up a notch.

For those more accustomed to the PCB, the Z80 membership card project is a great build for 8-bit computer fans.

Thanks to [analog engineer] for the tip.

Continue reading “CPU Made From 74HC Chips Is A Glorious Mess”