Mods Turn Junk UPS Into A Long-Endurance Beast

If you’ve got a so-called uninterruptible power supply (UPS) on your system, you’re probably painfully aware that the “uninterruptible” part has some pretty serious limits. Most consumer units are designed to provide power during a black out only long enough to gracefully shut down your system. But with a few hacks like these, you can stretch that time out and turn it into a long-endurance UPS.

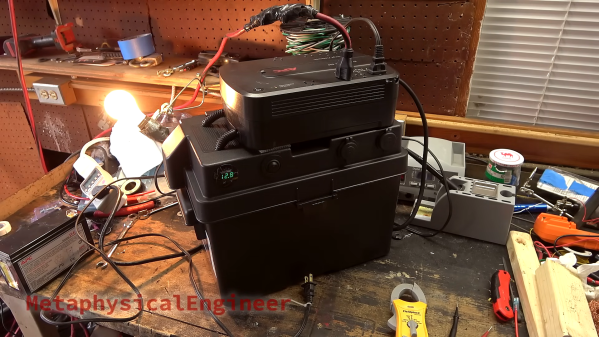
As many good stories do, this one starts in the trash, where [MetaphysicalEngineer] spotted an APC home office-style UPS. It was clearly labeled “broken,” but that just turned out to be a dead battery. While he could have simply replaced it with a 12-volt sealed lead-acid battery, [Meta] knew that his computer setup would quickly deplete the standard battery. A little testing showed him that a car battery would extend the run time significantly, especially if he threw in some extra cooling for the onboard inverter.

His final design uses a marine deep-cycle battery in a plastic battery box with the UPS mounted on top. The vacated battery compartment made a great place to add a cooling fan, along with a clever circuit to turn it on only when the beeper on the UPS sounds, with a bonus volume control for the annoying sound. He also added accessories to the battery box top, including a voltmeter, a USB charger, and a switched 12-volt power outlet. And kudos for the liberal use of fuses in the build; things could get spicy otherwise. The video below shows the entire build along with all the testing. [MetaphysicalEngineer] managed to triple the estimated runtime for the load he’s trying to power, so it seems like a win to us.

If your needs run more toward keeping your networking gear running through a blackout, you might want to check out this inverter-less DC UPS.

Continue reading “Mods Turn Junk UPS Into A Long-Endurance Beast”

A 3D Printed Grinder For Printed Lens Blanks

When one thinks of applications for 3D printing, optical components don’t seem to be a good fit. With the possible exception of Fresnel lenses, FDM printing doesn’t seem up to the job of getting the smooth surfaces and precision dimensions needed to focus light. Resin printing might be a little closer to the mark, but there’s still a long way to go between a printed blank and a finished lens.

That gap is what [Fraens] aims to fill with this homebrew lens grinding machine. It uses the same basic methods used to grind and polish lenses for centuries, only with printed components and lens blanks. The machine itself consists of a motorized chuck for holding the lens blank, plus an articulated arm to hold the polishing tool. The tool arm has an eccentric drive that wobbles the polishing tool back and forth across the blank while it rotates in the chuck. Lens grinding requires a lot of water and abrasive, so a large bowl is provided to catch the swarf and keep the work area clean.

Lens blanks are printed to approximately their finished dimensions using clear resin in an SLA printer. [Fraens] spent a lot of time optimizing the printing geometry to minimize the number of print layers required. He found that a 30° angle between the lens and the resin pool worked best, resulting in the clearest blanks. To polish the rough blanks, a lapping tool is made from polymer modeling clay; after baking it dry, the tool can hold a variety of pads and polishing compounds. From there it’s just a matter of running the blank through a range of abrasives to get the desired final surface.

Are the lenses fantastic? Well, they’re probably not going to make it into fine optical equipment, but they’re a lot better than you might expect. Of course, there’s plenty of room for improvement; better resins might result in clearer blanks, and perhaps degassing the uncured resin under vacuum might help with bubbles. Skipping the printed blanks and going with CNC-machined acrylic might be worth a try, too.

Continue reading “A 3D Printed Grinder For Printed Lens Blanks”

Simple Hack Lets Smartphone Take Resin Printer Time-Lapses

With how cheap they’re getting, everyone seems to be jumping on the resin printer bandwagon. They may not be able to fully replace your trusty old FDM printer, but for certain jobs, they just can’t be beaten. Sadly though, creating those smooth time-lapse videos of your prints isn’t quite as easy to do as it is on their filament-based counterparts.

Not as easy, perhaps, but not impossible. [Fraens] found a way to make time-lapses on any resin printer, and in a wonderfully hacky way. First, you need to find a smartphone, which shouldn’t be too hard, given how often we all tend to upgrade. [Fraens] recommends replacing the standard camera app on the phone with Open Camera, to prevent it from closing during the long intervals with nothing happening. The camera is triggered by any readily available Bluetooth dongle, which is connected via a simple transistor circuit to an Arduino output. To trigger the shutter, a light-dependent resistor (LDR) is connected to one of the microcontroller’s inputs. The LDR is placed inside the bed of the resin printer — an Anycubic Photon in this case — where light from the UV panel used to cross-link the resin can fall on it. A simple bit of Arduino code triggers the Bluetooth dongle at the right moment, capturing a series of stills which are later stitched together using DaVinci Resolve.

The short video below shows the results, which look pretty good to us. There are other ways to do this, of course, but we find the simplicity of this method pleasing.

Continue reading “Simple Hack Lets Smartphone Take Resin Printer Time-Lapses”

Hackaday Links Column Banner

Hackaday Links: February 12, 2023

So, maybe right now isn’t the best time to get into the high-altitude ballooning hobby? At least in the US, which with the downing of another — whatever? — over Alaska, seems to have taken a “Sidewinders first, threat identification later” approach to anything that floats by. The latest incident involved an aircraft of unknown type, described as “the size of a small car” — there’s that units problem again — that was operating over Prudhoe Bay off the northern coast of Alaska. The reason that was given for this one earning a Sidewinder was that it was operating much lower than the balloon from last week, only about 40,000 feet, which is well within the ceiling of commercial aviation. It was also over sea ice at the time of the shootdown, making the chance of bothering anyone besides a polar bear unlikely. We’re not taking any political position on this whole thing, but there certainly are engineering and technical aspects of these shootdowns that are pretty interesting, as well as the aforementioned potential for liability if your HAB goes astray. Nobody ever really benefits from having an international incident on their resume, after all.

Continue reading “Hackaday Links: February 12, 2023”

Continuous Printing On LCD Resin Printer: No More Wasted Time On Peeling? Is It Possible?

Anyone who has done any amount of 3D printing with SLA printers is probably well aware of the peeling step with each layer. This involves the newly printed layer being pulled away from the FEP film that is attached to the bottom of the resin vat. Due to the forces involved, the retraction speed of the build plate on the Z-axis has to be carefully tuned to not have something terrible happen, like the object being pulled off the build plate. Ultimately this is what limits SLA print speed, yet [Jan Mrázek] postulates that replacing the FEP with an oxygen-rich layer can help here.

The principle is relatively simple: the presence of oxygen inhibits the curing of resin, which is why for fast curing of resin parts you want to do so in a low oxygen environment, such as when submerged in water. Commercial printers by Carbon use a patented method called “continuous liquid interface production” (CLIP), with resin printers by other companies using a variety of other (also patented) methods that reduce or remove the need for peeling. Theoretically by using an oxygen-permeating layer instead of the FEP film, even a consumer grade SLA printer can skip the peeling step.

The initial attempt by [Jan] to create an oxygen-permeating silicone film to replace the FEP film worked great for about 10 layers, until it seems the oxygen available to the resin ran out and the peeling force became too much. Next attempts involved trying to create an oxygen replenishment mechanism, but unfortunately without much success so far.

Regardless of these setbacks, it’s an interesting research direction that could make cheap consumer-level SLA printers that much more efficient.

(Thumbnail image: the silicone sheet prior to attaching. Heading image: the silicone sheet attached to a resin vat. Both images by [Jan Mrázek])

Toilet Paper Tube Pulls Dissolved Resin From IPA, Cures It For Disposal

SLA 3D printing with resin typically means rinsing parts with IPA (isopropyl alcohol). That process results in cloudy, used IPA containing a high concentration of dissolved resin. The dual goals of cleaning and reusing IPA are important ones, and we have to say, [Jan Mrázek]’s unusual experiment involving a UV source and slowly-rotating paper tube to extract and cure dissolved resin might look odd, but the results are definitely intriguing.

Dissolved resin successfully pulled from IPA and cured onto a cardboard roll. This particular one rotated a bit too quickly, trapping IPA in the curing process and yielding a slightly rubbery wad instead of a hard solid.

The best way to dispose of liquid resin is to cure it into a solid, therefore making it safe to throw away. But what about resin that has been dissolved into a cleaning liquid like IPA? [Jan] felt that there was surely a way to extract the dissolved resin somehow, which would also leave the IPA clean for re-use. His solution? The device shown here, which uses a cardboard tube to pull dissolved resin from an IPA bath and a UV source to cure it onto the tube.

Here’s how it works: the tube’s bottom third sits in dirty IPA, and UV LEDs shine on the top of the tube. The IPA is agitated with a magnetic stirrer for best results. A motor slowly rotates the cardboard tube; dissolved resin gets on the tube at the bottom, UV cures it at the top, and the whole thing repeats. Thin layers of cured resin slowly build up, and after long enough, the roll of cured resin can be thrown away and the IPA should be clean enough for reuse.

So far it’s a pretty successful test of a concept, but [Jan] points out that there are still some rough edges. Results depend on turning the tube at a good rate; turning it too quickly results in IPA trapped with the cured residue. On the plus side, the UV source doesn’t need to be particularly powerful. [Jan] says that Ideally this would be a device one could run in a sealed container, cleaning it over one or two days.

Resin printing is great, but it’s a messy process, so anything that makes it less wasteful is worth checking out. Got any ideas for improving or building on this concept? If so, don’t keep ’em to yourself! Let us know in the comments.

When 3D Printing Gears, It Pays To Use The Right Resin

There are plenty of resins advertised as being suitable for functional applications and parts, but which is best and for what purpose?

According to [Jan Mrázek], if one is printing gears, then they are definitely not all the same. He recently got fantastic results with Siraya Tech Fast Mecha, a composite resin that contains a filler to improve its properties, and he has plenty of pictures and data to share.

[Jan] has identified some key features that are important for functional parts like gears. Dimensional accuracy is important, there should be low surface friction on mating surfaces, and the printed objects should be durable. Of course, nothing beats a good real-world test. [Jan] puts the resin to work with his favorite method: printing out a 1:85 compound planetary gearbox, and testing it to failure.

The results? The composite resin performed admirably, and somewhat to his surprise, the teeth on the little gears showed no signs of wear. We recommend checking out the results on his page. [Jan] has used the same process to test many different materials, and it’s always updated with all tests he has done to date.

Whether it’s working out all that can go wrong, or making flexible build plates before they were cool, We really admire [Jan Mrázek]’s commitment to getting the most out of 3D printing with resin.